Showing posts with label Mac iWork Pages clip art. Show all posts

Sunday, June 23, 2013

Retro Squiggles. Clip art in iWork Pages.


You may be searching for retro squiggles to use in your project.

Have a look at iWork/Pages templates. Musical Poster has a choice of squiggles that create a nice 'retro' effect. Click on the one you like and copy-paste into your project.

If you want to keep it as a separate graphic file, you can extract it from the template by dragging the image icon from the Metrics Inspector.
Click on the graphic element to select it, open the Metrics Inspector, click in the File Info window and drag the icon to the Desktop.


Wednesday, December 05, 2012

Where is the telephone clip art image?


If you are looking for the telephone icon (clip art), dip into the Characters palette on your Mac. 


In an iWork document, go to Special Characters under the Edit menu. When the Characters window opens, go to Symbols > Miscellaneous Symbols. You will see several telephone icons there. Click on one and drag it to your document. 

Symbols in the Character palette behave like letters. They move with the text. You can change the font size and colour or a font variation. Click on Font Variation at the bottom of the window to see which variations are available.

If you need a graphic image, enlarge the letter-like symbol and make a screenshot of it or export to PDF.

If you don’t use iWork, you can access the Characters palette from TextEdit. Special Characters option is under the Edit menu.

Monday, December 03, 2012

How to type the degree sign for temperature.


It’s getting cold and I’ve started marking daily temperature on my running log. Which made me think, does everybody know how to type the degree (º) sign?

On both British and US English QWERTY keyboards, press the Option (ALT) key and type zero in the top row of the keyboard (not on the zero in the numerical section of an extended keyboard.) The large zero will turn into a tiny degree sign shifted upwards.

Then you may add C for Celsius or centigrade or F for Fahrenheit: -1ºC or +30ºF.

Wikipedia has an article on various temperature measurement systems here.

If you are looking for weather clip art symbols, there is a selection of them in the Special Characters palette. Under Edit, got to Special Characters, and when the palette opens, look in the Symbols > Miscellaneous folder. A selection of snowflakes is also there. 

Click on the symbol and drag it to your document.

Saturday, April 28, 2012

Scissors clip art for iWork


If your are looking for a clip art image of scissors or a text icon of scissors, in screen-top menu go Edit>Special Characters

When Special Characters palette opens, choose Symbols>Miscellaneous Symbols.

There are several scissors characters there. Choose a font variation click and drag into your document. Some font variation include scissors sitting on a dotted line – to indicate where to cut out a coupon.


This character will behave like a letter in text. But if you want a graphic image of scissors make a screenshot (Command+Shift+4) and import it into your document.

Character Palette has masses of clip art images, so check what's there before searching on the internet.


Friday, October 21, 2011

A Remembrance Poppy

If you are working on a Remembrance Day project you may want to design a Red Poppy.

Here are the elements of a Remembrance Poppy:

And here is the finished clipart:


Please read Remembrance Poppy: Designed in Pages.

Tuesday, August 09, 2011

How to 'clip' an image to a piece of paper.

 
- Import a clipart note,
- then insert the image, move it over the note,
- copy-paste the paper clip from Collector’s Newsletter template and position it over the image,
- insert a text box and write your message.

Tip: if you add shadows, make sure they all go in the same direction. Rotate the shadow wheel in Graphic Inspector to align shadows.


The picture: Zinaida Serebryakova, Self-Portrait,  1909.

Monday, August 08, 2011

How to make a hand-written note


- Find a clipart image of a sheet from a note-pad, or scan a blank sheet of lined paper, or take a photo of one using the macro setting on your camera;
- Drag the image onto a Pages document;
- Insert a Text box and type your text in it;
- Move the Text Box over the image, Group under arrange menu,
- for additional effect, rotate slightly.

To make the text look like it’s hand-written use italics font variation. Some fonts are designed to look like handwriting, try Lucida Grande Handwriting, Mistral, Santa Fe, Textile, School House Cursive, Handwriting Dakota or Marker Felt. The font in the example above is Lucida Grande Handwriting.

You can use the Draw Tool to create your own original letters and numbers. Read this article to learn how to.


...or make a screenshot of a Sticky note and use it as clipart. The font used here is Handwriting Dakota.

Saturday, September 25, 2010

Use Wikipedia for Clipart

jack-o'-lantern from wikipedia
Wikipedia, for all its limitations, is a good source of free images that can be used for clipart. Check for general articles on the subject that interests you and you will most likely find a suitable image.

I am posting this separately, because many people start with general searches and get drawn into offers of paid images when this may be completely unnecessary for their projects. I would suggest looking at wikipedia first. For instance, 'Halloween clipart' google search will give you 2,5 mln results, but if you look at wikipedia articles on pumpkins and jack-o'-lantern you may find that the images accompanying them are suitable for your project.

Read the general overview on where to find clipart for Macs and see other posts on clipart at the 'Clipart and Photos' tab above. 


And see an example of how to use images from Wikipedia as clipart (magnifying glass) here.

Sunday, August 01, 2010

Card Design in iWork/Pages: A Complete 10-Step Tutorial


This tutorial is about designing a Christmas card, but, of course, the techniques described can be used for any occasion.

The tutorial is published here in ten easy to follow steps, each has jump-links to the next and the previous steps.


1. Santa Cap: how to draw the pompon (use and edit ready-made shapes)

2. Santa Cap: how to draw the band (use Draw Tool)

3. Santa's Cap: how to draw the top  (editing shapes and curving lines)

4. Santa's Cap: how to make the clip art image

5. Put Santa's Cap on the head: how-to (moving and arranging images)

6. Santa's Cap: the 'tracing paper' technique

7. Add background image, soft frame and additional frame, draw your own letters and give them a 'smudged' effect

8. Make a snapshot to turn it into a piece of original clipart

9. Holly made into clip art (how to use Alpha and Mask tools to make clip art)

10. Finishing touches: arranging clip art, various design suggestions, rotating, duplicating and resizing clip art images.

Please see also this list of other articles on creating shapes and original design and read an overview of where to find clipart on your Mac.

All elements of this design, except the portrait of the girl,  were created by ©Alexander Anichkin. To see the picture of the girl go here.

Sunday, December 20, 2009

Let's design a Christmas card in Pages: (10) - adding a holly pattern


This is how the holly twig will look in the card.

To do this copy-paste our clipart image from the previous post into the Pages document with the card. It should be set as a floating, not inline image.

Next, resize to proportions.  
Rotate: press Command, move cursor over one of the handles of the selected image and it will turn into a kind of bent arrow.
Duplicate (or copy-paste) to get as many additional clipart images as you want. Keyboard shortcut for duplicating is Command+D.
 
Flip to achieve symmetry. Flipping is in Metrics Inspector.  


We can stop here, or ad a dozen more hollies to create a frame (top image), or drop the whole lot, leave just one, but enlarge it (second image from top).

Now, to send out your card, print it in Pages, make it into a PDF, JPEG or a PNG to send via email or put on your web-page.

To see the original picture of the woman in the card click here. It is a landmark image of the 20th century.

And a very happy Christmas to everybody.

To go back to Step 9 click here

Tuesday, December 08, 2009

Design a holiday greeting in Pages

With the holiday season approaching many of you will be looking for ways to do greetings projects. Pages is a fun tool to accomplish them - with all the family taking part.

Clipart is one way of designing a greeting card. But there are tools in Pages that let you design your own original holiday greeting. Here, I have put together a list of posts about tools, techniques and tricks that can help you design an original greeting. (The apple image top right  is designed in Pages, read how to here)

It seems that many Pages users are simply unaware of the power that Draw Tool gives. It is not just curving lines you can create with it,  with drawing tool you can do exactly what it says - draw. And 'write' too. In fact, you can create your own full alphabet in any language - and original cards and drawings. I have published several articles here on various uses of the drawing tool.

Here is a list of posts about curving lines and irregular shapes:

Curving lines and shapes - make them in Pages
Doodling memorable dates in Pages
Creating clipart and original shapes in Pages
Designing D-Day map in Pages
Doodles: Picasso's room
Jigsaw cutouts with Pages
Christmas graphics and clipart: a few easy tricks
Valentine: make your own in Pages
Drawing letters and numbers in Pages: Happy New Year
Yes, we can: drawing in Pages
Keeping your lines straight
How to design folders
Maps in Pages


Please feel free to send me your own ideas, questions and links to what others do with Pages.

Saturday, November 14, 2009

How to add curving points to a custom shape

A reader of this blog is asking: Let's say I made a shape with curves, but then I wanted to add more points to it, how do I do that?


This is how:

- press and hold Option (alt) key and move cursor over the border of the shape at the point where you want to add a new point

- when the cursor turns into the little pen with a plus sign next to it click on the border and you get a new point

- the point is a white circle with red border which means it is ready to be moved and to take part in changing your curves

- when you finish click outside the shape.

 To delete a point just select it by clicking twice, slowly, not double-clicking, and when it turns white hit Backspace or Delete. 


You may find that deleting points is more useful than adding new ones. When you create a Custom Shape with smooth curves, you may find that fewer points make it easier to achieve exactly the curve you want. On the other hand, when the shape must have a very particular contour, e.g. a map, adding more points does help.


Whenever I use draw tool I can't help but feel a little bit nostalgic. It reminds me of the technical drawing classes we had at school back in the early 70-s.  We used to spend hours making complex curved shapes by connecting dots manually with a pencil and a tool called French curve (photo by Radomil Talk). By sliding the tool this way and that you had to find the right curve to connect three dots, then add another one, and again, looking for a connecting curve. Some of us were actually driven to tears... With computer aided design it's all but history. Still, even now I find that the skill learnt in those classes helps me, even though many of us thought it was completely useless.

It seems that many Pages users are simply unaware of the power that Draw Tool gives. It is not just curving lines you can create with it,  with drawing tool you can do exactly what it says - draw. And 'write' too. In fact, you can create your own full alphabet in any language - and original cards and drawings. I have published several articles here on various uses of the drawing tool. With the holiday season approaching many of you will be looking for ways to do greetings projects. Pages is a fun tool to accomplish them - with all the family taking part.

Here is a list of posts about curving lines and irregular (custom) shapes:
Curving lines and shapes - make them in Pages
Doodling memorable dates in Pages
Creating clipart and original shapes in Pages
Designing D-Day map in Pages
Doodles: Picasso's room
Jigsaw cutouts with Pages
Christmas graphics and clipart: a few easy tricks
Valentine: make your own in Pages
Drawing letters and numbers in Pages: Happy New Year
Yes, we can: drawing in Pages
Keeping your lines straight
How to design folders
Maps in Pages

Please feel free to send me your own ideas, questions and links to what others do with Pages.

Read more in my new book 'iWork for Mas OSX Cookbook' (2012)
Follow me on Twitter at iworkinpages  
Like my page I Work in Pages on Facebook 
and add me to your circles on Google+ 

Thursday, February 05, 2009

Valentine's clipart and graphics - make it in Pages


You can read the detailed how-to post here and read a 2011 article with another heart here

This is a small bit of Valentine's clipart hand-made by me in Pages with just the tools available in the programme.

Total time: 20 minutes. Result: lots of love to - and from - my loved ones.

There are four shapes. Two hearts are drawn with the free drawing tool under Shapes menu (last option in the drop-down menu). The arrow is from the Character palette>Arrows.

There are several hearts in the Character Palette you can use to create your own clip art and there are jem hearts in iChat icons folder - use them as well.

I will post a more detailed description of how to make this graphic design in a few days, but if you stopped by to have a look at this post why not listen to Georgi Sviridov's Romance, possibly the greatest piece of love music ever created.

Please check these previous articles on clip art for and graphic design in Pages:
Drawing letters and images in Pages
Where is clipart for Pages
Clipart for iWork/Pages - where is it?

Wednesday, December 31, 2008

Happy New Year 2009! Drawing letters and images in Pages


A very Happy New Year 2009 and best wishes to you!

Thank you for reading and supporting this blog.

I have designed this snowman and 'drew' the greeting with the tools available in Pages. The snowman is made of edited shapes (Format>Shape>Make editable) and the letters are drawn with the free draw tool (last option in Shapes menu or Insert>Draw a shape).

For a more detailed description please read these previous posts:
Christmas graphics: a few easy tricks
Curving lines and shapes: make them in Pages

Sunday, November 09, 2008

Remembrance theme: using background images

The photo of red poppies lining a Normandy field is used here to create a graphic margin for the Remembrance page in our magazine. The image is one of a series of photos I took this Summer.


Here is how it works:

- Import original photo with poppies (top right image).
- Under Arrange menu - Send to Back.
Now the photo is behind all other elements of the page.
- In Metrics Inspector click on rotation wheel or on degrees arrows to rotate the photo so that the line of red poppies is vertical.
You can also rotate the photo by pressing Command and dragging the photo's handles (little squares in the corners).
- Resize and move the photo so that the vertical line of poppies is on the margin of the page.
- Mask and edit mask so that the right side of the image slighlty, only just, overlaps the text. (top left image)
- In Object Inspector (update: Graphics Inspector in current version of Pages) add picture frame with blurred edges.
In my version of Pages it is the bottom left option. Blurred edges create romantic, moving feeling about the whole graphic composition.
- Reduce opacity of the image (also in Object Inspector).
Fading out the background image by reducing its opacity is needed to avoid a large graphic element dominating the page and also, because it overlaps the text in the first column, to make the text visible.

The whole process may sound complicated, but in fact it is rather easy to do - and very enjoyable. The things you do for England!

I was slightly concerned about the slanted line of horizon visible at the top, but then realized that, serendipitously, I gave the photo a 'fallen soldier' effect - you fall down and the earth and the sky look tilted in your eyes.

Whenever you use a photo as the background image always consider reducing opacity. I think it is the best way to achieve better visibility for text and other graphic elements 'in front'. Of course, light, consistently coloured images may not need this. Like the 'old parchment' image behind the main article on this page. The image itself is from the Musical Concert Poster template which comes with your copy of Pages.

Note: Click on pictures to see small details

Please also read these related articles on I Work in Pages:

Remembrance poppies: make your own clipart in Pages
Simple tricks with photos: fading photos from side to side
Fading out background image

and see other photos of red poppies in Normandy on our Readers' Photos blog here and here
If you use the photos please credit them to the Rendezvous Media.

Saturday, November 01, 2008

Halloween clipart


I know it's already late for Halloween, but Jack O'Lanterns are still in every window, and I know that many Pages users will still be pining for clipart long after Halloween.

So here is a free resource of free photos and clipart including this pumpkin:


Stock.XCHNG
It's a Hungarian site boasting over 2 million images. The licence for free use includes the use in ads and other promotional material.

The url for the pumpkin image is here. But search for Halloween and you'll get over 30 pages of lovely images, including the one below.


Please check out this earlier article on where to find clipart on your Mac - there are tons of preinstalled images. Not the pumpkin, though...

Thursday, October 23, 2008

Where is clipart for Pages?


- Graphic elements of Pages own templates can be used as clipart - just cut and paste them.

- Attractive clipart images are in Image Bullets under Bullets drop-down menu (Text Inspector, List tab).

- HD>Library>Desktop Pictures - high resolution images for backgrounds.

- Home>Pictures>iChat Icons (or HD>LIbrary>Application Support>Apple>iChat Icons.)

- User Pictures, also in HD>Library

- Character Palette - hundreds of clipart-like characters. Character Palette is under Input Menu chooser in the main screen menu. If it is not activated on your Mac, open System Preferences>International>Input Menu and check the Character Palette box.

- And, if you have kept your old copy of MS Office, nothing is simpler than just copy-pasting or drag'n'dropping clipart from the Office folder right into your Pages project.

This is a bite-size version of the full article
on Clipart for Pages

published earlier with a linked list of other articles about clipart on this blog.

Clipart for iWork/Pages: where is it


There are tons of clipart images on your computer even though there is no clipart folder in iWork. Because you've already paid for clipart when you bought your Mac. iWork is an integral part of the Mac: it complements, works together with apps which are already there - iLife (iPhoto), Mail, Preview, Address Book, Dictionaries, Spotlight and others. Unlike MS Office which is a separate Universe on your machine. So where is clipart for Pages?

Here is where:

Pages (and other iWork) Templates
- First, elements of Pages templates can be used as clipart - just cut and paste them.

Among many others I have used a 'wrought iron fence post' (above) from the Collector Newsletter as a column divider. The image with little grey houses from the Real Estate Newsletter is good to go with anything about property. The index card image from the Back Page of the Green Grocery Newsletter went with a cooking recipe and the background image of yellowish piece of paper from Musical Concert poster looked nice behind an article on history.

Most of templates clipart is editable and easy to resize. Some of the images are locked or grouped. Under Arrange menu unlock and ungroup them to use as separate graphic elements. Many of them are easy to recreate with Pages tools. Bear in mind, however, that some of the images have low resolution and should only be used with small dimensions.

- A dozen or so attractive clipart images are in Image Bullets under Bullets drop-down menu (Text Inspector, List tab).

There are check boxes and others. I love silver and golden pearls. But any of your own original images can be made into a bullet. (Custom Image - Choose) Note that images with shadows may distort the surrounding text, so it is best to avoid shadows here.

Mac Library
- HD>Library>Desktop Pictures

There are 76 high-resolution images here including the famous dew drop (top right image) and the ladybird. These are large files, good enough for use as background images.

- Home>Pictures>iChat Icons
(or HD>LIbrary>Application Support>Apple>iChat Icons.)

National flags are stored here as buttons. The apple on the left is in the Fruit folder. I've also used Gems icons from this folder as bullets, like the ruby heart on the right.

- User Pictures, also in HD>Library.

Animals, flowers, nature, sports and other clipart here. I was disappointed not to find a cricket ball there even though, arguably, cricket, of all ball games, has the biggest following in the world (Britain, South Africa, Australia, India, Pakistan, Bangladesh, Sri Lanka etc., more than a hundred countries in the international federation). But I found a free image on Wikipedia and made it into clipart.

Note: there may be several Libraries on your Mac. The main Library is on your Hard Drive, don't move or rename any folders there. Your personal Library (these are created for each Account on your machine) is in the Home folder. This may sound a bit confusing, but you don't have to wade through endless folders to find what you want - just use Spotlight like you'd use Google.

Character Palette
- And there are hundreds of very useful clipart-like characters in Character Palette

They range from the familiar Command symbol on the Mac keyboard to zodiac symbols, to chess pieces and cards icons, to mathematical and musical signs, various daily life shapes, including icons of telephones, pens and pencils, scissors, aeroplanes etc. And there is Greek alphabet for use in scientific papers (for instance, the letter π .) Just click and drag them into your Pages project.

Check out the Palette to find what you need under Input Menu chooser in the main screen menu. If it is not activated on your Mac, open System Preferences>International>Input Menu and check the Character Palette box. (update): Otherwise, if you are note using several languages, simply go via Edit > Special characters route. When you slide down to the last option under the Edit menu the Character palette opens.


The beauty of the Palette characters is that they behave like letters - there are font variations, you can change colour and font size in the Format Bar, add shadows and other effects in the Object Inspector or via the Font Panel (open it with Command+T keyboard shortcut). If you need to use them as separate images in PDF or JPEG format, 'print' to PDF or to iPhoto and crop as necessary. Or use Command+Shift+4 to make a screenshot image in PNG format (good for internet use.)


MS Office clipart is compatible
- And, if you have kept your old copy of MS Office, nothing is simpler than just copy-pasting or drag'n'dropping clipart from the Office folder right into your Pages project.

Among the Office clipart images I've used in the magazine without any problem are the pink and yellow electric lamp and the image of an old-fashioned computer with CRT display.

And, on top of all of the above, it is fun to create your own clipart in Pages. Children love it.

Read more in my new book 'iWork for Mac OSX Cookbook' (2012). Follow me on Twitter at iworkinpages, like my page I Work in Pages on Facebook and add me to your circles on Google+.

Please check out these previous articles about clipart and graphic images in Pages:
Remembrance poppies: make your own with Pages
Creating your own clipart with Instant Alpha 
A Complete 10-Step Tutorial (Christmas Card): create original shapes, from snapshots to clip art, draw and edit images,  Alpha and Draw tools, create and arrange images
How to design folders in Pages
Creating clipart and original shapes in Pages
Curving lines and shapes: make them in Pages
Maps in Pages

Friday, October 10, 2008

How to design 'folders'


Tabbed folder shapes are popular with designers. Not only because they are a means of grouping text in bite-size attention grabbing chunks, but also, I think, because there is a subconscious link to what every computer user sees on their screen - a multiplicity of folder icons.

Another explanation, especially applicable to design of magazine covers with large photos going up to the edges (bleeds), is that tabbed folder shapes make it easy to avoid text clashing with the photograph - various images and colours in the photo make it difficult to see the text clearly (read this article on how to make text stand out). Or, the other way round, because it is difficult to find a good photograph over which straplines stand out.

While there is no ready folder shape available in Pages it is very easy to design one.

- Insert two rounded rectangles in a Pages document (either from Insert>Shape submenu or from Shapes menu in the toolbar).
- Make one shape much smaller than the other and position behind the larger one.
- Adjust the curving of the rounded corners in the way you like (click on the little circle next to the top right handle of the shape - and drag.)

Now you have a simple two dimensional folder shape. But can something similar to the familiar small 3D Mac-folder (image below) be designed in Pages?


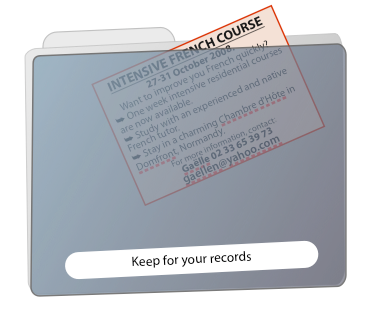
I spent a little time working on this and here is what I got (top right image).

The tab and the back cover of the folder are the same two rounded rectangle shapes, the darker front cover is a third.
The tilted effect is achieved through making the shapes editable (Format>Shape>Make shape editable.)


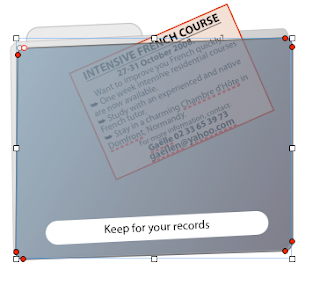
After making the shape editable you will see little red circles at the corners. Click on them one by one to drag or move with keyboard arrows. I dragged the top left corner of the large light-grey rectangle to the left to get the look of an opening folder. The top and bottom right corners of both the front and the back covers are dragged up.

If you later decide you are not entirely happy with your artwork, edit the shape by clicking twice - not double-clicking. Click, pause, click again - and the little red circles in the corners appear.

This gives a 3-dimensional effect which is further enhanced by adding Gradient Colour fill to the front cover. Do it in Object Inspector. Rotate the angle wheel to make the colour flow from light grey in the top left corner to dark grey in the bottom right corner.

Now, how do I put the draft small ad inside the folder? Tilt the ad with the Rotate wheel (Metrics Inspector), move it over the folder and
use Send Backward (under Arrange menu or with the keyboard shortcut - press ⌥⌘⇧ and type B) to move the object 'inside' the folder (i.e. behind the dark-grey rectangle).


Next, if you'd like to make the folder semi-transparent, reduce opacity in the Object Inspector. Here opacity of the folder 'cover' is set at 85%.

The label is another rounded rectangle with white colour fill.

Read more about designing original shapes in these previous articles on I Work in Pages:
Creating clipart and original shapes in Pages
Maps in Pages
Creating your own clipart with Instant Alpha

and about using Send Backward/Bring Forward keyboard shortcuts here.
Related Posts Plugin for WordPress, Blogger...

Copyright

© 2006-2010, 2010-2017 Alexander Anichkin, All Rights Reserved.
All content is original and was created by me, the author and publisher of I Work in Pages.
Quotations and images are attributed where applicable.
No republication without express prior permission.
Blog template by Blogger with customisation by the publisher.