Showing posts with label graphic design in iWork Pages. Show all posts

Friday, January 01, 2021

Happy New Year 2021!

 (Drawing and painting in Pages)

My annual New Year's card with a study after Modigliani, a Snowman and a little Robin. To add the past year's flavour I drew a few covid masks, a subject of so much debate and angst.

Everything here is drawn using Pages tools.

The mask itself is a modified Polygon from the Shapes menu with a Border and an Advanced colour fill. The straps are curved lines with endpoints.

The figures 2021 are drawn with the Pen Tool. When you click on Shapes in the Tool Bar you can see it in the top right corner.

'Modigliani's' model is a combination of edited shapes with colour fills.

Happy New Year!


Sunday, December 27, 2020

Happy Christmas 2020!

(Drawing in Pages)

Miserable as this year has been, still there is a cause to celebrate Christmas as a beginning of somethinig new and better.

Here is a drawing I made with tools available in Pages.

The faces are edited shapes from the Shapes menu. 

Eyes, eyebrows and the beard I made with the draw tool, the little pen you see at top right when you click on Shape in the Tool Bar.

Halos are coloured shadows from circle shapes hidden behind the faces. 

Note that Mary and Joseph have shadows going down to indicate their bodies.

The second image shows the shapes used in this computer graphics when selected.

If you have any questions ask me. 


Sunday, February 10, 2019

Christian Fish sign.


We were talking about early Christians.

A friend, who is well-versed in Bible and Biblical stories, told me how they used the Fish sign as a secret password to recognise each other when Christianity was still considered a dangerous extremist sect and Christians were persecuted. I've always thought of it simply as a reference to the bread and fish miracle. But it turns out there's more to it.

You meet someone who you think might be one of yours. You put a dot in the sand with a big toe. The person standing opposite you would look at it and draw a curving line around the dot. You look at it and, with his foot, draw another curving line. They join up near the dot and cross at the other and, thus forming a representation of the Fish.

I decided to try it in Pages and here is what I got.


Click on the Shapes menu in the Toolbar of your document and choose the circle from the menu. Reduce it to the size of a dot.  
Click on the Shapes menu in the Toolbar of your document and choose the pen tool in the top right corner. 
Draw the first line by clicking in the document, then drag, let go to make the second dot, then drag again, let go and double-click on the last dot to finish the line. 
Adjust the curve as you like by dragging the midpoints, they appear automatically as you hover the cursor over the line. 
In the Inspector side pane make it thicker, change colour (here it is Mocha), and add shadow. 

Repeat the above to draw the second line. And you get a lovely looking Fish sign. 

Keep it in your document, make a screenshot or export to PDF to reuse elsewhere.


Sunday, December 30, 2018

New Year Greetings, a card.


Happy New Year to all I Work in Pages readers!

It took me less than an hour to draw this card almost entirely with Pages Draw Pen (you can see it in the top right corner of the Shapes menu in the current Pages version (7.3). The Robin on Snowman's hand is from my previous design. The handle of the bucket is a line with end-points.

Enjoy graphic design in Pages!

This image shows all the separate elements highlighted:


And here you can see the Snowman's body with the dots I used when drawing him:


Friday, November 02, 2018

Eve. Advanced Drawing with Pages.


Over the years, I've posted here many times on the hidden gem, i.e. little known powerful set of design tools in Pages. In many ways it is no less sophisticated than similar Adobe applications but incredibly easy to master — and a pleasure to use. Some may even find it therapeutic, a respite from your usual work. Try, for example, to design a family or a company logo or even copy a famous picture.

As Apple updated Pages, menus, tools, and shortcuts have evolved and changed. However the basic principles of drawing with Pages tools remain the same in the current version of Pages. The main tool you would want to use is the  'Pen Tool', or draw tool. In the current version, Pages 7.2, October 2018, you will find it at the top right of the Shapes menu (see screenshot at the end of this post). Click on it and begin to draw shapes, lines, modify them, give them colour, and combine several shapes to create your own original image.

Here is a detail from 'Eve', a famous print by Eric Gill (1926). (I am not publishing here the full version to comply with Google's advertising rules, but you can see it on my other blog, 'Reading Art', here. You can support both, I Work in Pages and Reading Art, by donating via PayPal, click the button at top right of the blog.)  

This image is made entirely of lines and shapes created in a Pages document. See below for more explanations.


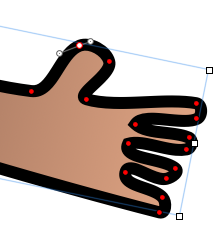
In the image below I've selected a hair on the woman's head. Note: it is a shape, not a line. To draw it, you need to click several time with the drawing pen and double click at the end of the shape. Then curve it, give it colour (here, it is Tin from the crayon box), move it around, drag to shorten or elongate. Repeat to create more. Zoom in when you work on small details of the picture.


This next image below shows the same detail but with a different hair selected. Now, this is a line. It may be easier to draw: from the shapes menu you select 'Line' rather than Drawing Pen, and then modify it. However, it gives you fewer options when you want to change style, curvature or other features. Working with the drawing pen may be more fiddly but allows you more creative space.


Visit Reading Art blog to see the full image, and you can see the original print on Wikipedia/Wikimedia here

Pen Tool in shapes menu.


Sunday, December 31, 2017

Happy New Year!


Happy New Year to all readers of I Work in Pages!

See previous years' Snowmen and Robins at this link. Includes tutorials, tips and videos. Some menus and tools may be different in the current Pages version (6.3.1) but the basic principles remain the same and still work.  

Thursday, July 20, 2017

Pages 6.2. The Shapes Library.

See this and other photos of Normandy
on my photo blog.
Aaaa
Apple’s new version of Pages 6.2 released this Summer has, among other new features, a large shapes library. 

Lovers of clipart often complained that there wasn’t enough of it on a Mac. So, here you are with several hundred predrawn clipart-like shapes, or images ready to use or modify.

Make sure your Pages document is set to show the Toolbar. If it isn’t go View > Show Toolbar. In the Toobar click/tap on the green rectangle and the library opens with the basic shapes first, including the powerful but often undervalued Draw tool. Then we have a collection of shapes grouped by topics — objects, nature, animals, business etc.

They are ok to use as they are. Select one, click on it and it will appear in your document.

However, if you want something more eye-grabbing there are many ways to modify the preset shapes. One of the easiest ones is Image Fill — putting an image (a photo) inside the shape.

Here is how it works. 

Let’s go to Symbols section and get a ‘credit card' shape. It looks like this:


1. Drag one of the editing points (little squares seen when the shape is selected) to enlarge the shape.
2. In the Inspector Pane, click on Style. Here you have a selection of different colours for your shape, but go further down to the Fill section, click on the tab under Fill to open the menu and select Image Fill.


3. Now, below you can click on Choose and select a favourite image from Desktop. Click on it to select and then click Open to put it inside the credit card shape.

Another option is to go to your Photos collection. Click on the Photos icon in the Dock to launch the programme. When it opens find a photo you want to go on the credit card and drag it straight from the Photos onto the credit card shape in the Pages document. Here, I've used my photo of a field of wheat with red poppies (©A.Anichkin, 2017).

4. Switch from Photos to Pages and resize the photo by dragging the Scale slider that shows up after the image is imported. 

Reposition the photo inside the credit card by clicking and holding on it. When the little white hand appears drag the photo inside the card until you are satisfied. 

Save — and that’s it!


Sunday, July 17, 2016

In Memory of Nice and Turkey


Horrific events took place in Nice, France, and in Turkey.

In memory of those who died and in solidarity with their families and friends I am republishing here a black remembrance ribbon I designed in Pages some time ago.


On the technical side, it is made of three overlapping edited rectangular shapes, each with different advanced colour fill. 
All the tools are in Pages.

Sunday, June 19, 2016

A Study after Matisse.


This is a study after Henri Matisse's work Nu bleu IV,  1952. The original, paper clips on paper and pencil, is in the Musée Matisse de Nice in France.

Here I made a copy in Pages tools.

Import shapes from the Shapes menu, make them editable (Format>Shapes and Lines>Make editable). Then reshape them one by one to look like what you see in the Matisse. Change colour with the tools in Colour Viewer (open it with Command+Shift+C).

The first image shows the study, in the second all used shapes are selected, the third shows one of the shapes with editing points and a guide showing.


Sunday, March 29, 2015

A Study after Modigliani.


Italian artists Amedeo Modigliani was friends with Russian poet Anna Akhmatova in 1910s. He made several dozen minimalist portraits of her. 

Here, I am recreating one of Modigliani's drawings with Pages' Draw tool, adding colour and some other effects. 

This is an unfinished study. I am publishing it to show the work in progress. 

Detail, head.


Composition:

Friday, November 07, 2014

After Modigliani, a Study Made in iWork/Pages.

This is a study after Amedeo Modigliani, the great Italian artist of the 20 Century.

I drew it in Pages using the Draw Tool (find it in Shapes menu) and combining edited shapes with various gradient colour fills. Style options for lines in Graphic Inspector give additional possibilities when working on details, for example hair. 


Sunday, December 01, 2013

How to Draw a Snowman.

This is a short video on how to draw a snowman in iWork/Pages. I made the slides from screenshots in Pages, then assembled them in Keynote and made into a video via iPhoto and uploaded to my channel on YouTube.

This version doesn't have additional explanatory notes and is intended for those who are already comfortable with iWork's basic tools.

Enjoy!

Sunday, October 13, 2013

How to Draw a Halloween Pumpkin.

This is a short video I made in Keynote with slides from Pages (to make screenshots: Command+Shift+4) showing how to draw a Halloween pumpkin in a few easy steps.

Thursday, August 22, 2013

Free Banking.


'Free [us from] Banking' is another design I've added to my gallery on CafePress. You can see it there on various products, such as t-shirts, bags and mugs, as in the picture here. Click on the picture to see the products with this design on CafePress.

The effect I was aiming at is to have two slogans in one. When you glance at it quickly, you only see 'Free Banking.' When you look again, you see 'Free us from Banking.' 

I put each line in a separate text box which allows more freedom in moving the chunks of text. 

I made the key word 'Free' largest at 180 points, 'Banking' smaller at 144, and 'us from' at 34. The font used is Palatino Bold.

For best results when printing in black type, remember to change the colour to 'true black.' In the Colour viewer (Inspector), click on sliders, choose CMYK and set Cyan, Magenta and Yellow at zero, and Black (K) at 100 percent.

Convert your Pages document to PDF and upload to CafePress.

Thursday, August 15, 2013

Talking man. A simple picture.


Here is a very simple design of a man with a speech bubble that anyone can do for their projects. Add him to your card, brochure or poster.


The main body shape is made with iWork/Pages Draw tool (Pen) which is at the end of the Shapes menu. Click several times to make a rough shape and then make it editable and smooth curves (Smooth Path) under the Format menu.
Arms are separate shapes. Double click on the last dot to make the upper part of the arm look  'connected' to the body. Fill the body and the arms with complementing colours in Graphic Inspector. The second arm is a copy (duplicate) of the first, you don't need to draw it again. Under Arrange menu Send to Back the second arm to make it look like a left hand.
The picture below shows how fingers are drawn. To make it easier, increase the zoom of your document from 125 to 300 or 400 percent.


The picture below shows editing points (red dots) for the arm.


And here is the full picture. Add a speech bubble and type in your words — a promotional slogan, a political point or a piece of advice.

Read more in my new book 'iWork for Mac OSX Cookbook' (2012), follow me on Twitter at iworkinpages, like my page I Work in Pages on Facebook and add me to your circles on Google+.


Monday, August 12, 2013

Obama cancels summit with Putin. A cartoon strip.

Here's a cartoon I made the other day with drawings made in Pages with the Draw Tool (Pen) and put them into a ComicLife template. 

Read more on how to create a drawing/picture with iWork/Pages tools here.


Read more in my new book 'iWork for Mac OSX Cookbook' (2012), follow me on Twitter at iworkinpages, like my page I Work in Pages on Facebook and add me to your circles on Google+.

Monday, July 29, 2013

Running on the road? Put a warning sign on your t-shirt.


Those who read my blog Running with Dogs know about my other passion - running. When running on the road it's important to make yourself visible to others, warn them that you are there.

Here's a design I made in Pages to go on my t-shirt. It is based on the usual widely recognised triangular warning sign on roads.

The runner's figure is drawn with iWork's draw tool (pen). Behind it is a white triangle, a slightly reshaped Triangle from the Shapes menu. And at the back is the red triangle with rounded corners. I made it from the Rounded Rectangle, which is available in the Shapes menu. I made the  shape editable (Format > Shape > Make editable), then deleted one of the corners and reshaped the triangle.

Click on the picture to go to CafePress to see this and other t-shirts and products with this design. Contact the editor if you want to commission similar.


Read more in my new book 'iWork for Mac OSX Cookbook' (2012), follow me on Twitter at iworkinpages, like my page I Work in Pages on Facebook and add me to your circles on Google+

Sunday, June 30, 2013

Sunny on CafePress Designs.


I've put my Sunny design on CafePress. See it on 76 different products including t-shirts and tank tops, mugs, bags, cushions and fridge magnets.

You can buy any of those via CafePress or try your hand at making your own.
See the how-to here, includes my video tutorial.


Read more in my new book 'iWork for Mac OSX Cookbook' (2012), follow me on Twitter at iworkinpages, like my page I Work in Pages on Facebook and add me to your circles on Google+

Saturday, June 29, 2013

Summertime. (Drawing in iWork)


Here is another design I made dreaming of a good relaxing summer.

It consists of several overlapping shapes. The woman's body is one continuous line with a number of editing points. The left hand is a separate shape and so is the hair. Shapes have gradient colour fill. The Sun on the right is an earlier design (see here).

The larger shape has image fill instead of colour fill.


In the picture below you can see the editing points. You can add (Command+Alt and move cursor over the contour of the shape, let go when pen with plus sign appears) or delete (select an editing point and hit delete) as many points as you like.


In this close-up you can see the curving handles of an editing point. Click on the tip of the 'propeller' and drag to change the curves of the shape.


Read more in my new book 'iWork for Mac OSX Cookbook' (2012), follow me on Twitter at iworkinpages, like my page I Work in Pages on Facebook and add me to your circles on Google+ 
Related Posts Plugin for WordPress, Blogger...

Copyright

© 2006-2010, 2010-2017 Alexander Anichkin, All Rights Reserved.
All content is original and was created by me, the author and publisher of I Work in Pages.
Quotations and images are attributed where applicable.
No republication without express prior permission.
Blog template by Blogger with customisation by the publisher.