
Showing posts with label iWork Pages clip art. Show all posts

Saturday, June 01, 2013

Special characters and Character palette.

Special characters are stored in a place called Character palette.

If you are looking for arrows, pointing fingers, smileys, hearts, telephone icons, scissors, zodiac signs, chess pieces, musical notes, mathematical symbols, Greek alphabet and similar, i.e. the symbols that are not on the keyboard but are frequently used, — that's where to look for them.

Popular clipart-like characters (symbols) are in Characters > Symbols > Miscellaneous Symbols.

To access the Character palette from iWork, go to the Edit menu and choose Special characters...

Edit > Special characters

Find the symbol you need and drag it to your document. It is imported as a letter. There are font variations and you can change the colour in the same way as you change the colour of text.

Special characters (the palette) can be accessed from other applications, including TextEdit and Stickies.

If you want to turn the symbol into a piece of clip art, enlarge it and make a screenshot. If needed, remove the white background with Alpha tool in iWork or Preview.


Read more in my new book 'iWork for Mac OSX Cookbook' (2012)
Follow me on Twitter at iworkinpages  
Like my page I Work in Pages on Facebook 
and add me to your circles on Google+ 

Wednesday, December 05, 2012

Where is the telephone clip art image?


If you are looking for the telephone icon (clip art), dip into the Characters palette on your Mac. 


In an iWork document, go to Special Characters under the Edit menu. When the Characters window opens, go to Symbols > Miscellaneous Symbols. You will see several telephone icons there. Click on one and drag it to your document. 

Symbols in the Character palette behave like letters. They move with the text. You can change the font size and colour or a font variation. Click on Font Variation at the bottom of the window to see which variations are available.

If you need a graphic image, enlarge the letter-like symbol and make a screenshot of it or export to PDF.

If you don’t use iWork, you can access the Characters palette from TextEdit. Special Characters option is under the Edit menu.

Friday, October 26, 2012

How to draw a Halloween pumpkin.


I made this pumpkin in Pages. Try it, it's fun. 

All work shouldn’t take longer than 30 minutes.

I've used the following techniques here: 

1. Combined separately drawn pumpkin segments. The starting shape was an Oval. Then I stretched it and made it editable - Format > Shape > Make editable. To move segments into place I used Arrange > Move Backward/Bring Forward.

Don't draw each segment from scratch, just duplicate - Command+D.

2. Here I used the simple Gradient Fill colour option that mixes two colours inside a shape. Colour fill options are in the Graphic Inspector. The two colours I used here are Cantaloupe and Tangerine from the Crayons box in Colours Inspector (viewer). You can also use Advanced Gradient fill where more than two colours can be mixed.

3. For the stalk of the pumpkin here, I used three edited shapes with Gradient Colour fill. The two colours are Cayenne and Mocha from the Crayons box.
The starting shape, again, was the oval made editable: Format > Shape > Make Editable. Then I dragged red dots and propellers to give it a 'twisted' shape.
For the base of the stalk, I simply squashed an oval with Moss colour fill.

Here is a video showing the process. I made it from Keynote slides.

Tuesday, September 04, 2012

Ribbons. Draw your awareness ribbon in iWork.


Coloured ribbons are widely used for various awareness campaigns and to show support for particular causes. Often you can download a ribbon of your choice from the Internet. And you can also draw your own in iWork.

I made this pink ribbon (often associated with breast cancer awareness campaign) with the Draw tool. 

- Go to Shapes drop-down menu, choose the last option - Draw tool. 
- Make six clicks with the tool to create the rough outline of the ribbon. If the shape has colour fill, go to Graphic Inspector, click on the Fill drop-down menu and choose None.
- When making a click, drag the mouse around slightly to make the shape (line) editable. The dot will show 'propellers' that will let you change the curves of the ribbon.
- Go to Format>Shape>Smooth Path to make the ribbon rounded (curving).
- In Graphic Inspector, click on the color tab under Line and choose a colour in the Colors Inspector (Viewer).
- From the line styles drop-down menu, choose a style. This picture shows the Graphic Inspector with the settings for this ribbon.


- Curve the contours of the ribbon: click on the tip of the propeller of the selected dot, drag the propellers, extend them or push in to change the curves.
- To give more volume to the ribbon, add shadow by clicking in the checkbox in Graphic Inspector. Remember that shadows also have colours. Click in the colour well and choose a complementing colour for the shadow.

Save when finished. 

Import your portrait, send it to back (under Arrange menu) and move the ribbon over it.

Make the iWork/Pages document into a graphic file - share via Share menu, save to iPhoto or make a screenshot - to use on your website or elsewhere.

This photo shows the ribbon with its editing points (red dots). The numbers show the sequence of clicks with the Draw tool.


This ribbon is a relatively simple design made with a single line. You can make a more sophisticated ribbon by creating an editable shape(s) and giving it gradient color fill like in this white ribbon I designed earlier.


Read this Wikipedia article about the various types and colours of awareness ribbons.

For how to put a ribbon or a badge on your photo read this post: 'Put Remembrance Poppy on Your Photo.'

Sunday, September 02, 2012

The Yawn. A Drawing.

Here, I was experimenting with drawing a yawn.

After Edvard Munch's picture The Scream was sold for a record-breaking $120 mln. earllier this year I was interested to see how to show a yawn and not a scream. Graphically they are not that different. Well, this is a yawn, and not a scream.


I've used the Pages draw tool to make the shapes and Gradient Fill with Mercury and Magnesium from the Crayons box in the Colors Inspector to give the face and the hand some volume. The inside of the mouth is Steel. The outline is one of the lines in Graphic Inspector.

Here, you can see all the shapes selected.

It may be tricky to make the small shapes for nostrils. Make one and then duplicate it.


I didn't draw the nose. Instead, I've added shadows to the nostrils and increased the blur and the offset of the shadows. Then, I rotated the shadow direction wheel to make the shadows go upwards. Here is the Graphic Inspector showing the settings for the nostrils.


This is a simple picture that can be used as clip art, an avatar or a favicon.

Draw one yourself or commission similar for I Work in Pages.

Tuesday, March 08, 2011

Fancy Shape for Nicky's Wedding (Curves and Points)

Today is International Women's Day


I recently bought a Mac and am kinda looking for the easy way out without spending hours trying to 'play and learn.' I am trying to create my wedding invitations using Pages. I have a shape that I would like to use I am not sure if I just need to practice more but I am having an issue trying to make it one flowing line from using the 'trace paper technique'.
Any advice would be great. Thanks!  

- Nicky

Here is the basic shape with editing points showing:


First, create a rough outline of the shape with the Draw Tool in the Shapes menu. Under the Format menu, choose Format>Shape>Make Editable and then Format>Shape>Smooth Path. Red dots (editing points) show where you click with the little pen of the Draw Tool.

Second, you need to change the middle points at the top, bottom, left ahd right from curving points to angled. Double click on each of those red editing points – and they change from curve to angle, they become pointed, like arrows. Read more on how this works here.

Next, adjust the curves by moving the editing points and dragging 'propeller' handles that appear when you click on an editing point. Editing points can be moved by dragging or with the keyboard arrows.

Then, in Graphics Inspector change colour of the shape, thickness of its outline (frame), add shadow and try different colours, offset and blur for the shape to give it a more 3D look.

Time-wise, work up to this point should take 15-30 minutes, 
it's not hard and becomes easier with practice.

When you are satisfied, you can duplicate the shape (Command+D). In Metrics Inspector check 'Constrain Proportions' box and make the second shape (duplicate) smaller. Then move it over the first one – and you'll have a shape with double frame. You can change the colour of the shape, thickness and colour of the frame to achieve a more striking look. 

By default Pages have 'Alignment Guides' (Snap to Grid) function activated. When you move the second shape it will 'snap' to align itself with the first one which makes your job easier.

Group the two shapes under Arrange menu, so you can move them as one object.

Next, you can add a message inside the shape. Click on 'Text Box' in the tool bar and type the message.

Now, you can draw a shape like this yourself, or you can recreate it from an example somewhere else, using what I call 'tracing paper' technique.

Nicky wanted to recreate the shape from a commercial web-site, a business which makes a living by selling creative designs.  Using someone else's idea for yor own original design is perfectly legitimate while just copy-pasting is not.

And have a very happy wedding, Nicky, best wishes!

Nicky commented on this post, showing how 'tracing paper' technique can be used to draw cartoon-like images in Pages.


Read more in my new book 'iWork for Mas OSX Cookbook' (2012). Follow me on Twitter at iworkinpages, like my page I Work in Pages on Facebook and add me to your circles on Google+.

Thursday, February 10, 2011

Draw a Heart in Pages


Check out another great Valentine's idea in this article

Here is a quick way to draw a Valentine's heart with Pages tools. 
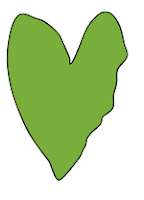
1. Rough shape, four points

1. Open a blank document, click on Shapes in the tool bar and choose the Draw Tool. You can also access Draw tool via the main menu: Insert>Shape>Draw a Shape. Draw a rough outline first by clicking five times with the little pen of the Draw tool, the fifth click is onto the first point – to close the shape. You now have a shape that looks something like in the first picture.

2. Next step – make the shape editable. Under Format menu slide down to Shape and choose Make Editable.

2. Curved, editable shape
3. Next, make the shape curve – Format>Shape>Smoothen Path. After that you have a shape that looks something like in the second picture.

4. Now, the heart shape should have a sharply outward cornered bottom and an inward cornered dip in the middle at the top. Here is the trick to achieve this. The red points (dots) of an editable shape allow you to edit it – change its contours. Click on the red point and when it turns white double click on it. The curves will turn into a corner. Next double click on the editing point in the top middle. 
Tip: if you accidentally go off the shape, make it editable again by clicking, pausing and clicking again – two clicks, not double-click.
3. Cornered bottom and middle top
After this you will have a shape that looks something like in the third picture. 

5. Next you need to give the heart the curves to give it a finished look. The editing points at top left and right will show 'propellers' when you click on them. Click on the white points at the tips of the propeller and drag. Drag propeller points out or in (extend or shorten them) to make the curve more rounded, drag propeller points up and down, left and right to change the flow of the curved shape. Move the editing points one by one to change the look of the shape. 
Tip: editing points will try to align themselves against each other if snap-to-grid function (or alignment guides) is on. To disable it temporarily while you work on the shape press Command key as you move the points. Alternatively, use keyboard key to move the points.

6. When you are satisfied with the look of the shape, play with the thickness and colour of the outer border (Stroke, in Graphic Inspector). To add volume to heart try giving it gradient (changing) colour fill, try changing the direction of the flow of colours by rotating the wheel in Graphic Inspector. In the example above the deeper red colour is a slightly adjusted Marascino and the pink at the bottom is a slightly modified Salmon.


See how to draw wrinkles, mouth and nose in this article and how to make droopy eyes here.

This is the finished image: 

Wednesday, December 15, 2010

Custom Bullets - How to Make Them

A pink footprint and a wine glass
from Carly's photos 

Hi! - I was wondering if you had any advice for creating custom bullets? - What is the best size? Resolution? File extension?
Carly Loewenthal, www.flickr.com/carlyinfocus


Any image or graphics would do, I think. It all depends on how you are going to use your bullets. 

To create a custom bullet in you document, go to Text Inspector click on List tab, then click on the Bullets and numbering drop-down menu and scroll down to Custom Image.  Click Choose and select an image to make it into a custom bullet. Or you can drag the image from Desktop to Custom Image well. I've just tried Carly's 'hippie church' photo with the pink footprint and another one with the wine glass, they both work fine.  I've used PNG format that you get when you use Screenshot (Command+4 and drag crosshairs over the image on screen). 

You can also use JPEG format that digital cameras produce or PDFs that you can make from your pages document. 

General rule: use smaller, lighter files with lower resolution for web projects (72 dpi, you can check resolution in Preview) and higher resolution (300 dpi) for print projects (cards, posters etc.). 

On your Mac, have a look at the images in iChat Icons on your hard disc: HD>Library>Application Support>Apple>iChat Icons. You will see a selection of images there – flags, flowers, fruit, guitars, planets. They are .gif files, very small in size,  4 kb, but still usable as bullets in a print project. From the Gems collection I’ve used with good results the Ruby Heart – for bullets in Private Ads of the Classifieds section in my magazine when we did a Valentine's special. If you are planning to use any of the files there duplicate, but don’t remove them from the folder as this is an Application Support folder for the whole of your computer.


I've used a photo of a Christmas candle for bullets in an article on how to avoid holiday stress and a photo of a red poppy for a list of Remembrance Day (Veterans Day) events. Just a few days ago I designed images for a Q&A page in a magazine that can be used as bullets to outline Questions and Answers in the body of the text.

If you simply put a photo into the Custom Image window of the Bullets window, it will come out as a square bullet.

To make photos look round you can, in a Pages document, put your image inside a round shape: insert an oval shape, in Graphics Inspector choose 'Image Fill' and select the photo (put it onto Desktop while working on the project). Alternatively, put the photo itself in a Pages document, and Mask With Shape>Oval. This may take longer, but you have more flexibility in moving the image inside the mask – with the photo of the pink footprint I've avoided clipping the big toe. Make a screenshot of the round image (it will go on your Desktop) and choose it as custom image for bullets.
You can also remove background with Instant Alpha (if it's not in the toolbar of your document, use it from the Format menu). That way you get just the footprint without the tarmac it's painted on. Make a screenshot of the Alpha image and choose it for the Custom Image.

Update (January 2012): in OS 10.7 Lion, you can make Alpha images in Preview. Click on Tools, choose Alpha and remove background. With this new enhancement Alpha images can be created for separate use across different applications and on the internet.


Bulleted text below is an image, click on it to enlarge.


Photos are copyright material and belong to Carly Loewenthal, used with permission. www.flickr.com/carlyinfocus

Saturday, September 04, 2010

Money Clipart for Pages

Euro coins
This is just a little note to say that money clipart, coins and notes can be copy-pasted or extracted as jpegs from the 'Travel Journal' template. There are two images: a €20 note and a €2 coin.

Wikipedia has numerous pages depicting currencies, but check the copyright status of images – many of have restrictions. The image on the right, for example, is copyrighted by the European Central Bank, but its usage is allowed.

It is easy to turn chocolate coins into attractive clipart for Pages. For how-to read this previous article.

And an overview of where to find clipart already installed on your Mac (that's why there is no special 'clipart' folder in iWork) read: Clipart for iWork/Pages - Where Is It?  


20 euros from 'Travel Journal' template
2 euro coin 


This is the copyright note to the Wikipedia image of eurocoins: The image above depicts a unit of currency issued by the European Central Bank (ECB). This design is copyrighted by the ECB, and its use is permitted by ECB, "as long as reproductions in advertising or illustrations cannot be mistaken for genuine banknotes"[1] and [for coins] "for photographs, drawings, paintings, films, images, and generally reproductions in flat format (without relief) provided they are in faithful likeness and are used in ways which do not damage or detract from the image of the euro".

Wednesday, December 16, 2009

Let's design a Christmas card in Pages: (8) - adding a holly pattern

Click here to go to Step 9
Holly tree leaves with red berries are often used in Christmas decorations and on cards. I am lucky to have a huge holly tree just down the lane. So, today, on a sunny frosty day I walked there and picked a few twigs. 

Let's see how to work them into the cards we've already created. Come back in a while and have a look. For a clue read this previous article on I work in Pages.


for Step 7 click here

Wednesday, April 29, 2009

Where is the Command symbol?


Where are the technical symbols you see on the keyboard, but cannot type?

They may not be of much use in ordinary work with text and graphics, but when writing something technical it's nice to be able to illustrate it with keyboard symbols. For instance, the distinctly Apple Mac Command symbol.


Technical symbols as well as many other useful mini-images, arrows, telephone icons, zodiac signs, chess pieces sit in the
Character palette. To access it go to

System Preferences> International>Input Menu
Check Character Palette for input method
Check Show Character Palette in menu bar

Open the Character palette>Symbols>Technical Symbols. Here you will see various squiggles, arrows, broken lines etc - the ones that are marked on your keyboard. Drag the symbol you need from there into your text and operate with it in the same way as you would with letters - change size, colour and font variations.

To use the symbols as graphic objects enlarge to a bigger font and make a screenshot (Command>Shift and type 4).

Remove white background with Instant Alpha (under Format Menu) if the object is to be used on coloured background.

Tuesday, February 10, 2009

Valentine's clipart and graphics: how to make it in Pages


Have a look at another Valentine's heart and read a later article here

This is a small bit of Valentine's clipart hand-made by me in Pages with just the tools available in the programme. Here is how to do it.
1. Draw a heart shape with the free draw tool under Shapes menu. First do a rough outline, then choose Format>Shape>Smooth Path. The contour of your shape now has smooth curves.
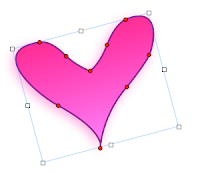
2. Work on the heart shape by making it editable: click on the shape, pause, click again - little red dots appear. Click to turn a red dot into a white circle with ‘propeller’ handles. Move dots with mouse or keyboard keys to change the contour of the shape and rotate, extend or shorten 'propellers' to change the way shape curves.

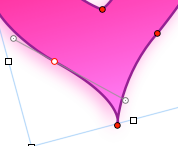
3. To make the bottom end of the heart ‘sharp’ move the propeller handles towards the red circle until they disappear.
4. Add 3D effect with Gradient colour fill. In the Crayon Box of the Colour Palette colours which are next to each other work best. Add ‘glowing’ effect with Shadow (both in Object Inspector).

5. When you are satisfied duplicate your heart shape (Command+D) and move, rotate, flip and send backwards or forwards the two shapes. To rotate press Command and click on a handle (litlle squares in the corners of the selected shape) or use rotating wheel in the Metrics Inspector. Flipping is in Metrics and Sending backwards and forwards is under Arrange menu. That way you get an ‘embracing’ effect.

6. To add a ‘piercing’ arrow:
- open the Character Palette>Arrows. Choose an arrow and drag it into your Pages document. Characters from the palette behave like letters. So change colour, enlarge the arrow as you would enlarge letters.
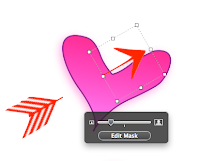
- Take a screenshot of the arrow and import the .png image into Pages.
- Remove white background with Instant Alpha (under Format menu).
- Duplicate and mask one half of the first arrow, and another of the second. Now, under Arrange menu, Send to Back the first half-arrow, and Bring to Front the second half-arrow.
- Next, move and rotate the two half arrows so that it looks as though one arrow pierces the two loving hearts.

Set yourslef in the mood by listening to this beautiful piece of love music by Georgi Sviridov.

If you find drawing your own original shapes too much work you can use a selection of hearts from the Character Palette>Miscellaneous or use Gem Hearts in HD>LIbrary>Application Support>Apple>iChat Icons.

You are welcome to send me your Valentine’s projects made in Pages and I will publish them here.

Please read these earlier articles on I Work in Pages:
Clipart for iWork/Pages - where is it
Creating clipart and original shapes in Pages
Curving lines and shapes: make them in Pages
Moving shapes backwards and forwards, screenshots and other shortcuts

Thursday, February 05, 2009

Valentine's clipart and graphics - make it in Pages


You can read the detailed how-to post here and read a 2011 article with another heart here

This is a small bit of Valentine's clipart hand-made by me in Pages with just the tools available in the programme.

Total time: 20 minutes. Result: lots of love to - and from - my loved ones.

There are four shapes. Two hearts are drawn with the free drawing tool under Shapes menu (last option in the drop-down menu). The arrow is from the Character palette>Arrows.

There are several hearts in the Character Palette you can use to create your own clip art and there are jem hearts in iChat icons folder - use them as well.

I will post a more detailed description of how to make this graphic design in a few days, but if you stopped by to have a look at this post why not listen to Georgi Sviridov's Romance, possibly the greatest piece of love music ever created.

Please check these previous articles on clip art for and graphic design in Pages:
Drawing letters and images in Pages
Where is clipart for Pages
Clipart for iWork/Pages - where is it?

Wednesday, November 05, 2008

Obama, Blues Brothers and Picasso - yes, we can


Like millions all over the Globe I was watching Barack Obama speaking in Grant Park, Chicago. I was crying, laughing, dreaming - and I started drawing doodles in an open Pages document.

I am a fan of the Blues Brothers, a musical comedy which was filmed on several locations around Chicago. One of the spots featured was the famous Picasso statue located in the Rt.Hon.Daley Plaza. In the climax scene of the movie, after running from the law the entire movie, they are finally approaching the tax assessor's office to pay to pay a Catholic orphanage's taxes - with the entire Chicago police force in tow.

Picasso! The Dove of Peace! The bullfights! And endless nudes!

I did a quick Google search and found La Femme - the famous Picasso drawing, consisting of just four crayon strokes. I pasted it into a blank Pages doc and tried to copy it with the Draw Tool from the Shapes menu in the Tool Bar.

I finished just when the mesmerised crowd heard the "Yes, we can" pitch from Barack -

Pages may not be a drawing programme, but a few simple things can be accomplished even when they are not meant to.

How to:
- use Draw Tool from the Shapes menu in the Tool Bar
- draw four curved lines over the imported Picasso image.

Use as many dots as you can and choose Smooth Path from Format>Shape submenu.

Please read these related articles on I Work in Pages:
Curving Lines and Shapes - Make Them in Pages
Creating Clipart and Original Shapes in Pages

Thursday, October 23, 2008

Where is clipart for Pages?


- Graphic elements of Pages own templates can be used as clipart - just cut and paste them.

- Attractive clipart images are in Image Bullets under Bullets drop-down menu (Text Inspector, List tab).

- HD>Library>Desktop Pictures - high resolution images for backgrounds.

- Home>Pictures>iChat Icons (or HD>LIbrary>Application Support>Apple>iChat Icons.)

- User Pictures, also in HD>Library

- Character Palette - hundreds of clipart-like characters. Character Palette is under Input Menu chooser in the main screen menu. If it is not activated on your Mac, open System Preferences>International>Input Menu and check the Character Palette box.

- And, if you have kept your old copy of MS Office, nothing is simpler than just copy-pasting or drag'n'dropping clipart from the Office folder right into your Pages project.

This is a bite-size version of the full article
on Clipart for Pages

published earlier with a linked list of other articles about clipart on this blog.

Saturday, December 15, 2007

Creating your own clipart with Instant Alpha

Here is how to:

  • Set your digital camera to Macro
  • Take a photo of the object you want to make into clipart - a leaf of Holly, a twig of frosted fir-tree, a coin (chocolate coins would do)
  • Import your photo into a Pages document
  • Remove background with instant Alpha
  • Resize or drop into the Custom Image window in Text Inspector - List - Bullets drop-down menu.

Many Pages users are asking on internet forums where they can find clipart to use with their projects. While there are dozens of web-sites that allow free downloads of clipart and the elements of Pages own templates could be used as clipart images, it is often difficult to find high definition images of exactly what you want, especially if you don't want to spend time registering, logging-in or paying a download fee.

I was absolutely thrilled to see that Apple included Instant Alpha as a new feature in iWork/Pages'08 - it is under Format menu. What it does is it allows you to 'remove' the background from any picture you use and make the image 'transparent'. For nearly two years I've been struggling to design nice looking ads for my clients where an image or logo was supplied with white (or coloured) background, but had to be used on a different colour background in the ad. Now I can do it in Pages!

In one recent example I had to find a clipart image to an article on ramifications of the sub-prime mortgage crisis in America. I took out a pile of chocolate coins ready to go into children's Christmas stockings, put them in various arrangements on a sheet of white paper and took a series of macro photos. The result exceeded my expectations - judge for yourself. A screenshot of the magazine page with a clipart image at top right, original photo - below left.

After applying Alpha I've also added a coloured Shadow (Object Inspector) to create a 'glowing' effect.

Alpha even allowed me to put a hand-drawn black and white cartoon strip on a colour background!

Also check this previous article: Designing ads in Pages - the Golden Apple

Addendum: Click on clipart and instant alpha labels to check out other tips and tricks on clipart and the use of Instant Alpha.
Related Posts Plugin for WordPress, Blogger...

Copyright

© 2006-2010, 2010-2017 Alexander Anichkin, All Rights Reserved.
All content is original and was created by me, the author and publisher of I Work in Pages.
Quotations and images are attributed where applicable.
No republication without express prior permission.
Blog template by Blogger with customisation by the publisher.