Showing posts with label transparent shapes. Show all posts

Tuesday, June 11, 2024

Pages to PNG: How to make transparent files for design uploads


Pages - PDF - PNG


Here is a short script for those who dabble in graphic design in Pages, and print-on-demand (POD). 

1 Make your design in Pages.

2 Under File menu go to Export to (Exporter vers... in French) and chose PDF. 

3 Open the PDF file in Preview, the Mac does it by default. 

4 Again, under the File menu slide down to Export (Exporter...) and in the opening window click on the Format menu and chose PNG. Here, set Resolution to 301 pixels per inch, which is an industry standard for professional/commercial printing.

5 Save, open the PNG file and under the View menu open Tool Bar (or Markup Toolbar), in the tool bar click on Alpha, second from left at the top.

6 Drag the cursor over the background, and when the blinking cursive line appears, click delete. You will get a checkered grey background. This is a transparency. Now, check for the white spots inside some letters of your 'slogan' design, like A, D, P, O, B. These have to be 'whiped' out with Alpha too. Click and drag, then click Delete. Once you're done with these, save your file and it's ready for uploading to whatever POD site you use.

Once you get to grips with this, it takes less than five minutes from doing a text slogan in Pages to uploading a ready design for a mug or a tee-shirt. 

And here you can see one of my recent designs on CafePress, one of the top POD sites. I have used the Pages to PNG method described above. 

Good luck with this! 

Thursday, June 20, 2013

Comic Life: Curve Text, Outline Letters and Put Images inside Them.

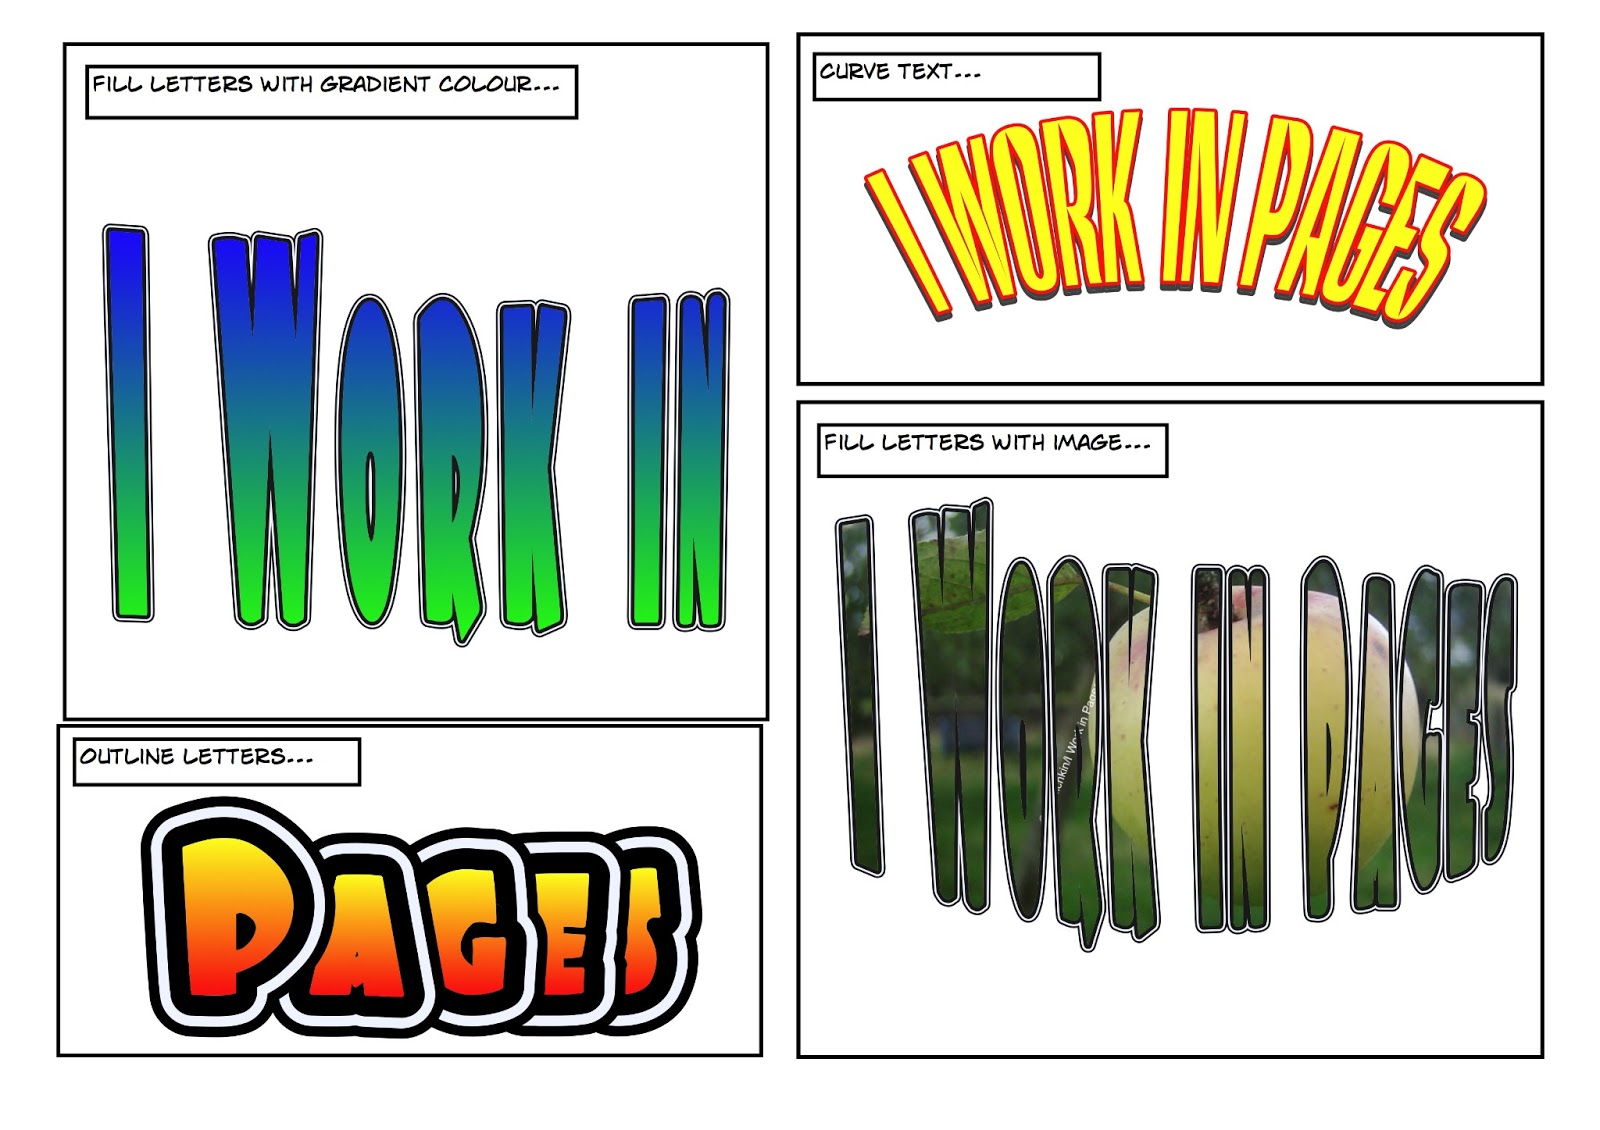
A comic showing what you can do.


Readers often ask how to curve text in Pages or how to outline the letters. Filling letters with images is another design trick popular with the readers of this blog.

I’ve mentioned several times here Comic Life, a graphic and layout programme from Plasq.com. 

It is designed to put together comic strips with graphic images or photos in various layouts and add captions and speech bubbles to the images.

Comic Life has a colourful and joyful interface and is very easy to use. It’s tools, menus and techniques are very similar to iWork’s. There is a familiar Inspector and many icons in the Toolbar are the same as in iWork. If not they are easy to understand. If you are already comfortable with iWork it will take no time for you to start using Comic Life straight away, simply by following prompts and clicking around.

Full completed designs can be exported to a number of popular formats, including PDF, ePub, JPEG and PNG. And elements of Comic Life designs, such as chunks of text or text and graphics can be copy-pasted into iWork projects.

Comic Life may look like child’s play but it has a number of powerful features not available in iWork. Here is what you can find in Comic Life 2.2.6 that can be useful in iWork projects.
  
1. Curving text.
Text can be curved by dragging blue handles of the selected text box. Click on Lettering in the window at the bottom of your document and drag it to a comic panel.

2. Outlined text.
Text in templates is already outlined. Change the number and colour of the outlines in the Graphic Inspector under Stroke.

3. Colour-filled typography.
Letters and other typographical symbols can be colour-filled. Many come with gradient (changing) colour. Choose either gradient or solid colour fill in Graphic inspector by clicking in the colour well and then in the colour palette. Click on the comic panel to choose a background colour for the panel.

4. Image inside text.
If you want to put an image inside letters, go to Graphic Inspector and choose Image from the Fill drop-down menu. Drag an image from iPhoto or from the Desktop into the image well. It will fill the letters. Here, I’ve used the same apple photo that’s in the graphic panel and favicon of this blog.

There is much more of course. Comic Life is a fun and useful programme that will complement whatever you do in iWork.

Comic Life retails for $29.99 on Plasq.com and from Mac App Store. 


Saturday, July 02, 2011

Background Images


I am publishing this wonderful photo of a meadow in full bloom in France (photo by ©Francesca Bostock, 2011) just to show how to use background images.

What is attractive about this photograph is that it has a natural colour sequence: look how deep green, light green, speckled yellow, scarlet red, orange-red, deep blue and light blue is spread throughout the expanse of the meadow. And the curving road at the top adds a pefect finishing touch. Nature is the best artist.

Now, drop the photo into your Pages document, then under Arrange menu Send it to Back or Send Object to Background. After that create a Shape (a text box, or a rectangle) and in Graphic Inspector choose colour fill, pick colour (here it is a shade of green, but grey would work well too) and reduce opacity to around 75 percent, then type and format your text – an invitation to the Fourth of July barbecue, to la Bastille fireworks or to the Remembrance ceremony (image on the right).

One semi-transparent box
If you think the text doesn't stand out enough, use the two box trick (image below): insert a second shape, make it larger than the shape with text and Send Backward under Arrange menu. Then reduce opacity to around 75 percent.

Next select the box with text, in Graphic Inspector click on colour well and when  Colour viewer opens increase opacity to 100 percent. Using two boxes instead of one gives the impression of transparency while in fact the main box has solid colour fill to allow the text to be clearly visible.


Read more in the articles How to make coloured text stand out on the same colour background and Fading Out a Background Image.

See more photos of Normandy on my photo blog.
Related Posts Plugin for WordPress, Blogger...

Copyright

© 2006-2010, 2010-2017 Alexander Anichkin, All Rights Reserved.
All content is original and was created by me, the author and publisher of I Work in Pages.
Quotations and images are attributed where applicable.
No republication without express prior permission.
Blog template by Blogger with customisation by the publisher.