4 Jan 07
There is a map in one of the Pages ready-made templates 'Classic Brochure' (three panel, Vineyard B&B) - but the map image does not really give clues as to how to construct it....
Macs are famous for being user friendly because they replicate operations we are already used to doing with pencils, scissors and glue. There is very little that you can't do in Pages. One challenge for me was to create a map. As it turned out constructing maps in Pages is very similar to using tracing paper.
Well, here is one way of putting together a nice looking map:
1. Scan a real geographical map or take it off the internet - in JPG or PDF, it doesn't really matter so long as it can be imported in Pages.
2. Drop it into your pages document.
3. Use draw tool (a new feature in Pages 2) to create a custom shape lying on top of the scanned map. Follow the contours of the area you need for your map in a Pages document.
4. Fill the custom shape with colour (green or light brown for land area), gradient colour, or even an image - whichever suits your project best.
5. If it is a seaside area, create square shape, colour fill it with blue, put the blue square shape over the custom shape (map outline), adjust dimensions so that they match exactly and under Arrange menu 'Send backward'.
6. Use text boxes for placenames. They can be rotated to fit the map.
7. Use arrows for directions.
8. Use oval shapes or create more custom shapes to show areas needed on maps.
9. Move place name boxes and arrows into required position.
10. Command or Shift Click to select all objects and Group (under Arrange menu)
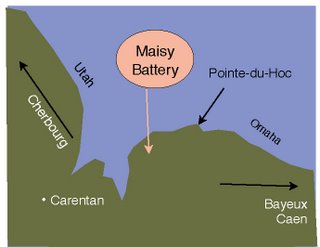
So here is what I constructed to show the area in Normandy where a huge, but long forgotten German WWII battery was recently uncovered.

Note: wrapping should be killed or set at zero.
Now your map is ready to be placed on page - resized, rotated etc. Remember to check the 'constrain proportions' box in dimensions inspector when resizing. It may also be useful to 'Print' your map as a PDF document and then import it into your project.
If anyone knows a better solution I'd like to hear very much.
Addendum (2011): Read later articles on designing maps (with illustrations):
D-Day Map: Making Maps, Schemes and Plans
Designing D-Day Map in Pages (Part Two)
Add Arrows to Maps in Pages (how to change the shape and curve of the arrows)
There is a map in one of the Pages ready-made templates 'Classic Brochure' (three panel, Vineyard B&B) - but the map image does not really give clues as to how to construct it....
Macs are famous for being user friendly because they replicate operations we are already used to doing with pencils, scissors and glue. There is very little that you can't do in Pages. One challenge for me was to create a map. As it turned out constructing maps in Pages is very similar to using tracing paper.
Well, here is one way of putting together a nice looking map:
1. Scan a real geographical map or take it off the internet - in JPG or PDF, it doesn't really matter so long as it can be imported in Pages.
2. Drop it into your pages document.
3. Use draw tool (a new feature in Pages 2) to create a custom shape lying on top of the scanned map. Follow the contours of the area you need for your map in a Pages document.
4. Fill the custom shape with colour (green or light brown for land area), gradient colour, or even an image - whichever suits your project best.
5. If it is a seaside area, create square shape, colour fill it with blue, put the blue square shape over the custom shape (map outline), adjust dimensions so that they match exactly and under Arrange menu 'Send backward'.
6. Use text boxes for placenames. They can be rotated to fit the map.
7. Use arrows for directions.
8. Use oval shapes or create more custom shapes to show areas needed on maps.
9. Move place name boxes and arrows into required position.
10. Command or Shift Click to select all objects and Group (under Arrange menu)
So here is what I constructed to show the area in Normandy where a huge, but long forgotten German WWII battery was recently uncovered.

Note: wrapping should be killed or set at zero.
Now your map is ready to be placed on page - resized, rotated etc. Remember to check the 'constrain proportions' box in dimensions inspector when resizing. It may also be useful to 'Print' your map as a PDF document and then import it into your project.
If anyone knows a better solution I'd like to hear very much.
Addendum (2011): Read later articles on designing maps (with illustrations):
D-Day Map: Making Maps, Schemes and Plans
Designing D-Day Map in Pages (Part Two)
Add Arrows to Maps in Pages (how to change the shape and curve of the arrows)

No comments:
Post a Comment