Showing posts with label Instant Alpha in iWork Pages. Show all posts

Friday, August 02, 2013

Transparent Background.


Photo with sky in the background

Abby Olivo, a reader of this blog, is asking: Is there a way to make the background of an image transparent in Pages?

- If you want to make transparent an image IN the background of a document select it and drag the Opacity slider in Graphic Inspector.

If you can't select the image go to Arrange menu and choose Make background objects selectable. If the image is locked (it shows small black crosses in the corners) choose Arrange>Unlock.

- If you want to make transparent the background of a photo (lake, mountains, sea or sky with you and your children in front), first make a cutout of the people in the photo and then import the same photo into your document again, Send to back or Send Object to Background (Arrange menu), make it transparent (Graphic Inspector, drag Opacity slider). With the cutout over the second photo itself it will look as though the background is transparent, or semi-transparent.

Sky removed with Alpha.

To make a cutout, use Format>Mask with Shape. 
Choose Oval and when the mask appears go to Format>Shape>Make editable. Little red dots (editing points) will appear on the mask. 
Click on a dot and move it with the mouse of the keyboard arrows so that all of the image is inside the mask. 

This method is more complicated, but fun. 

If the background in your photo is in solid colour, eg blue sky, you can remove it with Alpha tool (it's in the toolbar and under Format>Instant Alpha. 

Photo by me A.Anichkin: war memorial in a Normandy village.


Read more in my new book 'iWork for Mac OSX Cookbook' (2012), follow me on Twitter at iworkinpages, like my page I Work in Pages on Facebook and add me to your circles on Google+

Saturday, August 11, 2012

Colouring a Building.

To colour a building, choose a picture that has large areas of consistent color.

Remove the color with Instant Alpha tool.

Add one or more shapes (eg. rectangles or ovals) and choose color fill or gradient color fill in Graphic Inspector.

Send coloured shapes to back. Send to Back function is under Arrange menu.

Coloured shapes will show through the 'holes' in the photo or the building that were created by Alpha.

Adjust the size and position of the coloured shapes. You can select the shapes by clicking on them and move them around by dragging or with the keyboard arrows.

If the shapes overlap, resize or move them.

You can also 'shuffle' them by using Bring Forward and Send Backward functions under Arrange menu. This moves shapes (images) layer by layer. To make this easier, add icons for Send to Back, Bring to Front, Send Backward and Bring Forward to the Toolbar. To do this, go to the View menu and choose Customize Toolbar. Drag the icons to the Toolbar and click Done.


This project is a homage to the Russian feminist punk-rock group Pussy Riot. Three members of the group are currently on trial in Moscow for creating an anti-Putin performance partly staged in the cathedral of Christ the Saviour. Read more about the trial in the New York Times and elsewhere.

Original photo of the cathedral is by Sergius, from Wikimedia. Used under GNU licence.

Sunday, July 11, 2010

Transparent Letters: Put Image Inside Words


A simplified version of this post in four easy steps with 'I♥NY' as an example is here.

Transparent letters with images showing inside them create a striking design effect, very attractive for magazine covers, flyers, posters or cards. I have seen claims that it is not possible, but in fact it can be done in Pages in a few very simple steps.

If you are an advanced user just this clue should be enough:

turn your text into an image and then 'rub out' the letters with Alpha.

And here is a detailed step-by-step how-to:


1. Select photos. Here I took three of the most striking images of Normandy: Mont-Saint-Michel rock with its towering abbey, 11th Century Bayeux tapestry which depicts the Norman conquest of England in 1066 and the American Military Memorial above Omaha Beach near Coleville-sur-Mer.

Blend photos into a strip

2. If you haven't done so when opening a blank Pages document, at this point go to Document Inspector, choose Page Setup and click on landscape (horizontal) composition. That way you can make photos much larger which makes it easier to work with small details.

Add frame with blurred edges
3. Put photos in a strip, adjust sizes and in Graphic Inspector add soft picture frame.  As you see, now photos flow, blend one into another because of the soft, semi-transparent edges. Move Scale slider to increase or reduce the blur at edges.
Mask photos to highlight detail
4. Adjust the sizes of photos again and then use Mask (if it's not in your document toolbar, then it is under Format Menu) to select just the part of the photo you want to use in your composition. Here  you can see that I masked much of the very large photo of Bayeux tapesry to highlight the knight on horse. It takes practice to master masking, but it's worth it. Here are three ways to work with the Mask:

- Click Mask and drag the white square handles to change dimensions of the mask - the image that will appear in your document.
- Click and hold on the photo inside the frame, drag to move the photo itself inside the mask so that only the detail you want shows.
- Click on the photo, drag handles of the photo to resize it. When finished hit return or click on the black Edit Mask box.


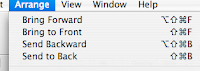
5. As you import images into your Pages document the latest goes on top of the previous. For example, if I put Mont St.Michel first, Bayeux tapestry second, then it would cover the Mont. And the American Cemetery would go over the tapestry. To change the way photos are layered go to Arrange Menu>Bring to Front or >Send to Back. In my example the Bayeux tapestry detail is in front of both the Mont and the Cemetery.

Now, the crucial bit, the text.

Squash text with spacing
6.  You may want to ad a new page to your document or open a new one. Type your words, choosing the richest, thickest font or font variation. You need this so that images are discernible within letters. Here I used Myriad Pro Black Condensed, but Helvetica, Verdana and many other font families have bold and condensed variations. Impact font is very thick. Make text as large as your page allows. Here the size is 177 points. And another tip: reduce character spacing to squash text so that letters just touch or nearly touch one another. Don't overdo, make sure the word(s) are easy to read.

7. Now, do one of the following: make a screenshot of the text (Command+Shift and type 4, drag crosshairs over the text), print your page to PDF or to JPEG (iPhoto). These three options give you an image of the text.


Rub out letters with Instant Alpha


8. Go back to the document with your photo strip and import the image of the text into it. Move the image over the photos and click on Alpha tool (if it's not in your toolbar, it is under Format menu). Click on the letters and drag to make them transparent. You should see the images through letters now!

9. Next, resize and move your text-image around to make sure that crucial details of the images within letters are not clipped. Here, for example, the spire of the Abbey and the head of the knight should be clearly seen. You may have to resize or move the photos to achieve the perfect look.


We can stop here. All the steps described so far shouldn't take longer than 30 minutes to accomplish. For a more striking effect read the next three steps.

10. Put the text on coloured background. Go back to the beginning of step 6 and in Text Inspector click on More tab, in Background Fill check Paragraph fill box and click on colour panel to choose colour.  Make sure that text and background have contrasting colours. Complete steps 6, 7, 8 and 9 and go to step 11.

11. To give letters voluminous, 3D feel add shadow to the text-image in Graphic Inspector. Try changing the colour, offset, blur and opacity of the shadow. Adjust the direction of the shadow by rotating the wheel in the Inspector. You will see how your letters suddenly stand out.

12. Next, reduce opacity of the text-image to make the underlying photos just visible. In Graphic Inspector slide the opacity control to somewhere between 60 and 80 percent. You should find a fine balance: making the background too transparent reduces the impact of text, but making it too solid will lose photos to a viewer.  If you'd ever observed how people watch images, you would have noticed that they love investigating small or half-hidden details. This is why this trick makes the final result so attractive. 


And of course you can 'draw' letters or original shapes in Pages and fill them with your images - or take solidly coloured shapes from templates (Catering Brochure, for example, has editable 'knives and forks').


Original photos courtesy of the Normandy Tourist Board (CRT Normandie)


Update (Feb.2015) : This article shows menus from an older version of Pages. While basic techniques described here remain the same, some menus will look different in the current version of Pages. This screenshot shows where to find Picture Frames in the current version. Select Picture Frame from the drop-down menu and then click on the picture icon to open a selection of different frames:


Read more in my new book 'iWork for Mac OSX Cookbook' (2012). Follow me on Twitter at iworkinpages, like my page I Work in Pages on Facebook and add me to your circles on Google+.

Sunday, December 20, 2009

Let's design a Christmas card in Pages: (9) - adding a holly pattern


... and this is what you should get after working on the photo with the Alpha tool.

Here are a few how-to steps:

- import the photo into a Pages document. Opening a new one might make the work easier.

- remove blue sky with the Alpha tool (it’s under Format menu and in the Tool Bar). Drag the crosshairs several times, but be careful not to make 'holes' in the leaves.


- mask the Alpha image with Shape. Mask with Shape is under Format menu. We want to mask the image in order to get a piece of clipart without the unwanted bits.
Here I used the Oval. After putting the mask on, we first resize it to cover the wanted area of the photo.

Then, under Format, we make the mask editable just like any shape. Red editing dots appear. When you click on them you can move them with keys or mouse, and also change curves of the shape with 'propeller handles'.


Click on propeller end-points and drag to extend or shorten them. Click on the red dots and move them around one by one until you achieve the desired result. Remember that if blue grids get in your way, you can temporarily disable the 'snap to grid' function by pressing and holding the Command key while moving the dots.

After  masking is complete we have a holly clipart that we can put anywhere (image at the top).

Come back in a few hours to put the holly on our Christmas card.

To go back to Step 8 click here 

Friday, March 06, 2009

Doodles: Picasso's room


This is just a quick doodle I made in Pages while thinking about something else.

The picture is made of several shapes with colour fill, gradient fill and masked images. On the wall: a famous portrait of Picasso with bread buns as his fingers and on the door is a copy of his drawing Femme.
The door is an edited rectangle shape. Curved arrow on the floor is in response to a reader's question about drawing segments and curved lines for blueprints. Read more about this in the article 'Curving lines and shapes make them in Pages'.

Shapes are superimposed and continously moved backwards and forwards to achieve desired effect (under Arrange menu).

Please read a more detailed description of techniques used here:
'How to design a folder'
and have a look at Femme drawn in Pages with a description of how-to here:
Obama, Blues Brothers and Picasso: yes, we can

Wednesday, February 18, 2009

An Apple Intermezzo: Adopt a Macintosh

Note: This post is not about Apple Macintosh computers, but about just Apples. An Englishman in Normandy is trying to preserve apple varieties which have become rare. He needs local and international help. There is a list of apple trees for adoption on his web-site, and last time I looked there was a Macintosh tree - the variety after which the first personal computer was named.

The project logo on the right had white background. For use on the coloured background in my magazine I removed the background with Instant Alpha. Read more about the uses of Instant Alpha here.

Saving the cider apple

Henry May is on a mission - to save cider apples. Hundreds of varieties have been lost forever in England and in France and the threat to them is continuing, he says. Having launched the the Tidnor Wood Orchards CIC (Community Interest Company) in the UK where over 400 UK, Irish and Channel Island varieties are already preserved in the Museum Orchard, May now hopes to create a similar enterprise in Normandy:

“France is the mother of cider apples and England her daughter. Many French varieties are commonplace in England either under their own names or an anglicised version. It seemed natural for us to decide to protect French varieties and where better than in their own environment?

A chance trip to southern Calvados ended with us being captivated by, and buying, ten acres - Les Vergers Tallevende - of stunning hogsback close to Lac Dathée near Vire.

Our vision is to protect English and French cider apple varieties in perpetuity; not as cordons or bush trees but in proper picnic orchards, half standards. We are setting up a 4.5 acre French Orchard at Tidnor and have a tricolour waiting to take its place on our flag staff.
And we have now planted the first tranche of trees in Les Vergers Tallevende and have a whole lot more for this coming season.

However, in England, where Tidnor Wood Orchards CIC is certified organic and recognised as a National Collection® (NCCPG), we pride ourselves on being self-sustaining; we do not seek or accept grants or any form of public money. Instead, we sell our apples to a cider maker and survive on the income.

But we have to find a different model for our French aspirations - at least in the short and medium terms. We need help and inspiration from local people to realise our ambition of twinning the world’s two principal cider nations and seeing the tricolour flying at Tidnor and the Jack at Tallevende.

If you - English and French Viroises - want to join us setting up the French organisation we would be delighted to hear from you at lesvergerstallevende@pommesdecidre.eu
Cider apples need you. A bientôt.”


Read a delicious apple recipe, quick to cook and filling, here.

Tuesday, December 09, 2008

Сhristmas graphics and clipart: a few easy tricks


Do a Google search for Christmas clipart - and it returns over a million results. Many images are free to download and use, some are for sale. But there are many simple tricks to create your own original clipart or ad a festive theme to your projects.

Here are a few of my favourites:
1. Use your own photos as background images.

2. Create panoramic photo strips

3. Use elements from Pages templates


4. Create graphic elements from the Character Pallette


5. Create your own clip art.


1. Use your own photos as background images for festive theme.

Here I put a narrow vertical mask on the photo of a snow covered fir tree on a sunny Winter day in my garden. Then added a picture frame with blurred edges (Object Inspector - Picture Frame - bottom left option) and put this graphic element on the outside margins of a double page magazine spread. If there is text or other graphic elements over the background photo, fade it to around 80 percent (reduce Opacity in Graphic Inspector). Read a more detailed description of this method in this previous article.

To see the original picture click here


2. Create panoramic photo strip.

- Choose your photo, import into the Pages project and duplicate (once or more).
- Flip second photo horizontally (in Metrics Inspector)
- Align the photos so that they look like one continuous image. Here I used the edges of the glass shelves for aligning. You may need to move photos backwards and forwards to achieve a perfect fit (this option is under Arrange menu).
- Put masks on all photos and adjust the Mask height dimensions to be the same for all photos. Vertical coordinates (distance from the top edge of the page) should also be exactly the same for all masked photos in the strip.
Now you have a perfect panoramic shot.
- Next put a text box over the image and type your heading.
Photo was made in Café du Théatre, Vire, Normandy with Nikon Coolpix 8.1 megapixel camera.

3. There are many graphic images in iWork/Pages templates

They can be used to add a holiday theme. Here I used a photo of champagne glasses from the Catalogue template. Choose Image Fill in Object Inspector and pick the photo. Set Image Fill to Scale to fill. One advantage of using Image Fill-Scale to fill is that the photo automatically adjusts itself to fill the object as you resize it. Here I just dragged down the bottom edge of the box to fill whatever space was available. You may find Image Fill easier to work with than Masking.

4. Create graphic images from characters in the Palette

There are several snowflakes and stars in the Character Palette>Miscellaneous Symbols (if you don't see the palette in your screen menu, go to System Preferences>International>Input Menu and check the Character Palette box to activate it). Characters from the Palette behave like ordinary letters. To make them into graphic elements choose colour as you would for text, enlarge as needed and take a screenshot to get a PNG file. (Screenshot: press Command+Shift and type 4, drag crosshairs over the characters and release)


You may want to remove white background with Instant Alpha (under Format menu) if your graphics go onto a coloured background. (as with the Holly twig in the box at the top)

5. Create your own clipart.

Read how to here and here.

And read more about clipart for Pages here

Friday, November 28, 2008

How to change background in a photo


It's a popular graphic design trick. You take a picture of a person, remove background and put the person in front, for example, of a famous landmark.

While Pages is not a specialised graphic design programme, a few simple tricks can help you achieve striking graphic effects.

Here is a photo of the new American monument in Normandy, recently unveiled at Utah Beach. The US Naval Order raised thousands of dollars to create this moving memorial to the sailors who fought to liberate Europe from nazis and the French provided the land. Surprisingly, while there are dozens of memorials to American soldiers in Normandy, the Navy had none. Photo of the unveiling ceremony below left.

I used Instant Alpha to remove the sky and put in a real documentary photo of American forces landing at Utah Beach on D-Day in 1944. The black and white photo is masked and the mask is set to have the same width as the main photo.

Please read these previous articles about some other simple tricks with photos:
How to separate people in photo from background
Remembrance theme: using background images

To see the original photo please click here

Thursday, October 30, 2008

How to separate people in the photo from the background


This beautiful picture by Mike Forster was on the cover of a February issue of our magazine with Valentine's theme.

I wanted to put the just married couple in the picture in front of the magazine strapline while keeping the background behind the text. This is a powerful design trick, very popular in print media.

And it can be done with just the tools available in Pages.

There are two ways to 'separate' the people in the picture from the background and put them 'in front' of the text:

- use Draw Tool from the Shapes menu in the Tool Bar to create a cutout
- use Instant Alpha to remove background


Here I used the 'cutout' method.

- First import the photo in the Pages document, resize and position it as needed.
- Then choose Draw Tool from the Shapes menu in the Tool Bar and create a shape which 'traces' the contours of figures you want to cut out from the original photo. Set object fill to none and stroke to none in Object Inspector so that you can see the photo underneath. The more dots you use the better.
- Third, after the free draw shape is finished, set it to Image Fill in the Object Inspector and choose the original photo for the Fill.
- In the Fill submenu choose Scale to fill... With luck the original photo will fit the free draw contour exactly. If not edit the shape by clicking on it twice (not double clicking - click, pause, click again). You should see little red dots. Click on them one by one to edit the shape (drag them or move with keyboard arrows) and make the photo sit tightly within the shape.
- Now, under Arrange menu, bring your cutout to front, so that it overlaps the straplines at the top of the page. Adjust the position of the cutout on the page.
- Then select the original photo and Send it to Back (Arrange menu) so that the background you had cut out from the image in front sits behind the magazine title and other text.


You may find that the original photo in the back shows bits you don't want to be seen. Resize and reposition it so that only the empty background shows. Here I had to import the original photo again to leave just the empty sky in the back. In the image below you can see parts of the two photos sitting in the back. I moved them for demonstration purposes.


- Next, create Text Boxes for other magazine straplines highlighting contents etc.
In print the seam between the three photos is practically invisible.

I also wanted to put the bare foot of the bride on top of the bottom strapline - but by then ran out of time.

The Instant Alpha method may be easier, but you must have a photo with consistent colour in the background. Otherwise the Alpha tool will be erasing elements of the image you want to keep.

Anyway, again for demonstration purposes, here is the same photo with the grey Normandy Winter sky removed with Instant Alpha and replaced with the bright blue Summer one. The Summer sky photo is behind the main photo, masked and mask resized to fit the photo dimensions.


Read more about cover design tricks in 'How to Outline Text in Pages'.

Please read these articles on I Work in Pages where other uses of Draw Tool and Instant Alpha are described:
Creating clipart and original shapes in Pages
Creating your own clipart with Instant Alpha

and about another design trick used in this magazine cover - opaque patch on the Willys Jeep:
Last minute corrections - use patchwork

Thursday, October 23, 2008

Clipart for iWork/Pages: where is it


There are tons of clipart images on your computer even though there is no clipart folder in iWork. Because you've already paid for clipart when you bought your Mac. iWork is an integral part of the Mac: it complements, works together with apps which are already there - iLife (iPhoto), Mail, Preview, Address Book, Dictionaries, Spotlight and others. Unlike MS Office which is a separate Universe on your machine. So where is clipart for Pages?

Here is where:

Pages (and other iWork) Templates
- First, elements of Pages templates can be used as clipart - just cut and paste them.

Among many others I have used a 'wrought iron fence post' (above) from the Collector Newsletter as a column divider. The image with little grey houses from the Real Estate Newsletter is good to go with anything about property. The index card image from the Back Page of the Green Grocery Newsletter went with a cooking recipe and the background image of yellowish piece of paper from Musical Concert poster looked nice behind an article on history.

Most of templates clipart is editable and easy to resize. Some of the images are locked or grouped. Under Arrange menu unlock and ungroup them to use as separate graphic elements. Many of them are easy to recreate with Pages tools. Bear in mind, however, that some of the images have low resolution and should only be used with small dimensions.

- A dozen or so attractive clipart images are in Image Bullets under Bullets drop-down menu (Text Inspector, List tab).

There are check boxes and others. I love silver and golden pearls. But any of your own original images can be made into a bullet. (Custom Image - Choose) Note that images with shadows may distort the surrounding text, so it is best to avoid shadows here.

Mac Library
- HD>Library>Desktop Pictures

There are 76 high-resolution images here including the famous dew drop (top right image) and the ladybird. These are large files, good enough for use as background images.

- Home>Pictures>iChat Icons
(or HD>LIbrary>Application Support>Apple>iChat Icons.)

National flags are stored here as buttons. The apple on the left is in the Fruit folder. I've also used Gems icons from this folder as bullets, like the ruby heart on the right.

- User Pictures, also in HD>Library.

Animals, flowers, nature, sports and other clipart here. I was disappointed not to find a cricket ball there even though, arguably, cricket, of all ball games, has the biggest following in the world (Britain, South Africa, Australia, India, Pakistan, Bangladesh, Sri Lanka etc., more than a hundred countries in the international federation). But I found a free image on Wikipedia and made it into clipart.

Note: there may be several Libraries on your Mac. The main Library is on your Hard Drive, don't move or rename any folders there. Your personal Library (these are created for each Account on your machine) is in the Home folder. This may sound a bit confusing, but you don't have to wade through endless folders to find what you want - just use Spotlight like you'd use Google.

Character Palette
- And there are hundreds of very useful clipart-like characters in Character Palette

They range from the familiar Command symbol on the Mac keyboard to zodiac symbols, to chess pieces and cards icons, to mathematical and musical signs, various daily life shapes, including icons of telephones, pens and pencils, scissors, aeroplanes etc. And there is Greek alphabet for use in scientific papers (for instance, the letter π .) Just click and drag them into your Pages project.

Check out the Palette to find what you need under Input Menu chooser in the main screen menu. If it is not activated on your Mac, open System Preferences>International>Input Menu and check the Character Palette box. (update): Otherwise, if you are note using several languages, simply go via Edit > Special characters route. When you slide down to the last option under the Edit menu the Character palette opens.


The beauty of the Palette characters is that they behave like letters - there are font variations, you can change colour and font size in the Format Bar, add shadows and other effects in the Object Inspector or via the Font Panel (open it with Command+T keyboard shortcut). If you need to use them as separate images in PDF or JPEG format, 'print' to PDF or to iPhoto and crop as necessary. Or use Command+Shift+4 to make a screenshot image in PNG format (good for internet use.)


MS Office clipart is compatible
- And, if you have kept your old copy of MS Office, nothing is simpler than just copy-pasting or drag'n'dropping clipart from the Office folder right into your Pages project.

Among the Office clipart images I've used in the magazine without any problem are the pink and yellow electric lamp and the image of an old-fashioned computer with CRT display.

And, on top of all of the above, it is fun to create your own clipart in Pages. Children love it.

Read more in my new book 'iWork for Mac OSX Cookbook' (2012). Follow me on Twitter at iworkinpages, like my page I Work in Pages on Facebook and add me to your circles on Google+.

Please check out these previous articles about clipart and graphic images in Pages:
Remembrance poppies: make your own with Pages
Creating your own clipart with Instant Alpha 
A Complete 10-Step Tutorial (Christmas Card): create original shapes, from snapshots to clip art, draw and edit images,  Alpha and Draw tools, create and arrange images
How to design folders in Pages
Creating clipart and original shapes in Pages
Curving lines and shapes: make them in Pages
Maps in Pages

Saturday, October 18, 2008

Remembrance Poppies: make your own clipart in Pages


Readers of our magazine are mostly Brits living in Normandy. So every November we run Remembrance day theme.

The distinct symbol of Remembrance is the red poppy. The connection comes from the killing fields of Flanders (Belgium) where many soldiers died during World War I: red poppies in wheat fields are like drops of blood.


This summer I took a series of photos of red poppies near the town of Falaise where fierce fighting took place in the final days of the battle of Normandy in 1944.


To create your own original clipart:

- Import the photo in to your Pages document and choose an element in the photo to make into clipart
- launch Instant Alpha (under Format menu)
- remove background by continuosly dragging the Alpha tool over the photo


The poppies in my photo are now on their own, without the ripening crops in the background. Next I mask the photo to leave just one flower. Now it is ready to be resized and copy pasted as a Remembrance Day clipart.

You can also 'Print' the Pages document to iPhoto and then crop the JPEG to keep it with your stock of clipart images. This option is under PDF drop down menu available in Print Dialogue window (Command+P).


Clipart JPEGs created this way can also be used as bullets (as, indeed, any other image).
- In Text Inspector click on the List tab
- and choose Custom Image from the drop down menu.
- Click Choose and import your clipart image.


While Instant Alpha is a wonderfully powerful tool, you may find that with some photos it is very difficult to 'separate' the background from the desired object. It happens when background colours are similar to those of the object. I have a beautiful picture of a holly bush with bright red berries which I wanted to make into Christmas clipart - but couldn't, because holly leaves blended with thick forest foliage in the background. (Update: a year later I cut off a twig of holly with berries, took a photo against blue sky and made it into clipart for my Christmas card.)

Bear it in mind if you are taking photos to make them into clipart. For example, when taking a picture of an apple, angle your shot so that the apple is against blue sky. If it is a red flower, it is best to have green leaves in the back.

Have a look at 'paper' Remembrance Poppy designed in Pages here and an example of a magazine page with the Remembrance theme here.


Please read these previous articles about creating clipart with iWork/Pages tools:

Creating your own clipart with Instant Alpha
How to design folders with Pages tools
Creating clipart and original shapes in Pages
Curving lines and shapes: make them in Pages
Maps in Pages

and about an easy way to make your Pages document into a JPEG:

Quick JPEGs straight from Pages

Friday, October 10, 2008

How to design 'folders'


Tabbed folder shapes are popular with designers. Not only because they are a means of grouping text in bite-size attention grabbing chunks, but also, I think, because there is a subconscious link to what every computer user sees on their screen - a multiplicity of folder icons.

Another explanation, especially applicable to design of magazine covers with large photos going up to the edges (bleeds), is that tabbed folder shapes make it easy to avoid text clashing with the photograph - various images and colours in the photo make it difficult to see the text clearly (read this article on how to make text stand out). Or, the other way round, because it is difficult to find a good photograph over which straplines stand out.

While there is no ready folder shape available in Pages it is very easy to design one.

- Insert two rounded rectangles in a Pages document (either from Insert>Shape submenu or from Shapes menu in the toolbar).
- Make one shape much smaller than the other and position behind the larger one.
- Adjust the curving of the rounded corners in the way you like (click on the little circle next to the top right handle of the shape - and drag.)

Now you have a simple two dimensional folder shape. But can something similar to the familiar small 3D Mac-folder (image below) be designed in Pages?


I spent a little time working on this and here is what I got (top right image).

The tab and the back cover of the folder are the same two rounded rectangle shapes, the darker front cover is a third.
The tilted effect is achieved through making the shapes editable (Format>Shape>Make shape editable.)


After making the shape editable you will see little red circles at the corners. Click on them one by one to drag or move with keyboard arrows. I dragged the top left corner of the large light-grey rectangle to the left to get the look of an opening folder. The top and bottom right corners of both the front and the back covers are dragged up.

If you later decide you are not entirely happy with your artwork, edit the shape by clicking twice - not double-clicking. Click, pause, click again - and the little red circles in the corners appear.

This gives a 3-dimensional effect which is further enhanced by adding Gradient Colour fill to the front cover. Do it in Object Inspector. Rotate the angle wheel to make the colour flow from light grey in the top left corner to dark grey in the bottom right corner.

Now, how do I put the draft small ad inside the folder? Tilt the ad with the Rotate wheel (Metrics Inspector), move it over the folder and
use Send Backward (under Arrange menu or with the keyboard shortcut - press ⌥⌘⇧ and type B) to move the object 'inside' the folder (i.e. behind the dark-grey rectangle).


Next, if you'd like to make the folder semi-transparent, reduce opacity in the Object Inspector. Here opacity of the folder 'cover' is set at 85%.

The label is another rounded rectangle with white colour fill.

Read more about designing original shapes in these previous articles on I Work in Pages:
Creating clipart and original shapes in Pages
Maps in Pages
Creating your own clipart with Instant Alpha

and about using Send Backward/Bring Forward keyboard shortcuts here.

Saturday, December 15, 2007

Creating your own clipart with Instant Alpha

Here is how to:

  • Set your digital camera to Macro
  • Take a photo of the object you want to make into clipart - a leaf of Holly, a twig of frosted fir-tree, a coin (chocolate coins would do)
  • Import your photo into a Pages document
  • Remove background with instant Alpha
  • Resize or drop into the Custom Image window in Text Inspector - List - Bullets drop-down menu.

Many Pages users are asking on internet forums where they can find clipart to use with their projects. While there are dozens of web-sites that allow free downloads of clipart and the elements of Pages own templates could be used as clipart images, it is often difficult to find high definition images of exactly what you want, especially if you don't want to spend time registering, logging-in or paying a download fee.

I was absolutely thrilled to see that Apple included Instant Alpha as a new feature in iWork/Pages'08 - it is under Format menu. What it does is it allows you to 'remove' the background from any picture you use and make the image 'transparent'. For nearly two years I've been struggling to design nice looking ads for my clients where an image or logo was supplied with white (or coloured) background, but had to be used on a different colour background in the ad. Now I can do it in Pages!

In one recent example I had to find a clipart image to an article on ramifications of the sub-prime mortgage crisis in America. I took out a pile of chocolate coins ready to go into children's Christmas stockings, put them in various arrangements on a sheet of white paper and took a series of macro photos. The result exceeded my expectations - judge for yourself. A screenshot of the magazine page with a clipart image at top right, original photo - below left.

After applying Alpha I've also added a coloured Shadow (Object Inspector) to create a 'glowing' effect.

Alpha even allowed me to put a hand-drawn black and white cartoon strip on a colour background!

Also check this previous article: Designing ads in Pages - the Golden Apple

Addendum: Click on clipart and instant alpha labels to check out other tips and tricks on clipart and the use of Instant Alpha.
Related Posts Plugin for WordPress, Blogger...

Copyright

© 2006-2010, 2010-2017 Alexander Anichkin, All Rights Reserved.
All content is original and was created by me, the author and publisher of I Work in Pages.
Quotations and images are attributed where applicable.
No republication without express prior permission.
Blog template by Blogger with customisation by the publisher.