Showing posts with label iWork Pages tips and tricks. Show all posts

Sunday, June 28, 2020

How to type grave accent on a QWERTY keyboard.


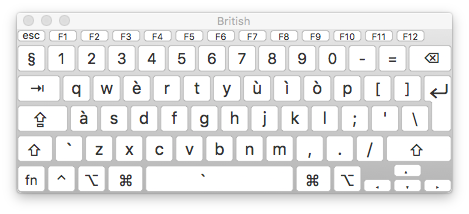
Keyboard Viewer shows letters
where you can type the grave accent
If you are used to the QWERTY layout on your keyboard but occasionally have to type in French or other languages with accents, you don't have to switch to the French AZERTY layout.

To type the grave accent, the one that goes to the left, press the Option (Alt) key and tap on the accent key to the left of the Z. Then type an 'a' and you get à the preposition instead of a the form of avoir (to have). This is good for capitals as well — À.

The same works for all other vowels. The screenshot here shows the QWERTY layout with all the keys where you can type the grave accent.

PS: I've checked this trick for Pages 8.1 version, it still works.

Accent grave: Accent qui marque le e ouvertL’accent grave sert aussi à distinguer des homonymes :  (adverbe) et ou(conjonction); à (préposition) et a (verbe avoir).

Tuesday, January 29, 2019

Where is my document data?


29 jan 2019

- Click on the document icon > Command+i, or
- Click/tap once on document icon > Control+click for on-screen menu > Choose Get Info

We have many different reasons to want to look up the document data — word count, type, ownership-copyright status, who commented on it and when. 

For me, one of the main reasons is to remember when I wrote (created it). When I work I get loads of side ideas that I want to scribble down quickly to develop later. Sometimes it’s a full sentence, sometimes just a couple of key words. Sometimes I put the words into the name of the document leaving the body itself blank.

Suppose it’s a reference to a news event of the day, or a radio programme? I need the date! How do I find out? Document properties, of course.

For some reason, the current version of Pages  (7.3; UPD 16 Sept 2019: this trick works in Pages 8.1)) doesn’t make it as easy as it used to be. In older version you could look up the Pages document under the File menu. Now it’s no longer there.

So, where do we find data on our Pages document? 

Close the document, click or tap on it once in Finder or in the folder where you keep it. 

Press Command and type i (letter i for ‘information’). The old-style Inspector window will open showing you lots of information about your document, including the day it was created and when it was opened and modified. 

After selecting (clicking once your file) you can also go to the File menu in Finder and select Get Info.

And a third, even smarter for some, way of opening that window is to Control-click the Pages doc, which opens a pop-up menu with a Get Info option right over the file icon.   

That’s it!

Thursday, October 05, 2017

Drag and Drop Images Straight from the Browser.


UPD: This trick works with the current Pages 8.1 — and with most other Mac applications, Numbers, Keynote, TextEdit, Stickies, Notes etc. (August 2019)

This post is to draw attention of Pages users to a simple trick with downloading images from the Internet: click on an image in your browser, hold and drag it straight into an open Pages document.

When 'caught' the image will 'lift off' the web page and show a white + sign in green circle and a black arrow.

Drag and hover over the Pages document and let got. The image will land into the document.

I wrote about this trick in a 2011post and it still works in the current Pages 6.3 version. It saves time and space on your hard disc. You don't need to store all images in Photos (library), they just as well sit comfortably in Pages, and can be extracted easily when needed as a separate graphic file.

Remember to check the copyright status of the image.

note technique pour des lecteurs français: drag and drop est glisser-déposer.

Friday, June 30, 2017

How to get back to the top of the document — or an internet page.


In an open Pages document, especially a long one, a longread or even a book, you are often stuck in somewhere in the middle when you want to get back to the top.

Instead of swiping your Touchpad endlessly or clicking your mouse, press the Command key (marked cmd) and tap on the UP arrow in the bottom right end of the keyboard. Your cursor will jump back right up to the beginning of the document.

The same works when you are on an internet page with a long text. lick in the body of the page, press Command and then tap the UP arrow. This will bring you to the beginning to the internet page.

The same works when you want to go right to the end of the page, for example to read Terms and Conditions. Press Command and tap the DOWN arrow. 

Sunday, December 16, 2012

Where is the copyright sign on the keyboard?


If you decide that your text or photo needs copyright protection, you may want to add the  ‘copyrighted material’ symbol to it with your personal name or the name of your business.

The symbol sits on the same key as the letter ‘g’ on British and American QWERTY keyboards. Press Option and type ‘g’, you will get the ‘c’ inside a circle — ©. On the French AZERTY layout the sign is with letter ‘c’. Press Option and type ‘c’.

Registered (®) sign is Option+R on both QWERTY and AZERTY layouts.

Copyright (©), registered (®), trade mark (™) and a number of other letter-like signs are also in the Character palette. Under Edit menu choose Special characters and when the character palette opens go to Symbols >  Letterlike Symbols. Find the sign you want, click on it and drag to your document. It inserts in text like a letter. 

Characters from the pallette work with TextEdit too: access the Character palette via Edit > Special characters.

Wednesday, October 03, 2012

Where is the Command Key on a Mac?


On Macs, the main key that adds functionality to key strokes is called the Command key even though it's not marked as such on the Mac keyboard.

Hence the confusion among beginners and switchers from Windows, where the corresponding key is Control.

Even experienced mac users sometimes get confused when they see or hear 'Command' mentioned. Some call it 'the apple key' after the Apple icon shown on the key together with a squiggly rectangle.

In Windows you press Control and type S to save a document. On a Mac you press Command and type S. Most other standard keyboard operations are a combination of Command and one of the letters of the keyboard, for example, Command+P - to print, Command+Z - to undo.

If you touch-type, I suggest using the thumb of your left hand to press Command: move it slightly away from the Space bar, press and then type the letter of the shortcut.

The Control key is also present on Mac keyboards but it is not used as widely as in Windows.

Wikipedia has an article Table of Keyboard Shortcuts that shows which shortcuts on a Mac correspond to which in Windows. In iWork, a list of available shortcuts is under the Help menu.

If you want to use the Command icon ⌘ in your document, go to the Edit menu and slide down to  Special Characters. When the character palette opens, click on Symbols > Technical Symbols and drag the icon from there to your document.

Monday, September 24, 2012

How to select multiple files on Desktop by dragging.


The usual way to select a file is to click on it once. To select more than one file, press Shift and click on the files you need.

In an open folder, you can select files by dragging the cursor. In tables and spreadsheet multiple cells can be selected by dragging.

I've recently impressed a colleague by another trick – selecting multiple files on the Desktop by dragging the cursor over them. (see the picture above.) Click on the Desktop and drag the cursor over a number of files. They will all be selected (highlighted).

This shortcut is handy when you want to scoop up work-files left on the Desktop after you've finished a project. Open a new folder, mark it with the name of the project, scoop up the related files and put them in the folder.

Another use is when you have several graphic files (photos) on the Desktop and want to have a quick look at them. Drag the cursor over them to select, press Command and type O (letter, o - for open). All files will open in one Preview window with a side pane. Click on the thumbnails in the side pane to view, or run a slideshow. You can also add pictures to an iWork document by dragging them from Preview to the iWork document.

I often use this trick to clear space on the Desktop, or to group related files together. Select them by dragging the cursor, then click once on any of the selected files and move them all together to a new location – to the side of the screen, to a folder, or even to Trash.


Sunday, September 23, 2012

Drag and Drop Images Direct from Cover Flow View.


In recent Mac OS versions folders have Cover Flow viewing option: you can see previews of all files in the folder as an enlarged icon or slide.

You can quickly insert images from Cover Flow view to your iWork documents.

- Find the image you want to add to your iWork/Pages project by flicking through the slides;

- Click on it and drag to the open iWork document;

- When the cursor turns into a green button with white cross, let go. The image will plop into your document where you hover the arrow-cursor.

This drag-and-drop shortcut saves a lot of time when you want to find and select an image in a folder. Remember to name folders with key words that allow you to find folders themselves via Spotlight!


Thursday, September 20, 2012

Declutter: Four Icons for the Same operation in Toolbar?


In an open iWork document, you may have these four icons in the Toolbar: insert a Text Box, insert a pre-designed shape from the Shapes drop-down menu, insert an object from the Objects drop-down menu, insert a Table, and insert a Chart.

This is all very well when you start using iWork, or use it for one particular purpose, e.g. for writing texts with an occasional image. 

When you progress to more sophisticated uses, with complex designs requiring multiple operations, such as moving objects, layering, masking, editing images, – you may want to add icons for these operations to the Toolbar. And it becomes cluttered. Some icons can even be pushed out of the view in the Toolbar. 

This is the point when you may want to consider removing Text Box, Shapes, Table and Charts icons from the Toolbar. To remove the icon, press Command and drag the icon off the Toolbar. It will disappear in a puff of animated smoke.

To insert a text box, a shape, a table, and a chart, you can now use the one remaining icon – Objects, with its drop-down menu. 

Click on Objects in the Toolbar, and you will see Text Box, Shapes with an additional menu, Table, and Charts, with an additional menu. Choose what you need to insert. 


To put the icons back into the Toolbar, go to the View menu and choose Customize Toolbar. Drag the required icons to the Toolbar strip at the bottom of the dialogue and click Done.

If, in your work, you have a few operations or tools that you use often, put them in the Toolbar for one-click activation. Use the same path: View > Customize Toolbar. Drag icons to the Toolbar strip.

Tuesday, August 28, 2012

Colour of Gold

Gold is yellow. Simple yellow is dull, but the yellow of gold glows.


Here, the glowing effect of the letters is achieved with a little known, but relatively easy graphic design trick.

- Type the text in your usual black.

- Turn the text into an image: make a screenshot, 'print' to PDF or export to iPhoto as JPEG.

- Reimport the image of the text into your document.

- Rub out the black letters with Instant Alpha (under Format menu).

- Insert a shape, for example a Rectangle, from the Toolbar.

- In Graphic Inspector, choose Gradient Color fill, and choose Cantaloupe and Tangerine from the Crayons box. 
- Under Arrange menu choose Send to Back. The shape will slide behind the lettering and its colors will be seen through the letters. 

- With Alpha, we made them into 'holes'. It is through these holes that we see the colour. 

- Select the image of the text. In Graphic Inspector, tick the Shadow checkbox. As the 'letter-holes' are now represent the edges of the object, they throw shadows too. 

- Click in the color well below the Shadow checkbox and choose Cantaloupe. The shadow will give additional glow to the letters.

Wikipedia has an article on the Colour of Gold which gives RGB and CMYK readings for variations of the color. Open Colors Viewer/Inspector (Command+Shift+C), click on the sliders icon and choose CMYK from the drop-down menu. Type in your preferred CMYK reading to get the colour of gold you want. 

Saturday, April 07, 2012

How to Constrain Proportions Without Metrics Inspector


Press the Shift key as you drag the object's handles. 


Holding down the Shift key constrains proportions temporarily, just for when you need it. It's a simple trick when you want to get on with your project quickly. 

When working on a design, you mostly use Graphic Inspector. But changing size, rotating, flipping and constraining proportions is in Metrics Inspector. Some of these operations can be done without the Inspector, but it isn't obvious how to Constrain proportions without going to Metrics inspector. Using Shift avoids endlessly switching from Graphic to Metrics when you need to change the object's behaviour. 

To constrain proportions with Metrics Inspector: Put a tick in the checkbox next to 'Constrain Proportions'. It stops the graphic image distorting when it is resized – if you don't, the image will be squashed, when you pull horizontally, or stretched, if you pull vertically.

The Shift trick works with charts too.

Monday, March 12, 2012

Coloured Edges for Colour-coded Sections (example)

I've recently described how create colour-coded sections in a book, a brochure or a magazine. This is how coloured edges look in a brochure:


It is a 'yellow pages' type directory in The Property Guide to Normandy, written, designed and produced in iWork/Pages and printed on a flat-bed press in France.

To make coloured edges in your publication, use shapes or boxes with Color Fill. Position them as bleeds – going over the outside margins in the pages of your publication. When it is trimmed and bound by the printers, the colour shows as a section in the publication.

See more details in this post: 'Colour Coded Sections: How to Colour Page Edges'

Tuesday, February 28, 2012

How to make JPEGs in Lion


For some reason, the popular path Print>PDF>Save PDF to iPhoto has been removed in Mac OSX Lion (10.7). Instead there is a Save PDF to iTunes option. It is difficult to see how widely macusers will need it.
Saving document to iPhoto has long been the easiest one-step way to produce JPEGs from iWork documents. Luckily, I have an older Mac which I’ve decided not to upgrade to Lion – and I still use the iPhoto option. 

If you only have Lion on your machine, here’s a simple two-step way to JPEGs.
1. Print>PDF>Open PDF in Preview 
2. File>Save>JPEG
Type Command+P (File>Print) to open Print dialogue. In the bottom left corner click on PDF and choose Open PDF in Preview option. 

When Preview document opens, type Command+S (File>Save) and in the Save dialogue click on the document format drop-down menu to choose JPEG. The document will be converted to JPEG. 
Next, you can crop or edit it in Preview or iPhoto.

If you are comfortable with Automator, try another path to JPEGs suggested on the Apple discussions forum. I haven’t tried it myself, so cannot vouch for it.

Tuesday, October 25, 2011

Five Years of Working in Pages.


It is five years since I've started blogging about iWork/Pages.

It seems like a long time. I only began it to organize my numerous scribbles on solutions I found while working in Pages, but slowly it grew into a popular source of information, a point of reference for hundreds of iWork/Pages users throughout the world. The blog is now visited by over a thousand people a day.

It seems like a long time, but what amazes me is that I still have that uplifting feeling of excitement and discovery every time I try something new in Pages.

A big thank you to the readers of I Work in Pages for support, encouragement, comments and suggestions.

Letters above are 'written' with the Draw Tool (in the Shapes menu) and then edited (Format>Shape>Smooth Path). The candle consists of edited shapes – two ovals with gradient colour fill and a rectangle. Both ovals have coloured shadows flowing in opposite directions (add shadow in Graphics Inspector and rotate the shadow angle wheel). This gives the halo effect to the flame.

Monday, September 05, 2011

Drag and Drop Images Straight from the Browser

Don’t overload your computer – drag and drop images straight into your Pages document without first downloading them to your hard disc. The image will be stored with the Pages document and could always be easily extracted when needed as a separate file.

When you find an image you want on the internet click on it and hold, then drag it from an open browser window to an open Pages document. When Pages are ready to receive the image a blue outline will appear in the document. The blue contour shows where the images will sit: just on the page or inside a shape that you have already created in the Pages document.


Now, to get the image back from Pages open Inspector>Metrics and click on the little icon that shows in the Metrics file window. Hold and drag it to the Desktop or wherever you want it to sit.

That's it, easy-peasy!

This trick may be especially useful for Windows switchers. Macusers know that a lot of work is done by dragging and dropping.

Remember about copyright: look for free domain images on wikipedia or some such, or ask for permission to use an image.

Read this earlier article: Extracting Photos Back from Pages.

Thursday, September 01, 2011

Quick Scrolling

Scrolling down a long document or a web-age can be annoying no matter how good is your mouse.

Here is a different technique I've discovered recently:

Press Option (Alt) and click in the vertical scroll bar, roughly where you want to go in the document, near the end or near the middle. You'll jump straight there. Without Option pressed clicking in the scroll bar will move you just one page. Using Option lets you jump much faster.

Another efficient method of skimming through a long document is using Command+F function - search. It works within Pages (opens search window), but it also works in most browsers. In Safari a little search window opens at the top, in Firefox at the bottom. Type in a key word, something you're looking for, and then click 'Next' or 'Previous'.

Wednesday, August 24, 2011

I Work in Pages Reaches 22,000 Visits.

Another thank you note to readers and supporters of this blog – it has passed 22,000 monthly pageviews mark and daily visits are about to break through a thousand mark. While the largest readership is in America, the UK and other English speaking countries, I am especially pleased with having huge audiences in Germany, the Netherlands and Sweden.

Friday, October 29, 2010

Frequently Used Repeated Text. Storing for Easy Access.

A reader if this blog recently asked me if there is a way to store frequently repeated text, i.e. disclaimer, address, slogan or business description, in such a way that you have quick and easy way to copy-paste it into a new document.

It would be a great idea to have two or more Clipboards - like you can have several Inspectors open for one document - store repeated text on one clipboard, use another for copy-pasting. But no, we don't have that option. Still there are several other simple ways of storing repeated text.

- Put your file in the side-bar of a folder. In the side-bar of any open folder there are several folders by default: Home, Applications, Desktop etc. You can drag any folder or file there for quick access. So type your frequently used repeated text in TextEdit, save and drag to the Side Bar. Next time you need it, click on the file alias in the Side Bar and the file will open (launching the application in which it was created). Select the text and either copy-paste it or drag to your document.


- Drag from Stickies. Another similar trick is with Stickies. Launch Stickies (if they are not in the Dock by default, find them in Applications folder), type your text, highlight it and leave the sticky hanging somewhere in the corner of your screen while you work on the main document. Current versions of Stickies can make them float in front of all other open windows and be translucent - you can see your document even when there's a sticky hovering over it. When you need the repeated text, go to the sticky, click AND HOLD on the text and drag it to where you want it appear in your document. You don't need to switch Applications - grab and drag without leaving Pages, or whatever other programme you are in.

- Put the file with repeated text in the Dock. Two options here.
First, on Macs, open windows  collapse and sit in the right-hand side of the Dock when you click on the yellow button or double-click on the top bar of the document. You can leave a document with repeating text there.
Second, if you need the repeated text for a longer time, drag the icon of the file without opening to the right-hand side of the Dock and leave it there. When you need it, click - and it will jump up open.

Please drop me a line if you know other ways of storing frequently repeated text.

Sunday, January 17, 2010

Putting together a book in Pages

Mihail Stelios asks if it is possible to make a book in Pages.

Of course you can make a book in Pages. I have been producing a magazine and guides of up to 64 pages.

There are many things to consider. I think the main one is to plan thoroughly all stages of your work.

Here are a few pointers:

- start with deciding on the format (A4 or A5? or custom size? portrait or landscape orientation?), check dimensions with printers if you are going to print the book professionally. Normally, you add 3 mm all around to allow for printers' edge cutting. Calculate margins carefully allowing more space if the book is going to be bound. Set dimensions in a Pages document and save it to duplicate for all other pages of the book.

- calculate production costs, including packaging and delivery. Weight of paper and type of binding (stapled, ring or hard spine) affect the final cost and quality. Heavy paper allows for better quality, but may put your publication into a higher postal tariff bracket. Lighter paper saves on cost, but may make images show through paper on adjacent pages which would upset artists or advertisers. Check with printers and ask for quotes and look at samples. Don't be afraid to ask 'unprofessionally' sounding questions. Nobody knows everything in full detail.

- decide how you are going to deliver finished pages to printers. Most take PDFs, many are happy to bundle them themselves, some will ask you to do it. Make sure you have the software to convert Pages to press quality PDF (e.g. Adobe Acrobat) and check the settings with your printers. In my experience it is best to establish physical, face-to-face contact with printers you are going to work with. But if this is not practical, test run sending large files via File Transfer Protocol programmes, such as Zipper of SendIt.

- make a 'map' of your book. Put all pages as boxes on one page or on a double page and mark what goes where. Then print it out or keep the file in the Dock or in the side panel of an open window to have quick access to it. Mark finished pages as you go, it will save a lot of hassle later.

- make sure all files/pages are clearly named (e.g. page number, what's on it) and don't change them until the work is finished. It's very easy to loose track of where you are on each particular page. Make folders for each stage in work - e.g. 1 draft, 2 draft, 1 proofs, 2 proofs, printers proofs etc. and move pages from one folder to the next only when the work is finished.

- break all work into manageable chunks: front page/cover, back page/cover, contents, index, sections, don't work in large files. It is best to work page by page, or on two facing pages. However, if your book is one continuous body of text, e.g. a novel, pre-edit and pre-proof it BEFORE breaking into chunks for layout. Read more in 'Editing Large Texts' article.

- first design two facing pages of the main body of the book and then use them as templates for the rest. Pay special attention to small design elements - lines, clipart, page headers and footers. They should be the same, in exactly the same position on the page throughout the book. Metrics Inspector allows fixing co-ordinates down to a fraction of a millimetre. Remember that repeating lines, boxes, clipart are used to align pages when the finished work is bundled for the printing presses.

- use one, maximum two fonts for all of the book. For headings, sub-headings and notes use font variations, not different font.

- don't rush to finish, check finished work at least three times for typos and other mistakes, such as page numbers. Contents and index pages are especially important - page number in Contents must correspond to the page in the body of the book. It may seem obvious, but that's where mistakes often occur. It's worth checking the whole finished work for just one element - for instance page  numbers: go through the whole book to make sure you haven't lost any pages or haven't repeated page numbers. Then take another element,  for instance, font size of headings, and check that it is the same throughout the book. Then, check co-ordinates of lines, logos or clipart in headers or footers. They must be the same throughout the book too. This may seem unimportant, but if style is not consistent it creates an impression of sloppy, unprofessional product. 

- make sure you know and understand certain rules that are used in particular types of publications. For example, if you work on an arts catalogue, you should know that descriptions of  works of art follow a particular set of rules. Take a catalogue of a reputable fine arts firm and follow the pattern - for example, first, title (bold), then name of the artist (regular), date of the work, media (italics), position of author's signature (semi-bold), notes (light, smaller font size), provenance (regular font, but indented). Suggested price/deposit etc.

Have a look at Books in iPhoto on your Mac, you may get good design ideas from there - or even decide to make a book in iPhoto. I haven't used it myself, but have friends who have. The results are very good, but the costs are high, so it's only worth using for special occasions - family book, gift etc.


Check other articles on this blog under Press quality PDFs and professional printing (in the side-bar)

Friday, March 20, 2009

Colour palette shortcut

Colour palette shortcut is Command+Shift+C


When you work with colours in Pages the colour palette opens automatically. For instance, to change the colour of text you click on the colour bar in Text Inspector.


The shortcut is useful when you want to skip making several movements and clicks with the mouse. For example, when I want to check CMYK count of text (pure black comes out crisp in print, while Licorice is a bit fuzzy) I click in the text, open colour palette with the shortcut and get the information I need.

Colour palette works and opens with the same shortcut not just in Pages, but in many other Mac applications where you mainly work with text, including Mail and TextEdit.

Lists of keyboard shortcuts are under Help menu in Pages and in System Preferences>Keyboard&Mouse. Here you can customise or create your own shortcuts and also reassign a particular shortcut to a different operation. For example, my Mac came with Command+Space assigned to opening Spotlight. I reassigned it to switching between different languages as I use it more frequently.


Please read the article on why it is important to use shortcuts and not just mouse:

Health and Efficiency: three serious reasons to use shortcuts

The article contains a list of other posts about keyboard shortcuts.
Related Posts Plugin for WordPress, Blogger...

Copyright

© 2006-2010, 2010-2017 Alexander Anichkin, All Rights Reserved.
All content is original and was created by me, the author and publisher of I Work in Pages.
Quotations and images are attributed where applicable.
No republication without express prior permission.
Blog template by Blogger with customisation by the publisher.