Showing posts with label curving shapes. Show all posts

Thursday, June 20, 2013

Comic Life: Curve Text, Outline Letters and Put Images inside Them.

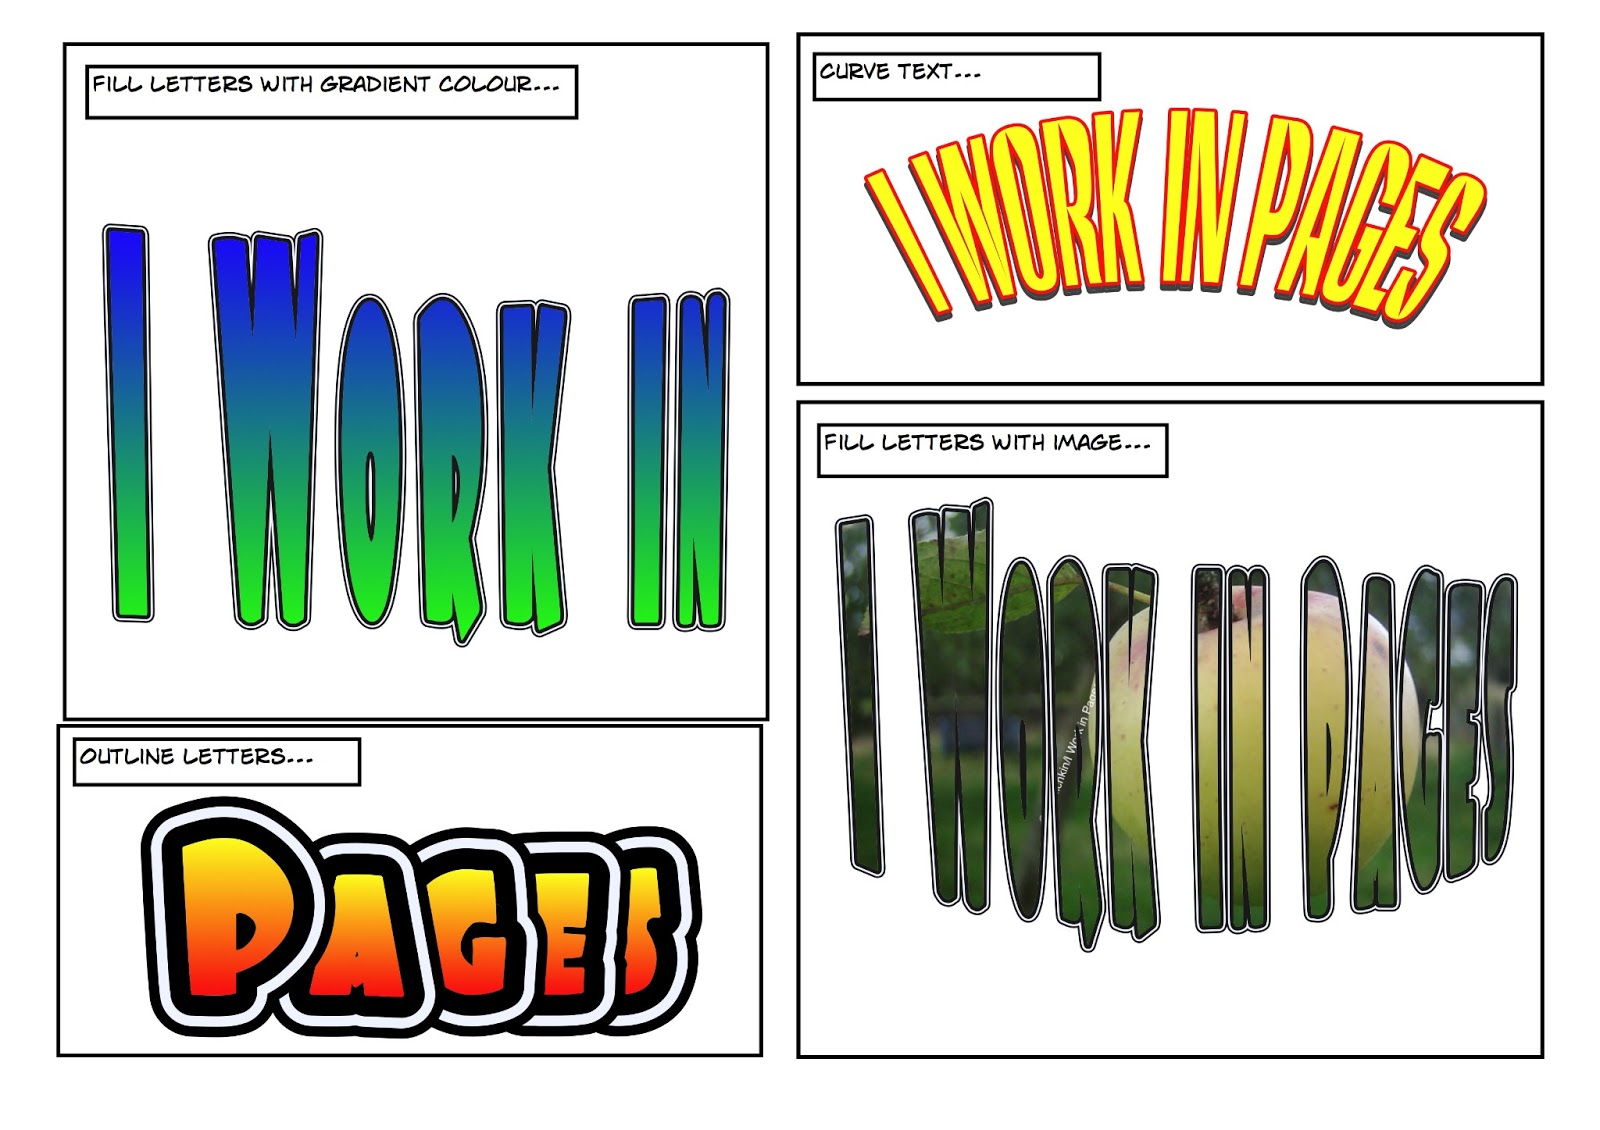
A comic showing what you can do.


Readers often ask how to curve text in Pages or how to outline the letters. Filling letters with images is another design trick popular with the readers of this blog.

I’ve mentioned several times here Comic Life, a graphic and layout programme from Plasq.com

It is designed to put together comic strips with graphic images or photos in various layouts and add captions and speech bubbles to the images.

Comic Life has a colourful and joyful interface and is very easy to use. It’s tools, menus and techniques are very similar to iWork’s. There is a familiar Inspector and many icons in the Toolbar are the same as in iWork. If not they are easy to understand. If you are already comfortable with iWork it will take no time for you to start using Comic Life straight away, simply by following prompts and clicking around.

Full completed designs can be exported to a number of popular formats, including PDF, ePub, JPEG and PNG. And elements of Comic Life designs, such as chunks of text or text and graphics can be copy-pasted into iWork projects.

Comic Life may look like child’s play but it has a number of powerful features not available in iWork. Here is what you can find in Comic Life 2.2.6 that can be useful in iWork projects.
  
1. Curving text.
Text can be curved by dragging blue handles of the selected text box. Click on Lettering in the window at the bottom of your document and drag it to a comic panel.

2. Outlined text.
Text in templates is already outlined. Change the number and colour of the outlines in the Graphic Inspector under Stroke.

3. Colour-filled typography.
Letters and other typographical symbols can be colour-filled. Many come with gradient (changing) colour. Choose either gradient or solid colour fill in Graphic inspector by clicking in the colour well and then in the colour palette. Click on the comic panel to choose a background colour for the panel.

4. Image inside text.
If you want to put an image inside letters, go to Graphic Inspector and choose Image from the Fill drop-down menu. Drag an image from iPhoto or from the Desktop into the image well. It will fill the letters. Here, I’ve used the same apple photo that’s in the graphic panel and favicon of this blog.

There is much more of course. Comic Life is a fun and useful programme that will complement whatever you do in iWork.

Comic Life retails for $29.99 on Plasq.com and from Mac App Store. 


Friday, May 10, 2013

More Runners Drawings.

I've made a few more runners, this time in colour and featuring both a man and a woman. All drawings are a combination of lines drawn with the Pages Draw tool (or Pen).

The brown colour is Cayenne and the grey is Steel from Crayons in Colour Viewer. The blonde woman's hair is a slightly modified Banana, and the dark haired woman's hair is Licorice.

The colour of the shadow in some drawings is a real human skin colour I picked off a photograph. The background rectangle is also coloured with varying shades of human skin off a photo (Graphic Inspector > Advance Gradient Fill > Radial Gradient Fill.)

All designs ©Alexander Anichkin. Contact the editor if you'd like to commission one like this.


Monday, October 29, 2012

The Remembrance Poppy. (How-to tips)


A few tips on how to make a Remembrance Poppy in iWork Pages. (See a short video below with added images.)

1. Import an Oval.

2. Change the default colour in Graphic Inspector. Click in the colour well and choose a colour from the Colours Viewer. Or mix a colour yourself. Here the red has these CMYK readings.


3. Make the shape editable: Format > Shape > Make editable. Besides the white square handles the oval shape will show red dots - editing points.

4. Drag the white squares to resize the shape.

5. Click on a red editing point and drag to change the shape of the oval.

6. When a red editing point is selected, it shows propeller-like handles. Click on the round tip of the propeller and drag to change the curves of the oval.  

7.  Finally, tilt the petal of the poppy slightly. Press Command, and drag a white square. 

8. To make the second petal, duplicate the first. Press Command and type D. Edit the second petal in the same way as the first. Move them together to form the Poppy.


9. Add another oval to the document. In Graphic Inspector, give it a black colour. 
Resize to the dimensions of the central button. To stop the oval losing its round shape, press Shift while dragging the white square handles. This constrains proportions of the shape.

10. Draw the leaf and the stalk with the Draw Tool. It activates when you choose the last option in the Shapes menu in the Toolbar, or Insert > Shape >Draw a Shape.
Click to make the first point of a shape. When you click again and the second point will be connected to the first with a line. 
Click several times to make a rough outline of the leaf and then click on the first point to ‘close’ - finish the shape. Change default colour to the one you want, for example Asparagus in the box of crayons in Colors Viewer (Inspector).

11. Make the rough shape rounded: Format > Shape > Smooth Path. Next, edit the rough shape by moving the red editing points (click and drag, or type on the keyboard arrows) and dragging propellers. 
Each rounded point of the shape can be made ‘spiky’ again. Select the editing point and double-click on it.

12. The poppy stalk can be made with the Draw Tool, or by inserting a Rectangle from the Shapes menu and editing it – Format > Shape > Make editable.

I’ve added the curved text ‘Poppy Appeal’ to the button here. There is no easy way to curve the text in Pages. So I made it in Comic Life and then pasted into the Pages project.

When the poppy is ready, you can use it in your iWork Remembrance Day project, or make a screenshot, export to PDF and use it anywhere in other projects. 

You can remove the white background in Preview. Use the Alpha tool there to ‘rub out’ the white. 

All images in this post are created by A.Anichkin, the publisher of I Work in Pages. I waive any copyright claims to them. Please feel free to reuse them in honour of the veterans and the war dead.

Click on the Remembrance Poppy label to see other posts with the Remembrance theme on I Work in Pages.

Related Posts Plugin for WordPress, Blogger...

Copyright

© 2006-2010, 2010-2017 Alexander Anichkin, All Rights Reserved.
All content is original and was created by me, the author and publisher of I Work in Pages.
Quotations and images are attributed where applicable.
No republication without express prior permission.
Blog template by Blogger with customisation by the publisher.