Showing posts with label keyboard shortcuts. Show all posts

Sunday, June 28, 2020

How to type grave accent on a QWERTY keyboard.


Keyboard Viewer shows letters
where you can type the grave accent
If you are used to the QWERTY layout on your keyboard but occasionally have to type in French or other languages with accents, you don't have to switch to the French AZERTY layout.

To type the grave accent, the one that goes to the left, press the Option (Alt) key and tap on the accent key to the left of the Z. Then type an 'a' and you get à the preposition instead of a the form of avoir (to have). This is good for capitals as well — À.

The same works for all other vowels. The screenshot here shows the QWERTY layout with all the keys where you can type the grave accent.

PS: I've checked this trick for Pages 8.1 version, it still works.

Accent grave: Accent qui marque le e ouvertL’accent grave sert aussi à distinguer des homonymes :  (adverbe) et ou(conjonction); à (préposition) et a (verbe avoir).

Friday, July 07, 2017

How to add accents on QWERTY keyboard — à.


A few years ago I wrote a post with tips on using various accents (diacritical marks) on the English QWERTY keyboard without switching languages, which can be a distraction if not real pain.

One mark that I missed was accent grave,  i.e. the accent in French that goes upwards and to the right.

To type it, press the Option (alt) key and type accent grave key, the one to the left of Z on the QWERTY layout. You will see the (sometimes) yellowed accent grave. Type the letter you want with this accent — and it's done.

In French, the presence or absence of this accent can make a huge difference. When you mean 'where to' it's à; when you mean 'have' or 'had' it's a without the accent. When you mean 'or' as in either or, it's ou, but when you mean 'where' [is it], it's où.

Mind your French, folks!

Other accents still work the same as described in my old post.

Friday, June 30, 2017

How to get back to the top of the document — or an internet page.


In an open Pages document, especially a long one, a longread or even a book, you are often stuck in somewhere in the middle when you want to get back to the top.

Instead of swiping your Touchpad endlessly or clicking your mouse, press the Command key (marked cmd) and tap on the UP arrow in the bottom right end of the keyboard. Your cursor will jump back right up to the beginning of the document.

The same works when you are on an internet page with a long text. lick in the body of the page, press Command and then tap the UP arrow. This will bring you to the beginning to the internet page.

The same works when you want to go right to the end of the page, for example to read Terms and Conditions. Press Command and tap the DOWN arrow. 

Thursday, July 25, 2013

How to find out where is your file or folder.

Command+Click on folder title


Command-click

Command and click the window title to reveal the folder or the file path, i.e. where the open folder or document is on the computer.

Remember that it works with both folders and files (documents.)

This trick is handy when you have a busy computer with lots of files and project folders.  It's best to organise your work as you go. Still, what if you have to find something you worked on last month, last year, or even a few years ago? 

Spotlight is brilliant in that it helps you find files by the keyword that you remember. When you hover the cursor over the name of the file in the Spotlight window it shows its path — where it is on the computer, folder after folder. But when you open the folder or the file you may not remember where it is on the machine. That's when checking the 'path' is helpful. It's like backtracking or zooming out — going from your current immediate location to a larger picture.

You can customise the toolbar of a folder window to have the path icon in it. In the Finder, click View > Customize toolbar and drag the Path icon to the toolbar. Click Done. When you click on the icon in an open folder, it shows the chain or path of all the folders where the one you're in at the moment is placed.


Read more in my new book 'iWork for Mac OSX Cookbook' (2012), follow me on Twitter at iworkinpages, like my page I Work in Pages on Facebook and add me to your circles on Google+

Sunday, June 09, 2013

Open All Files in a Folder: Command+O


This shortcut is particularly useful when you have a folderful of screenshots or downloaded images that are nor clearly named. To flick through them, open the folder, type Command+A to select all, then type Command+O to open all. Preview will open all images in one window. Click on a thumbnail to see the image you want, or click on arrows to go through the images one by one.

Command+A
Command+O

Tuesday, May 28, 2013

Insert image keyboard shortcut.


The keyboad shortcut to insert a photo or any other graphic image is

Command+Shift+V

I want to recommend it because, first, it is easy to remember. Everybody knows the copy-paste shortcut -
Command+V. 
Inserting an object can be seen as a kind of copy-pasting.

Secondly, there may be numerous situations when using the shortcut is more efficient than drag-and-drop.

For example, when you’ve collected or created dozens of images to illustrate your project, you would put them in a folder within another folder put away in a project folder.

Instead of rummaging through the folders to find the image and then dragging and dropping the image, you type Command+Shift+V and the Insert dialogue window opens. In this window, you find the folder and choose the image from previews. Click Insert and the image will appear in your document.

If you are more comfortable with using menus, look for Choose... at the end of Insert menu.


Read more in my new book 'iWork for Mac OSX Cookbook' (2012). Follow me on Twitter at iworkinpages, like my page I Work in Pages on Facebook and add me to your circles on Google+.

Thursday, May 16, 2013

How to find invisible objects on a page.


Sometimes your document has invisible objects, text boxes or shapes that affect your work. For example, text starts flowing around an 'underwater rock'. 

This may happen when you work on a continuing project (newsletter, magazine) or use a previously formatted document, customised to your needs, for new documents. Instead of creating a new one you may create a copy via Save as or Duplicate and type over and insert new graphic elements.

When deleting previous elements on the page you may miss an object or two. Leftovers from a previous project without lines, frames and colour fill may stay hiding in you document.

To see if there are any leftovers that you don't need in your current document,

- click away so that cursor is not within text  or click on a floating object;

- type select all: Command+A, or choose Select All from the Edit menu.

- click on the unwanted element to select it and delete.

Sunday, March 03, 2013

Where is the Command key?


In case you are confused about what is the Command key on an Apple Mac, here's where it is:

Command key adds additional functionality to keyboard shortcuts in much the same way as the Control key does in Windows.

There are two Command keys on a standard Apple Mac keyboard. If you've learned to touch-type, use the right one when you type letters on the left-hand side of the keyboard, and vice versa. If you don't touch-type and you are a right-hander, use the key on the left. If you are a left-hander and don't touch-type, use the key on the right. 

Sunday, December 16, 2012

Where is the copyright sign on the keyboard?


If you decide that your text or photo needs copyright protection, you may want to add the  ‘copyrighted material’ symbol to it with your personal name or the name of your business.

The symbol sits on the same key as the letter ‘g’ on British and American QWERTY keyboards. Press Option and type ‘g’, you will get the ‘c’ inside a circle — ©. On the French AZERTY layout the sign is with letter ‘c’. Press Option and type ‘c’.

Registered (®) sign is Option+R on both QWERTY and AZERTY layouts.

Copyright (©), registered (®), trade mark (™) and a number of other letter-like signs are also in the Character palette. Under Edit menu choose Special characters and when the character palette opens go to Symbols >  Letterlike Symbols. Find the sign you want, click on it and drag to your document. It inserts in text like a letter. 

Characters from the pallette work with TextEdit too: access the Character palette via Edit > Special characters.

Tuesday, March 13, 2012

Where is the Euro sign on keyboards.


NB: just checked it for the current Mac OS, it still works (July 2019)

Make of it what you will, but on the French AZERTY keyboard, the Euro is an option for the Dollar. 

And there is a slight difference in the position of the Euro sign in QWERTY keyboard layouts.

In US Qwerty layout, press Option+Shift and type 2:

⌥+⇧+2 = €

In British English Qwerty, just press Option and type 2:

⌥+2 = €

In AZERTY (France) layout, the Euro sign is on the same key as the Dollar sign on the right of the top letter row. Press Option and type Dollar:

⌥+$ = €

On British Qwerty, the dollar is Shift+4 and the pound is Shift+3. However, on US Qwerty, there is no pound at Shift+3. You have to type Option+3.

Why this confusion? Originally, keyboard layouts were developed for typewriters in 1880s and computer keyboards simply adopted the already existing layouts adding new signs as options. 

It's nobody's fault if € or @ are used today more frequently than § paragraph sign. Has anyone used § lately?


Read more in my new book 'iWork for Mas OSX Cookbook' (2012). Follow me on Twitter at iworkinpages, like my page I Work in Pages on Facebook and add me to your circles on Google+.

Thursday, October 27, 2011

Zoom In and Zoom Out Shortcuts

Some web documents are set in such small text (font) size that even with healthy eyes it's quite a strain to read them.

A quick way to enlarge the text is to use Zoom In shortcut:
Command+

To make the text smaller type Command- (minus)

This shortcut also works in Preview – very useful for reading PDF documents, books for example, that are typeset in too small font size.

Tuesday, October 04, 2011

The Rest Is Practice: Why Learn Touch-typing

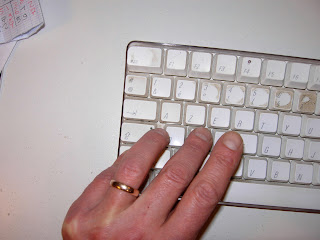
Left index finger goes on F.

First, you see typos as soon as you make them, and are able to correct them more efficiently, without having to stop typing and going through the typed text again. Second, and more exciting, you will soon notice that when you touch-type you can think as you write. After a while you also discover that you can type-write or type-retype much faster. Then, you can also perform many computer operations through keyboard shortcuts – save, select, copy-paste, etc., also without looking down. 

зфпуы - рщц ещ ьфлу сщщгкув щк сщдщгк сщвув увпуы шт ф ьфпфяштуб икщсргку щк ищщл -

The text above was supposed to be in English,  I just forgot to switch language mode from Russian to English – and carried on typing while looking at the keyboard and not at the screen. What a nuisance and a punishment for not concentrating. And not remembering to stick to touch-type. When you've mastered touch-typing, you can type without looking at the keyboard, your fingers find the necessary keys all on their own. Much like you tie your shoelaces or press on pedals in the car without looking down.

Why is it important to learn touch-typing (blind typing)?

With so much around us operated through keyboards, it may be considered a basic life skill. At first you may find that touch-typing slows you down, but the more you practice the more you find it liberating to see the text as it appears on screen.

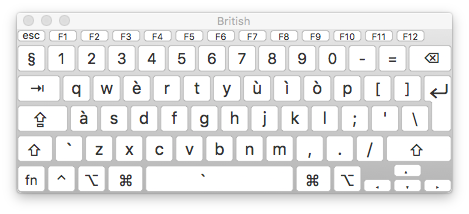
Here is how to start. First, learn the 'home' position of your hands. F and J keys on a QWERTY layout usually have little knobs studs – that's where your left and right index fingers should rest in the basic position. Move left finger to the right to type G and right finger to the left to type H. On QWERTY put the little finger of your left hand on A and the little finger of your right hand on ;. Thumbs should rest on the Space Bar. If a word finishes with a letter in the left-hand segment of the keyboard, hit space with your right thumb, if it's on the right, use your left thumb.

From here learn where all other keys are, relative to the basic position. Start with the basic position and progress to all-fingers touch-typing.

The rest is practice.

There are numerous courses and resources on the web to learn touch typing. Have a look at this BBC animated site, designed primarily for youngsters, but content-wise good for anyone.

Thursday, September 01, 2011

Quick Scrolling

Scrolling down a long document or a web-age can be annoying no matter how good is your mouse.

Here is a different technique I've discovered recently:

Press Option (Alt) and click in the vertical scroll bar, roughly where you want to go in the document, near the end or near the middle. You'll jump straight there. Without Option pressed clicking in the scroll bar will move you just one page. Using Option lets you jump much faster.

Another efficient method of skimming through a long document is using Command+F function - search. It works within Pages (opens search window), but it also works in most browsers. In Safari a little search window opens at the top, in Firefox at the bottom. Type in a key word, something you're looking for, and then click 'Next' or 'Previous'.

Friday, June 24, 2011

How to add accents to letters without switching languages

Option key

How do you type café with the accent sign on top of the 'e'?

If you use several languages on your Mac you probably know that it is dead simple to switch between the languages (keyboard layouts): Control Command + Space for the two most recently used or Control +Option+Space to switch between more than two languages used. (You have to add language options in System Preferences.)
Important UPDATE: In current OS (July 2019, High Sierra), instead of Command key use Control+Space bar to swithc between the last two languages. To go through all the languages you use, add Option (alt) key to the combination. 

However, simply to add an accent (diacritical mark) to one or two letters in your text, you don't need to switch to French, Russian, Spanish or German.

Option key (the funny one between Control and Command) gives most commonly used diacritical signs: press Option and type 'e' to get acute accent, common in French and also used as a stress mark. The accent will appear highlighted in your document, then type 'e' or another letter that needs the accent - é, á, ó or í .

To see the available combinations open the Keyboard Viewer and press Option.

To add circumflex (Welsh tô bach – little roof) press Option and type 'i' to get the highlighted accent circumflex, then type the letter you need: ô, î, ê or â.

Tilde sign, common in Spanish, is with letter n – ñ.

Two dots (trema or umlaut) over some letters in Russian, German and other languages are with u – ü or ë.

Cedilla, the little tail attached in French to 'c' when it should be pronounced as 's', is, logically, with 'c' – press Option and type ç.

It's cleverly programmed – it won't let you put diacritics on letters with which they are not used.

Switching between language layouts can be an annoying distraction, so learning this little trick can help improve efficiency. It takes little time to memorise accent combinations and then you use them automatically, much like touch-typing.

There is an article on Wikipedia describing diacritical marks and accents, their names and uses.


Read more in my new book 'iWork for Mac OSX Cookbook' (2012). Follow me on Twitter at iworkinpages, like my page I Work in Pages on Facebook 
and add me to your circles on Google+

Saturday, May 23, 2009

Keyboard shortcuts on this blog


Do many of us remember - or want to remember - the time before mouse? We used to do everything with just the keyboard, didn't we? There was an ad that had stuck in my memory from the seventies when the mouse first appeared: 'If you can point a finger, you can type'. Well, we've come the full round and re-learn the importance of keyboard.

Here is the list of my blogposts about various shortcuts I find particularly useful in Pages. A long list of shortcuts sits under Pages Help menu. And another comprehensive list of shortcuts is in System Preferences>International>Input Menu.


The usefulness of most shortcuts is self-evident, for example Command+S - Save. With many others it is not clear why you might need them and where they could be useful. That's why I scribbled notes about the ones I particularly liked while working in Pages.


Click on the label (tag) iWork Pages keyboard shortcuts or useful shortcuts to see all articles on this topic.

My top Pages shortcut: the undo
Health and Efficiency: three serious reasons to work with both hands
Look after your hands: useful shortcuts
Undo-Redo Shortcut: Zap To And Fro
How to design folders (about send backwards/bring forwards shortcuts)
Keyboard shortcuts: Hide and show invisibles and layout
Screenshots in Mac OS
What to do when picture wrapping pushes caption out of the text box - about Bring to Front shortcut
How to empty Trash (wastebasket) with locked files
Rose cover: simple tricks with photos
Mac-mouse equivalent of the 'right-click'
Colour Palette shortcut
'Up folder' shortcut on Macs
Valentine's clipart and graphics - uses for Command+D, Send to back and Screenshot key-shorts.
Use Preview to update repeated formats - how to use define as media placeholder short, select all, open file and open a selection of files.
Skip to my Lou: how to select random files
Say No to Autosave


Read more in my new book 'iWork for Mas OSX Cookbook' (2012)
Follow me on Twitter at iworkinpages  
Like my page I Work in Pages on Facebook 
and add me to your circles on Google+ 

Apple blossom photos by ©A.Anichkin/Rendezvous Media
Related Posts Plugin for WordPress, Blogger...

Copyright

© 2006-2010, 2010-2017 Alexander Anichkin, All Rights Reserved.
All content is original and was created by me, the author and publisher of I Work in Pages.
Quotations and images are attributed where applicable.
No republication without express prior permission.
Blog template by Blogger with customisation by the publisher.