Showing posts with label simple tricks with photos in Pages. Show all posts

Friday, January 04, 2019

Saving photos in Pages documents — and extracting them back.


It's been a while, but only recently I realised that I often put photos in Pages documents to save them for use later in a project or to keep text and illustrations together.

And it makes sense. You can only put very brief description of the photo in the name of the file, but in a text document you can give it a full description, place it in a context, format and edit it. And still keep it in the full original beauty.

One stumbling block that I encountered years ago when I started using Pages was how to get the photo back from the document if for some reason you want it back as a separate file. There is a simple trick that isn't obvious unless you know it.


In the Pages document click on photo to select it.

In the Inspector side-panel click on Image. You will see a small icon with the name of the file.

Click on the icon and hold.

Drag it to the Desktop — that's it, that will be the original photo file.

Now you can share it, use with a different document, upload it to the Internet etc.

(If you can't see the side-panel, go to the View menu, slide down to Inspector and choose Show Inspector).


Wednesday, December 07, 2016

How to extract photos from Pages documents.


A few years ago (in fact, ten! years ago)  I wrote here a about a simple trick that allows you to get a photo out of a Pages document. It's not obvious but quite easy once you know it; and useful because you are probably more likely to remember a Pages document where you used a photo rather than where and under what name the photo is filed and stored.

Once again, in the current version of Pages:

— click on the photo to select it in a Pages document;
— in the Inspector panel click on 'Image';
— click and hold on the photo file icon and drag it to Desktop;
— now you can put it into Photos, send as an attachment, change the file name or use for whatever purposes you'd been looking for it.

There you are, you got back the original photo file in all it's beauty.

Friday, August 02, 2013

Transparent Background.


Photo with sky in the background

Abby Olivo, a reader of this blog, is asking: Is there a way to make the background of an image transparent in Pages?

- If you want to make transparent an image IN the background of a document select it and drag the Opacity slider in Graphic Inspector.

If you can't select the image go to Arrange menu and choose Make background objects selectable. If the image is locked (it shows small black crosses in the corners) choose Arrange>Unlock.

- If you want to make transparent the background of a photo (lake, mountains, sea or sky with you and your children in front), first make a cutout of the people in the photo and then import the same photo into your document again, Send to back or Send Object to Background (Arrange menu), make it transparent (Graphic Inspector, drag Opacity slider). With the cutout over the second photo itself it will look as though the background is transparent, or semi-transparent.

Sky removed with Alpha.

To make a cutout, use Format>Mask with Shape. 
Choose Oval and when the mask appears go to Format>Shape>Make editable. Little red dots (editing points) will appear on the mask. 
Click on a dot and move it with the mouse of the keyboard arrows so that all of the image is inside the mask. 

This method is more complicated, but fun. 

If the background in your photo is in solid colour, eg blue sky, you can remove it with Alpha tool (it's in the toolbar and under Format>Instant Alpha. 

Photo by me A.Anichkin: war memorial in a Normandy village.


Read more in my new book 'iWork for Mac OSX Cookbook' (2012), follow me on Twitter at iworkinpages, like my page I Work in Pages on Facebook and add me to your circles on Google+

Saturday, June 29, 2013

Summertime. (Drawing in iWork)


Here is another design I made dreaming of a good relaxing summer.

It consists of several overlapping shapes. The woman's body is one continuous line with a number of editing points. The left hand is a separate shape and so is the hair. Shapes have gradient colour fill. The Sun on the right is an earlier design (see here).

The larger shape has image fill instead of colour fill.


In the picture below you can see the editing points. You can add (Command+Alt and move cursor over the contour of the shape, let go when pen with plus sign appears) or delete (select an editing point and hit delete) as many points as you like.


In this close-up you can see the curving handles of an editing point. Click on the tip of the 'propeller' and drag to change the curves of the shape.


Read more in my new book 'iWork for Mac OSX Cookbook' (2012), follow me on Twitter at iworkinpages, like my page I Work in Pages on Facebook and add me to your circles on Google+ 

Wednesday, September 26, 2012

How to make text stand out on difficult background.

Putting text over background images or simply on photos can be complicated when there are different colours and textures in the image. Parts of text can get completely lost.

To make the text stand out, put it in a Text Box, then go to Graphic Inspector and choose Fill > Color Fill. When Colours Inspector (Viewer) opens, choose a colour that does not radically contrast with the colours of the image, but is similar.

In Graphic Inspector, drag the Opacity slider to around 50 percent. Remember: you should be changing the opacity of the fill colour, not of the text. The colour fill becomes semi-transparent, allowing the text to be clear and sharp, but with the background image still visible.

Here is how it works with a macro photo I took the other day. It shows a greenish lichen on the mostly grey trunk of a rowan tree. (See my other photos on The Rendezvous Photo Journal).

Before:


After:

The grey used for colour fill here is the Silver from the box of Crayons in Colors Inspector with opacity set at 50 percent.


Sunday, September 16, 2012

How to add a picture frame and a copyright signature.


To add a picture frame with curved edges, that looks like an old fashioned photo print, and then add your signature with the copyright sign, you can do this:

1. Import your photo into an iWork document (drag and drop)

2. In Graphic Inspector, click on the drop-down menu under Stroke and choose Picture Frame.

3. Click on the picture frame styles menu and choose the one which gives a ‘curved edges’ effect. Adjust the shadow with the slider there. 

4. To add your copyright signature to the picture, click on Text Box icon in the Toolbar and type in your name. To add the copyright sign (©), press the Option key (alt) and type G.

5. Change the colour of the text to white to place on darker parts of the picture. Select text and click on the colour well in the Text inspector. Choose colour in the Colors Inspector.

6. Move the text box to a corner of the picture, rotate vertically if you want to. To rotate, press the Command key and drag one of the handles of the Text Box.

Export your iWork document to PDF or other graphic format. 


Monday, February 13, 2012

Combine layout and text boxes to create a multi-column design.


Read this previous post about the background for the page shown here.


This magazine page shows the layout grid (shortcut to show: Command+Shift+L, type again to hide) and all the objects on the page selected, showing their handles.

The page is designed in Word Processing mode. You have to choose the mode when you start your project. 

Note that the top of the page has a one and four-column layout for text. You can choose the number of columns in the Layout Inspector. 

The heading at the top is in one column, then there is a layout break, followed by the four-column layout. 

The lower half of the page is a combination of two Text Boxes and two graphic images, slightly tilted. 

To tilt, use rotate function: press Command and then drag one of the handles of the photo. You can use rotating wheel or arrows in Graphics Inspector. 

There is also a flip function. In the left photo the airplane can go leftward or rightward when you flip the image. Be careful: if there is lettering in the image, it will be inverted like in the mirror if you flip the photo.

In this design, what holds the text in four columns at the top half of the page is wrapping. Text boxes in the lower half push the text above into the four-column layout. 

Adding a layout break at the end of the article at the top of the page will also keep the text in four columns. But you may find that using text boxes alongside the layout gives more flexibility.

In Page Layout mode, use Text Boxes to create a multiple column layout.  

The image here is a screenshot. Actual PDF will have a much higher definition suitable for high-end printing.


Read more in my new book 'iWork for Mas OSX Cookbook
Follow me on Twitter at iworkinpages  
Like my page I Work in Pages on Facebook 
and add me to your circles on Google+ 

Friday, November 04, 2011

Put Remembrance Poppy on Your Photo

Finished photo with a Poppy


Here is a simple how-to:

- Drop a photo of yourself into a Pages document;

- Next, insert a photo of red poppies or a snapshot of the British Legion Poppy Appeal lapel poppy;

- If there are many poppies in the photo put a mask on it to leave just one;

- Remove background with Instant Alpha tool, so that only the red poppy is left;

- Resize and position the Poppy over the photo the way you like it to look;

- Take a screenshot, print to PDF or Jpeg - and use as avatar, favecom, profile picture, etc.

Click on Remembrance Poppies label (here, or below this post) to read other posts about Remembrance Day theme and making your own clipart with poppies.
Add photo of poppies


Remove background with Alpha

Mask to leave one poppy
Resize and reposition.
 Photos: ©A.Anichkin

Tuesday, September 06, 2011

How to Frame a Picture.

Pixellated frame

I've written a few times about designing cards on this blog, including a 10-step tutorial which includes finding clipart, making original shapes and using simple tricks with photos.

Here I just want to add a little word of caution: if your card is meant to be printed out and especially if you expect a high print quality, don't use picture frames provided in Graphics Inspector. (This is in response to a reader's question: he designed a book in Pages, but used picture frames from the selection in Graphics inspector)

They look nice on screen and even in print when used in small dimensions. But if you enlarge the image you'd see that the frame pixellates badly (small squares - pixels - show).

To avoid that make your own high-definition 'frame':

Coloured shape behind image.
– create a shape, eg. rectangle with solid colour fill, and slide your photo (image) over the created shape, adjust dimensions so that it looks as though the image is within a frame (pic. left). For additional effect, add a white rectangle between the picture and the coloured shape (pic. below right). This also improves the print quality, because the intense colour of the shape may affect the colours of the picture.
Coloured shape, white, then picture.


– instead of a coloured shape use a photo – take a macro shot of your wooden chopping board, or the garden table, or gravel, sand or thick foliage. Here (pic.below) I've used a picture of a beech hedge in winter.


– on the internet you may find high-resolution images of museum paintings with elaborate carved frames. Download the image, import it into your Pages document and cover the painting with your own picture while leaving the frame visible.

Slide white shape over 'frame', picture over white.


Image: 'Sappho', a fresco from Pompeii.

Monday, September 05, 2011

Drag and Drop Images Straight from the Browser

Don’t overload your computer – drag and drop images straight into your Pages document without first downloading them to your hard disc. The image will be stored with the Pages document and could always be easily extracted when needed as a separate file.

When you find an image you want on the internet click on it and hold, then drag it from an open browser window to an open Pages document. When Pages are ready to receive the image a blue outline will appear in the document. The blue contour shows where the images will sit: just on the page or inside a shape that you have already created in the Pages document.


Now, to get the image back from Pages open Inspector>Metrics and click on the little icon that shows in the Metrics file window. Hold and drag it to the Desktop or wherever you want it to sit.

That's it, easy-peasy!

This trick may be especially useful for Windows switchers. Macusers know that a lot of work is done by dragging and dropping.

Remember about copyright: look for free domain images on wikipedia or some such, or ask for permission to use an image.

Read this earlier article: Extracting Photos Back from Pages.

Wednesday, April 06, 2011

How to 'Age' a Piece of Paper

I wrote about 'folding' a corner in this post a few days ago. If you want to give the page the yellowed, aged effect, one simple way of doing it is to import the image into iPhoto, click Effects and then Sepia. Try Antique as well. If 'yellowness' is not enough, click on Boost Colour.

Here is how the note-pad page looks like after the process.


This image is a scan of a page I tore from my pad. If you don't have a scanner, try setting a digital camera (or your mobile phone camera) to macro and just photograph a piece of lined paper, crop the image in iPhoto or Preview afterwards and use as clipart.

Oh, and have a look at the Collector's template, it has several clipart images of 'antique' paper. Select and copy-paste into your own project.

Notepaper from Collector's template

Friday, August 13, 2010

Transparent Text (Putting Image Inside Letters) - Simplified Process

Read the original full tutorial here,
and see examples here and here and here.

I thought the step-by-step guide to putting an image inside transparent letters might be too complicated for less confident Pages users. Here is a simplified version, skipping details and additional effects.


- type text as usual (black letters on white background), make them bold, enlarge;
- make a screenshot of the text: Command+Shift+4 (⌘+⇧+4), image should appear on your Desktop;

- put screenshot over the photo.
It may be easier to open a new blank document and import the photo into it, then the screenshot of the text.

- remove black text with Alpha
- you should see your image through letters now.


 Here I put a panorama of New York skyline inside the famous I love New York slogan. The heart shape is in the Character Palette>Symbols>Miscellaneous.

Original panorama photo of New York by Daniel Schwen

Sunday, July 11, 2010

Transparent Letters: Put Image Inside Words


A simplified version of this post in four easy steps with 'I♥NY' as an example is here.

Transparent letters with images showing inside them create a striking design effect, very attractive for magazine covers, flyers, posters or cards. I have seen claims that it is not possible, but in fact it can be done in Pages in a few very simple steps.

If you are an advanced user just this clue should be enough:

turn your text into an image and then 'rub out' the letters with Alpha.

And here is a detailed step-by-step how-to:


1. Select photos. Here I took three of the most striking images of Normandy: Mont-Saint-Michel rock with its towering abbey, 11th Century Bayeux tapestry which depicts the Norman conquest of England in 1066 and the American Military Memorial above Omaha Beach near Coleville-sur-Mer.

Blend photos into a strip

2. If you haven't done so when opening a blank Pages document, at this point go to Document Inspector, choose Page Setup and click on landscape (horizontal) composition. That way you can make photos much larger which makes it easier to work with small details.

Add frame with blurred edges
3. Put photos in a strip, adjust sizes and in Graphic Inspector add soft picture frame.  As you see, now photos flow, blend one into another because of the soft, semi-transparent edges. Move Scale slider to increase or reduce the blur at edges.
Mask photos to highlight detail
4. Adjust the sizes of photos again and then use Mask (if it's not in your document toolbar, then it is under Format Menu) to select just the part of the photo you want to use in your composition. Here  you can see that I masked much of the very large photo of Bayeux tapesry to highlight the knight on horse. It takes practice to master masking, but it's worth it. Here are three ways to work with the Mask:

- Click Mask and drag the white square handles to change dimensions of the mask - the image that will appear in your document.
- Click and hold on the photo inside the frame, drag to move the photo itself inside the mask so that only the detail you want shows.
- Click on the photo, drag handles of the photo to resize it. When finished hit return or click on the black Edit Mask box.
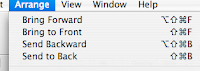

5. As you import images into your Pages document the latest goes on top of the previous. For example, if I put Mont St.Michel first, Bayeux tapestry second, then it would cover the Mont. And the American Cemetery would go over the tapestry. To change the way photos are layered go to Arrange Menu>Bring to Front or >Send to Back. In my example the Bayeux tapestry detail is in front of both the Mont and the Cemetery.

Now, the crucial bit, the text.

Squash text with spacing
6.  You may want to ad a new page to your document or open a new one. Type your words, choosing the richest, thickest font or font variation. You need this so that images are discernible within letters. Here I used Myriad Pro Black Condensed, but Helvetica, Verdana and many other font families have bold and condensed variations. Impact font is very thick. Make text as large as your page allows. Here the size is 177 points. And another tip: reduce character spacing to squash text so that letters just touch or nearly touch one another. Don't overdo, make sure the word(s) are easy to read.

7. Now, do one of the following: make a screenshot of the text (Command+Shift and type 4, drag crosshairs over the text), print your page to PDF or to JPEG (iPhoto). These three options give you an image of the text.


Rub out letters with Instant Alpha


8. Go back to the document with your photo strip and import the image of the text into it. Move the image over the photos and click on Alpha tool (if it's not in your toolbar, it is under Format menu). Click on the letters and drag to make them transparent. You should see the images through letters now!

9. Next, resize and move your text-image around to make sure that crucial details of the images within letters are not clipped. Here, for example, the spire of the Abbey and the head of the knight should be clearly seen. You may have to resize or move the photos to achieve the perfect look.


We can stop here. All the steps described so far shouldn't take longer than 30 minutes to accomplish. For a more striking effect read the next three steps.

10. Put the text on coloured background. Go back to the beginning of step 6 and in Text Inspector click on More tab, in Background Fill check Paragraph fill box and click on colour panel to choose colour.  Make sure that text and background have contrasting colours. Complete steps 6, 7, 8 and 9 and go to step 11.

11. To give letters voluminous, 3D feel add shadow to the text-image in Graphic Inspector. Try changing the colour, offset, blur and opacity of the shadow. Adjust the direction of the shadow by rotating the wheel in the Inspector. You will see how your letters suddenly stand out.

12. Next, reduce opacity of the text-image to make the underlying photos just visible. In Graphic Inspector slide the opacity control to somewhere between 60 and 80 percent. You should find a fine balance: making the background too transparent reduces the impact of text, but making it too solid will lose photos to a viewer.  If you'd ever observed how people watch images, you would have noticed that they love investigating small or half-hidden details. This is why this trick makes the final result so attractive. 


And of course you can 'draw' letters or original shapes in Pages and fill them with your images - or take solidly coloured shapes from templates (Catering Brochure, for example, has editable 'knives and forks').


Original photos courtesy of the Normandy Tourist Board (CRT Normandie)


Update (Feb.2015) : This article shows menus from an older version of Pages. While basic techniques described here remain the same, some menus will look different in the current version of Pages. This screenshot shows where to find Picture Frames in the current version. Select Picture Frame from the drop-down menu and then click on the picture icon to open a selection of different frames:


Read more in my new book 'iWork for Mac OSX Cookbook' (2012). Follow me on Twitter at iworkinpages, like my page I Work in Pages on Facebook and add me to your circles on Google+.

Thursday, July 01, 2010

Transparent Letters in Pages

I've long wanted to figure out how to make letters transparent in Pages to be able to put an image 'inside' the text. It came to me today. Come back to read the how-to later.

Sunday, May 02, 2010

Show Detail With Magnifying Glass. William the Conqueror


You may want to read first Show Detail With Magnifying Glass: How-To

Here I used another, only slightly different method of putting an enlarged detail of a picture  inside a 'magnifying glass'.

Instead of masking the second image, use Image Fill option in the Graphic Inspector.


- First prepare the detail as a separate file. Make a screenshot: Command+Shift and type 4, then slide the crosshairs over  the detail. This will give you a light PNG file that is easy to upload. Alternatively, select the detail in Preview by dragging the cursor, copy and then choose File>New from clipboard.

- Next, in the Pages document, insert an Oval shape and in Graphics inspector choose Image Fill. Find the file with the detail in the dialogue window and click to open.

- Slide the oval over the magnifying glass and resize to fit 'inside' the glass.

A fine touch: did you notice how image gets blurred at the edges of the real magnifying glass? To achieve this effect choose Picture Frame in Graphics Inspector and select the one with blurred edge (see screenshot above right). Another way of doing this is to add a blurred edge effect to detail in iPhoto (picture below left) and then import the image in your Pages doc.

The picture is part of the Bayeux Tapestry, depicting the Norman conquest of England in 1066 AD and the detail shows William the Conqueror. The original Tapestry itself is now on display in Bayeux, a medieval town in Normandy, saved from destruction by the rapid advance of British and Canadian forces on D-Day in 1944. The tapestry at the time was stored in a vault in the Louvre. The nazis wanted to ship it to Germany as the Allies approached Paris, but by the time the snatch team arrived in the French capital the Louvre was already out of reach - the Resistance fighters controlled that part of the city. (Read more in 'D-Day: The Battle for Normandy' by Antony Beevor)

Tapestry image courtesy of the Normandy Tourist Board/CRT Normandie


View Larger Map

Monday, March 29, 2010

Arrows and call-outs: show yourself in a mass photo


Suppose you take part in a mass public  event -  the London Marathon, a Spencer Tunick live installation or the Washington Tea Party. You want to shout to the world 'Hey, I was there!' - and show it. 

There is an easy way to make a card with an arrow, a circle or a call-out showing where exactly you are in a mass photo. Here is one of the London Marathon 2003 with the author passing the 8 Mile marker.

1. So, first, drop the image into a Pages document.

2. In the document menu click on the Draw Tool (little pen) and draw a rough outline with draw tool (or use one of the arrows provided in the menu if you are happy with just the straight arrow as on the right of my image.) You can see that just five dots are enough to make the call-out. When you are finished double click the last dot or hit Escape. It's good to uncheck wrapping in Wrap inspector so objects don't interfere with one another.


3. In Graphics Inspector choose colour, thickness and style for the call-out, choose endpoints and style of the line. Pages'09 version has a selection of lines that give a smudgy effect as though the line was drawn with chalk or crayon.

4. This is the fiddly bit, but great fun as well. Under Format menu choose Smooth Path and, also under Format > Make Editable. Now your line curves smoothly and has little red dots which can be moved with the mouse or keyboard arrows. When you click on a dot it also shows 'propellers'. Click and drag to extend and rotate them giving the call-out line exactly the curves you want.

5. Next create text box(es) for your message (e.g. I am here!), choose style and size, rotate the text box for additional effect (press Command and drag the box by the handles). Here remember to put dark text on light background in the photo and if the background is dark choose light text. If the background is mixed add colour fill (in Graphic Inspector) and adjust opacity so that the text stands out, but photo behind it is still visible.


You can also use the Call-out or Quote Bubble shapes for this kind of project. Edit them, rotate, change style - it works. (picture below right)

 
Now, the Marathon story. Emma, to the left of me in the picture, was my accidental running buddy. We just happened to run at the same pace next to each other, started chatting, passing water bottles and sponges as we went. This went on okay for about 20 miles, but then at around mile 22 she suddenly ran out of steam and stopped. I tried to encourage her: 'Just keep moving, rest, stretch and walk - and you'll be there'. Then I ran on and finished in 3 hrs 36 min., but Emma - she wasn't on the list of finishers.

Even world class runners drop out of marathons - Paula Radcliff did. But to this day I feel pangs of guilt for not staying with her.  If you know Emma or see her at this year's London Marathon, tell her I am sorry.


Photo by ActionPhotos
Related Posts Plugin for WordPress, Blogger...

Copyright

© 2006-2010, 2010-2017 Alexander Anichkin, All Rights Reserved.
All content is original and was created by me, the author and publisher of I Work in Pages.
Quotations and images are attributed where applicable.
No republication without express prior permission.
Blog template by Blogger with customisation by the publisher.