Showing posts with label design coupons in iWork. Show all posts

Friday, March 01, 2013

The Square Puzzle: 28 - 35.


In previous posts we've counted 28 squares inside the grid shown below. Next, the four larger squares in each corner of the grid. I am showing them here, as in previous posts, by separately selecting the borders of table cells and changing their colour from black to blue for demonstration.

To recap the process described in previous posts:

1. To select a cell border, click once on the table to select it.
2. Click again on a grid line, this will select the whole line, right across the table.
3. And click again - once, not double click - on one of the borders of a cell. This will select only one border in one cell.
4. To select all the cell borders that you want to select, press Shift after you've selected the first one and click on the other one by one.
5. In the Table Inspector, click in the small colour well under Cell Borders, and choose a new colour.

This picture shows a square comprising four smaller squares inside it. I've changed the colour of outer borders of four cells.

31
Inside the table we have four squares like this one (the other three are not shown here.)

In the previous post we counted twenty seven squares. Now we have thirty one: 27+4=31

Next, let's find and show four more squares inside the table, each consisting of three cells across and three down. Use the technique described above to select the cell borders and change their colour to blue.

Here they are.
One -
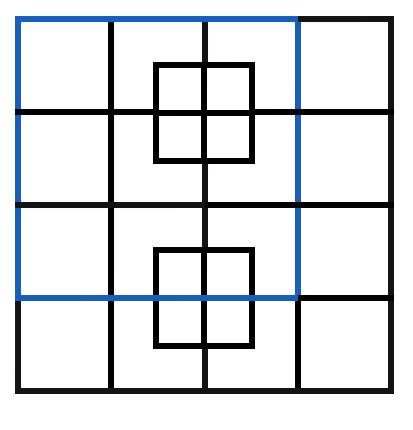
32
Two -
33
Three -
34
Four -
35

Thirty one plus four, thirty five squares. 31 + 4 = 35. In the next post we'll find another four squares hiding within this table.

As I said in previous posts, the ability to select cell borders separately and change their colour, thickness and colour fill (the colour inside the cell) is an exciting design tool. Like here, you can use it in puzzles, including crossword puzzles. You can design coupons where some cell borders are invisible.

Or you can create 'open angles' to use in the layout of your newsletter or brochure. And another use for tables is when you need to group a photo and a piece of text. To read about this last technique, see an earlier article on I Work in Pages: 'An underused layout tool — tables'.

Friday, February 15, 2013

How many squares can you count? (tables in iWork)

Here's a puzzle. You must count as many squares as possible in this grid.

I've counted 51.
(update 25 March: after a recount, I could only find 40!)


While you count I want to show you how to design this grid, and then how to highlight the squares you found.

To design the grid, import a table into an iWork document. Go to the Toolbar and click on the Table icon. iWork will create a default table in your document.

1. Go to the Table Inspector.
2. Uncheck header row.
3. Set the number of rows and columns at four.
4. Make the cells square: click in the Row Width and Column Width windows and type the same number.  Here it is 2.63 cm
5. Set the thickness (width) of the lines in the grid. Here it is five points.
6. If you want a colour that is different from default, click in the colour well under Cell Borders (not the large one under Cell Background!) and choose your colour.

When you create a table in Pages word processing mode it may appear as an inline object that is anchored to a point in the document. Go to Wrap Inspector and change the setting to Floating.

7. Create another table and set the number of columns and rows to two.
8. Make the colour of the grid and the thickness of its lines the same as the larger grid.
9. Change the size of the second table so that its square cells are (roughly, it's only a puzzle!) a quarter of the size of the cells in the large grid.
10. Drag the small table to sit flush where the middle squares of the first and second rows of the large table come together.

11. Duplicate (copy) the small table and move the duplicate to the middle of the third and fourth rows.

Now that the puzzle is ready, count the squares.

You can try to do it mentally or marking them on a scrap of paper. Here, I will highlight each square with a different colour.

First, click on the large table to select it. In the Table Inspector, click on the colour well under Cell Borders and choose different colour. We have sixteen squares here.

16
Next, the large square that forms the outside perimeter of the grid. It's seventeen squares now:

17
1. To change only the outside lines, click on the large table to select it all.
2. Then click again on the left side to select just the line on the left.
3. Press Shift and click on the other three sides. All four will be selected.
4. In the Table Inspector, click in the colour well under Cell Borders and choose a colour.

I'll carry on counting in the next post, but meanwhile have a look at an earlier article in 'I Work in Pages' to see how the 'select cell borders' feature can help in designing coupons: 'How to design coupons in Pages'. 

Monday, March 03, 2008

How to design coupons in Pages


If you work on a periodic publication with a distribution list or a subscription base, sooner or later you'll face a task of designing a coupon grid. Marketing and publicity material, surveys and community publications also often use coupons or mail-back cut-out forms.

Many coupons I'd seen before designing one of my own have grids with 'open tops'. That is, letter/number cells have borders on the sides and at the bottom, but not at the top.


Use tables to design them in Pages.


Click on the Table icon in the toolbar, or choose Table from Insert menu to import a table into your document.

In Table Inspector select number of rows (1) and columns (18 in my example).

Choose width, style and colour of table borders.

Select the top border of the table (see picture below). In Table Inspector>Cell Borders click on drop-down menu and select None.


Now you have a nice looking grid like in the coupon above. If you need several rows for your coupon select the whole table and duplicate (Command+D) or copy-paste it.

This is what makes tables different from other objects - you can select any side of any cell in the table separately. Click on the table grid line once to select the grid line for the whole of the table (picture above). Click again to select the side of just one cell (picture below).


You can't select each individual side of an Object or a Text Box. This particular feature of tables makes them an attractive tool for various other design tasks.

Check these earlier articles:
- Tables, an underused layout tool
- Sorting out Tables and Charts in Word
- Separating ads by an 'open corner'
Related Posts Plugin for WordPress, Blogger...

Copyright

© 2006-2010, 2010-2017 Alexander Anichkin, All Rights Reserved.
All content is original and was created by me, the author and publisher of I Work in Pages.
Quotations and images are attributed where applicable.
No republication without express prior permission.
Blog template by Blogger with customisation by the publisher.