
Note: see the finished map and read Part One of this article here
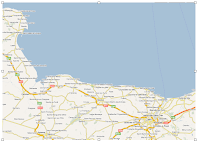
THE FIRST STEP is to find a relevant map and make a cut-out of the area you are going to use in your project.
Scan the map from a book, atlas or take it off the internet, Google maps for example. One simple way of doing this is to make a screenshot: Command+Shift and type 4. The cursor turns into crosshairs. Drag it over the area and let go, after a camera shutter sounds you get a .png graphic file on the Desktop. Import it into your Pages document.
NEXT STEP is similar to working with tracing paper. You need to cover your map with a custom shape. Click on Shapes in the toolbar and slide down to Draw tool. The cursor changes into a fountain pen tip. Each click of the 'pen' leaves a red dot in the document, the consecutive dots are connected to each other and as you continue clicking they form an outline of the map, the seashore for example. At this stage it can be done roughly, just to create the shape. Later the shape of the map can be edited: each dot you leave while creating the custom shape can be moved in editing mode.
The custom shape will have default wrapping, colour fill and stroke (frame). It is better to uncheck 'object causes wrap' in Wrap Inspector for the main shape as well as for all the next objects and text boxes, so that text on the map is not affected by wrapping.
In Graphic Inspector change colour fill and colour and thickness of stroke. You may want to choose 'no fill' to see the map under the custom shape, or, as I did, change opacity of the colour fill to about 50 percent (see picture below left). That way you get a feel of what your own original map will look like, but also see the cutout map area you are tracing.
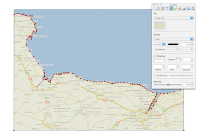
When the custom shape is finished roughly, edit it to follow exactly the contours of the cutout. Click on the shape, pause and click again. The red dots will show. Click on a red dot and it changes into a circle. This can be moved with cursor or with keyboard arrows. 'Snap to grid' function can be annoying at this stage as the circles will try to align themselves with other objects. To disable this function press Command as you start moving the dots.
To show the sea on the map, insert a rectangular shape, in Graphic Inspector choose a sea-like colour and resize the shape to fit with the right angles at the bottom of the map. Then under Arrange menu Send to Back.
After fine tuning the custom shape you are ready to add other map elements. Please come back to read my next posts.
Read how to add and edit arrows to the map here.
Read more in my new book 'iWork for Mac OSX Cookbook' (2012)
Follow me on Twitter at iworkinpages
Like my page I Work in Pages on Facebook
and add me to your circles on Google+

Alexander...great tutorial, and also, I didn't know about the Command override for snapping. That's a GEM of a trick to know about!
ReplyDeleteThanks!
I'm glad it helped - cheers!
ReplyDelete