Thursday, March 31, 2011

Folded Corner: How to Make It in Pages


I was folding the corner of a page in the book I'm reading and thought, hey, that could be a nice visual trick! How do I do it in Pages?

Here is what I've come up wtih:

- Draw a triangle with the Draw Tool (three clicks plus fourth to close the shape). There is a ready made 'Right Triangle' shape, but I found it too fussy to rotate and resize it.

- Position the triangle over the page where you are going to fold the corner. Here it's a page from a note-pad. Use snap to grids (Alignment Guides) to fit it flush with the note-pad.
Flip

- Pick colour of the background or simply choose white colour fill for the shape. This first triangle will hide the folded corner of the page.

- Next, duplicate (Command+D) the triangle. In Metrics Inspector flip the duplicate sideways, then flip vertically, position so that it points inside the note-pad.

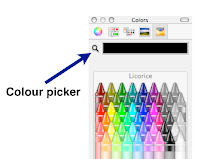
- To give it the natural look of folded paper pick the colour of the page in the note-pad. In Graphic Inspector click on the colour well, then on the magnifying glass in the Colours viewer next to the colour well and then click on the page of the note-pad as close to the shape as possible.
- To give the corner some volume choose ‘Gradient Fill’. For Stroke (shape frame) choose a colour slightly darker than the page and make it thinner. Add Shadow to the folded corner. Rotate the Angle wheels for gradient fill and for shadow to achieve the most natural look.

- Select all three Shapes (objects) and under Arrange menu Group them so that you can move, resize and copy the finished page with folded corner within your Pages project.
Settings for the corner shown

The whole work takes about 10-15 minutes.


If you also use PhotoShop, have a look at this article which describes how to fold corners in a different way.


Finished folded corner
Tip

Monday, March 28, 2011

How to Type Various Dashes and Hyphens


In ordinary day-to-day scribbling you may not need to go beyond the usual horizontal dash-hyphen at the right of the top row on your keyboard. For a more formal presentation, such as a letter to be printed out and sent by post or attached to an email, you may want to consider using 'proper' hyphens and dashes. If you write professionally, it may be the house-style requirement.

The three common types are as follows:

   Hyphen, it's on the QWERTY keyboard to the right of the zero.
   Longer, called n-dash. To type, press Option (Alt) key and type hyphen.
Still longer, called m-dash. To type, press Option+Shift key and type hyphen.

Don't type two hyphens (--) to represent a long dash, it looks untidy and amateurish.

If you edit copy and want to replace short hyphens for longer dashes, open the search window (Command+F). In the search space at the top type Space+Hyphen+Space (not the words – just hit the space bar, then hyphen key, then space bar again!). In the Replace window below type Space+Option/Hyphen+Space. Then replace all or one by one.

Here is what the Oxford English Dictionary says:

dash – a horizontal stroke in writing or printing to mark a pause or break in sense, or to represent omitted letters or words.
hyphen – the sign (-) used to join words to indicate that they have a combined meaning or that they are linked in the grammar of a sentence (as in pick-me-up, rock-forming), to indicate the division of a word at the end of a line, or to indicate a missing or implied element (as in short- and long-term).

On the various and often confusing rules and styles on hyphens and dashes read an extensive article on wikipedia.

Read also 'Editing Large Texts: the Many Uses of Command+F Function'

Friday, March 18, 2011

Add Arrows to Maps in Pages

There is a ready arrow shape in the Shapes drop-down menu.

Click to import. Arrows can be resized and rotated like any object. In Graphic Inspector change colour of the arrow and its ‘stroke’ – outline or frame.  and edit as suits your project. Drag the arrow into position on the map.

To give the arrow a curved look, go to Format>Shape>Make Editable and then Format>Shape>Smooth Path. The arrow now looks more like a mushroom, than an arrow. Double-click on those points where an angled/squared contour is needed, and get an arrow with a curving stem.
If you just want a thin arrow pointing to a particular spot on the map, use Draw Tool (last option in the Shapes menu). Click once, then again and double click on the second point. In Graphic Inspector set colour fill to ‘none’, choose Line in Stroke and add an arrow-shaped endpoint. Next, change thickness, colour etc. 

See another example and a more detailed how-to in this article: Arrows and call-outs: show yourself in a mass photo.

This post is Part Three of the popular tutorial D-Day Map: making maps, schemes and plans in Pages. Part Two is here. Read an earlier simple 10-step tutorial 'Maps in Pages'


Thursday, March 17, 2011

Using Pages to Make T-shirts


I've made this t-shirt as a present for my wife Miranda, a professional editor and writer.

A few tips.

Type your text, choose colour. Here I chose pure black for the word Editor: use CMYK sliders in the colour well to set CM and Y to nil and K (black) to 100 percent. The grey for 'the' I copied from the French Paper web-site: click on the magnifying glass (colour picker) in the colour well and then click on the colour you want to copy.

It may be that text looks too thin – the letters are too spaced. Tighten them up: highlight the text and in Text Inspector reduce Spacing. Don't overdo, otherwise the text will be difficult to read.   

Turn text into image. Print to PDF, save to iPhoto to make a JPEG file instantly or make a screenshot (Command+Shift+4 and drag crosshairs over the text) to get a PNG file. For best results use the PDF format and then re-save it as JPEG for uploading to a t-shirt making web-site.

Now, the image you get will probably have a white background. To put it on a t-shirt you need to remove it. Import the image back into Pages and remove the white background with Instant Alpha. Copy and paste it into the t-shirt printing application. If that doesn't work, create another shape in your Pages document, in Graphic Inspector choose None for colour fill and None for Stroke and move that transparent shape over the image of the text. Select both, copy and paste into an image making application, Preview for example. The transparent background should be preserved.

The credit for this trick goes to Ken Drake of KeynoteUser.com and is also described by Macworld. I've tested it and it works.

I've used CafePress, but there are other print-on-demand resources there, just google to see what suits you best. I placed the order on their web-site, paid through PayPal, the order was processed and confirmed within 24 hours, shipped within 48 hours and arrived in 10 days. The quality of the print and the shirt itself is very good.

Tuesday, March 08, 2011

Fancy Shape for Nicky's Wedding (Curves and Points)

Today is International Women's Day


I recently bought a Mac and am kinda looking for the easy way out without spending hours trying to 'play and learn.' I am trying to create my wedding invitations using Pages. I have a shape that I would like to use I am not sure if I just need to practice more but I am having an issue trying to make it one flowing line from using the 'trace paper technique'.
Any advice would be great. Thanks!  

- Nicky

Here is the basic shape with editing points showing:


First, create a rough outline of the shape with the Draw Tool in the Shapes menu. Under the Format menu, choose Format>Shape>Make Editable and then Format>Shape>Smooth Path. Red dots (editing points) show where you click with the little pen of the Draw Tool.

Second, you need to change the middle points at the top, bottom, left ahd right from curving points to angled. Double click on each of those red editing points – and they change from curve to angle, they become pointed, like arrows. Read more on how this works here.

Next, adjust the curves by moving the editing points and dragging 'propeller' handles that appear when you click on an editing point. Editing points can be moved by dragging or with the keyboard arrows.

Then, in Graphics Inspector change colour of the shape, thickness of its outline (frame), add shadow and try different colours, offset and blur for the shape to give it a more 3D look.

Time-wise, work up to this point should take 15-30 minutes, 
it's not hard and becomes easier with practice.

When you are satisfied, you can duplicate the shape (Command+D). In Metrics Inspector check 'Constrain Proportions' box and make the second shape (duplicate) smaller. Then move it over the first one – and you'll have a shape with double frame. You can change the colour of the shape, thickness and colour of the frame to achieve a more striking look. 

By default Pages have 'Alignment Guides' (Snap to Grid) function activated. When you move the second shape it will 'snap' to align itself with the first one which makes your job easier.

Group the two shapes under Arrange menu, so you can move them as one object.

Next, you can add a message inside the shape. Click on 'Text Box' in the tool bar and type the message.

Now, you can draw a shape like this yourself, or you can recreate it from an example somewhere else, using what I call 'tracing paper' technique.

Nicky wanted to recreate the shape from a commercial web-site, a business which makes a living by selling creative designs.  Using someone else's idea for yor own original design is perfectly legitimate while just copy-pasting is not.

And have a very happy wedding, Nicky, best wishes!

Nicky commented on this post, showing how 'tracing paper' technique can be used to draw cartoon-like images in Pages.


Read more in my new book 'iWork for Mas OSX Cookbook' (2012). Follow me on Twitter at iworkinpages, like my page I Work in Pages on Facebook and add me to your circles on Google+.
Related Posts Plugin for WordPress, Blogger...

Copyright

© 2006-2010, 2010-2017 Alexander Anichkin, All Rights Reserved.
All content is original and was created by me, the author and publisher of I Work in Pages.
Quotations and images are attributed where applicable.
No republication without express prior permission.
Blog template by Blogger with customisation by the publisher.