
 |
| Pages and Preview show the same set of Paper Size options |
Problems with setting custom dimensions in Pages projects seem to be quite common.
I’ve suggested one way of dealing with it in a previous post ‘How to Set Custom Dimensions for Pages Document’, but it doesn’t seem to work if you don’t have ‘Adobe PDF printer’ in your print options. Here is what happens with a reader’s project:
I’ve suggested one way of dealing with it in a previous post ‘How to Set Custom Dimensions for Pages Document’, but it doesn’t seem to work if you don’t have ‘Adobe PDF printer’ in your print options. Here is what happens with a reader’s project:
‘ My file is 17 x 11, for a full folded brochure. I created the custom size. When I open in Preview form PostScript it cuts my file directly in half, so I only see the left side. I don't have Adobe. I did try your suggestion. Adobe Reader is installed and in My Applications, and on my dock. But when I try print it does not appear in the drop-down. I did try to save as PostScript again, and dragged to preview just as you said to see if it worked, and it did not. Any ideas on why Adobe PDF does not show up even after installing it? Vicki’
I think I spotted where the problem is: changing the document dimensions in Preview too, not just in Pages.
Let's forget the Adobe side of this for now and only deal with dimensions.
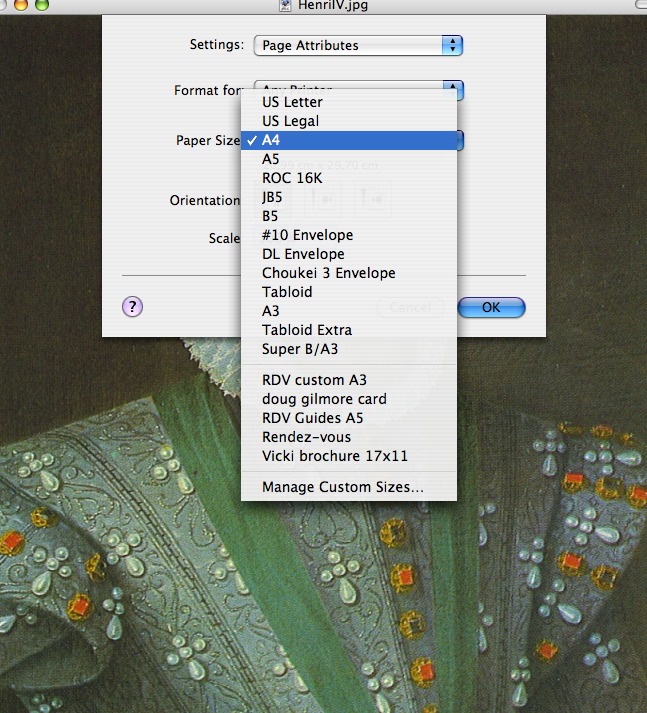
In Preview, open any document, for example your clipped brochure, go to File>Print Page Setup (see picture on the left). When Dialogue opens, click on Paper Size drop-down menu and choose your custom size 17x11, which you have already created in Pages and added to custom sizes in your Pages document (see previous article). Click ok and close the document. Then drag the PostScript file of the brochure onto Preview icon and it should open as a PDF with correct dimensions.
Now, this PDF will not be press-ready CMYK file, but printers who use digital process may not require CMYK separation and still take it into work, and even those who use larger off-set presses may take your PS file to convert to CMYK themselves, perhaps with an additional charge. (see this previous article on why the PostScript stage is important when you work with professional printshops).
You'll have to shop around where you are to see what's available. From my experience it's best to work with smaller printshops where you can talk face to face with someone who would understand your needs and the process you have used in creating your document.
It's important to think through your production process and decide where your work stops and others take over and not to try to go where additional specialised knowledge and skills are needed. There is nothing wrong or demeaning with division of labour, it has existed for as long as we, humans, have been on this planet, not just since the first version of Pages was released.
Update:
Several readers have asked me additional questions about setting dimensions and 'clipped' pdfs. General advice: use Preview to check that your document is going to come out in the right dimensions. Open the print dialogue and click on the Preview button.
And the picture is in reply to Lauren's questions (see comments). The screenshot is of the print dialogue, showing how to scale a large document to fit into a smaller paper format: click on 'Scale to fit paper size.'


I am having this clipping problem (but the quality of what I have got looks great, so thanks for the PS tip!). Now I am feeling like a numbnut though, because I am in Preview trying to follow the steps above, and I cant find 'page setup' in the file menu. Clearly i am being dumb about something. But what?! :)
ReplyDeleteOk- I have sorted out the above, page setup is under Print now. But even though I have changed the paper size, I am still only getting a tiny corner of my document once it opens in Preview. One issue may be that my original Pages document is huge - 1210mm x 914mm... it was a poster. I actually dont need it it be so big but I dont know how to shrink the overall file dimensions in Pages without cropping it. So.. I wonder if you could help with 1) Why it is still making a cropped PDF when I follow you PS method even though I have changed paper sizes in both Pages and Preview 2) How do you reduce overall dimensions in Pages? I really appreciate your blog, and any advice you can give on this?
ReplyDeleteno, it's not you, it's me - it should be File>Print (not Page Setup), then click on Paper Size in the dialogue window. Thanks for spotting this!
ReplyDeleteLauren,
ReplyDeleteto your Q 1 - after you've chosen your dimensions in the Print dialogue, did you press OK? I mean, when you 'print' your doc, does Paper Size show the dimensions you want to get? bot in Pages and in Preview?
to Q 2 - for viewing the document, click on the zoom drop-down menu at the bottom of the document and choose a smaller percentage. For printing, physical or to produce PDFs etc., in print dialogue, click on Paper Size drop-down menu and choose for example A4, then, lower down choose Paper Handling from drop-down and tick checkboxes against 'Scale to fit paper size' and 'Scale down only' (optional).
After this, you can print your giant poster on A4 (ordinary office letter format)
click on 'Preview' and check that it's not clipped. Then save to PDF or PostScript.
When Preview is open, there is another lovely trick that not everybody knows: go to 'Save as...' menu and save it as a new document - PDF, JPEG, PNG. From Preview.
It's a lovely trick that not everybody knows.
I've just updated this post and included a screenshot of the print dialogue.
Delete