Sunday, June 16, 2024

How to get info about your Pages file


This is a simple trick for when you need to get information about your file, e.g. when you created it, downloaded it etc. 

Click/tap once on the icon of the Pages document on the Desktop (Bureau in French) and then press Command and type i. An Inspector window will open showing all sorts of data about your file, including a preview of what's in it.

I wrote about this some time ago. Here I am revisiting the same trick for a more recent Mac Pages version — Pages 14.0, Mac OS Ventura.

Here is how it should look:


Thursday, June 13, 2024

How to remove background for print-on-demand uploads


After you've exported your design from Pages to PDF, and then to PNG at 301 pixels per inch, under View menu go down to Show Markup Toolbar, click on Alpha (the little magic wand, second from left) and drag over the background. 

The screenshot below shows what it looks like when Alpha is at work. Now, click Delete and the background will be wiped out. The next step is to go through the remaining bits of the background inside some letters, like R, O, and especially A. It's a bit of a fuss, but in the end you will get an entirely transparent image ready to upload to your chosen POD outfit. \

You can see — and purchase — mugs, t-shirts, bottles etc. with this design on my CafePress page. Here is the link. 

Feel free to contact me if you want to order a personalised design. 


Tuesday, June 11, 2024

Pages to PNG: How to make transparent files for design uploads


Pages - PDF - PNG


Here is a short script for those who dabble in graphic design in Pages, and print-on-demand (POD). 

1 Make your design in Pages.

2 Under File menu go to Export to (Exporter vers... in French) and chose PDF. 

3 Open the PDF file in Preview, the Mac does it by default. 

4 Again, under the File menu slide down to Export (Exporter...) and in the opening window click on the Format menu and chose PNG. Here, set Resolution to 301 pixels per inch, which is an industry standard for professional/commercial printing.

5 Save, open the PNG file and under the View menu open Tool Bar (or Markup Toolbar), in the tool bar click on Alpha, second from left at the top.

6 Drag the cursor over the background, and when the blinking cursive line appears, click delete. You will get a checkered grey background. This is a transparency. Now, check for the white spots inside some letters of your 'slogan' design, like A, D, P, O, B. These have to be 'whiped' out with Alpha too. Click and drag, then click Delete. Once you're done with these, save your file and it's ready for uploading to whatever POD site you use.

Once you get to grips with this, it takes less than five minutes from doing a text slogan in Pages to uploading a ready design for a mug or a tee-shirt. 

And here you can see one of my recent designs on CafePress, one of the top POD sites. I have used the Pages to PNG method described above. 

Good luck with this! 

Tuesday, June 04, 2024

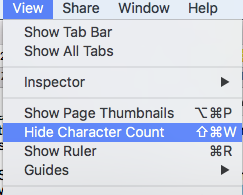
Where is the word count?

As I am revisiting the recent versions of Pages I note that the word count, a subject of high interest among users, is now in the toolbar menu.

Click on the icon in the top-left side of your Pages document (the Toolbar) and slide down to Show Character Count. Click on it and get the word/character/paragraph/pages count at the bottom of your page. 


(Pages 14.0, Mac OS Ventura)

Friday, January 01, 2021

Happy New Year 2021!

 (Drawing and painting in Pages)

My annual New Year's card with a study after Modigliani, a Snowman and a little Robin. To add the past year's flavour I drew a few covid masks, a subject of so much debate and angst.

Everything here is drawn using Pages tools.

The mask itself is a modified Polygon from the Shapes menu with a Border and an Advanced colour fill. The straps are curved lines with endpoints.

The figures 2021 are drawn with the Pen Tool. When you click on Shapes in the Tool Bar you can see it in the top right corner.

'Modigliani's' model is a combination of edited shapes with colour fills.

Happy New Year!


Sunday, December 27, 2020

Happy Christmas 2020!

(Drawing in Pages)

Miserable as this year has been, still there is a cause to celebrate Christmas as a beginning of somethinig new and better.

Here is a drawing I made with tools available in Pages.

The faces are edited shapes from the Shapes menu. 

Eyes, eyebrows and the beard I made with the draw tool, the little pen you see at top right when you click on Shape in the Tool Bar.

Halos are coloured shadows from circle shapes hidden behind the faces. 

Note that Mary and Joseph have shadows going down to indicate their bodies.

The second image shows the shapes used in this computer graphics when selected.

If you have any questions ask me. 


Sunday, June 28, 2020

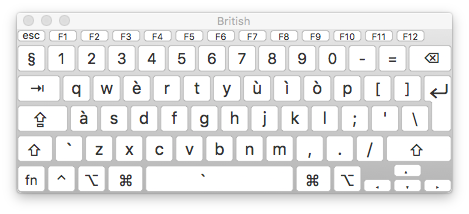
How to type grave accent on a QWERTY keyboard.


Keyboard Viewer shows letters
where you can type the grave accent
If you are used to the QWERTY layout on your keyboard but occasionally have to type in French or other languages with accents, you don't have to switch to the French AZERTY layout.

To type the grave accent, the one that goes to the left, press the Option (Alt) key and tap on the accent key to the left of the Z. Then type an 'a' and you get à the preposition instead of a the form of avoir (to have). This is good for capitals as well — À.

The same works for all other vowels. The screenshot here shows the QWERTY layout with all the keys where you can type the grave accent.

PS: I've checked this trick for Pages 8.1 version, it still works.

Accent grave: Accent qui marque le e ouvert. L’accent grave sert aussi à distinguer des homonymes : où (adverbe) et ou(conjonction); à (préposition) et a (verbe avoir).

Sunday, June 07, 2020

Jumping from word to word.


This little trick may be useful when you micro-edit a text. 

When you want to jump from word to word quickly, you don’t need to click with your moust cursor or swipe on the trackpad — and miss. 

Instead, press Shift and tap on right/left arrows. The cursor will ‘jump’ to the next word. 

Equally, you can highlight text word by word by pressing Shift and Option simultaneously. This can be useful for example, when you add hyperlinks to parts of the text.

Thursday, August 01, 2019

Clipart: telephone sign


(Emoji and Symbols)


Update for Pages 8.1, Mac OS High Sierra.

The telephone symbol can be found in two ways.

In the main menu at the top of the screen, go Edit > Emoji and Symbols.

This opens a huge collections of various non-letter or letter-like symbols, including the beloved of the internet generation silly faces and cute animals. The telephone symbol ☎︎ is right at the bottom of the window, in the section Sign/Standard Symbols and marked ♻︎ in the speed selection panel at the bottom of the window. By clicking on the double arrow sign there you can skip from section to section without having to scroll down a very long cache of options.

The second, more traditional way is to open the same window by clicking/tapping on the Language/Keyboard layout selection icon at the top right of the screen and sliding, again, to Emoji and Symbols.

Note that this works in Pages and in practically all Mac applications and browsers, including Google Chrome.

This post is an update to my previous articles on Mac clipart and various hidden places where you can find it. Click/tap on the clipart tag to read more. The previous post about the telephone symbol is here, I am going to update and link it to this.

The most recent article here described the Character Palette/Viewer. Now, in the current Mac OS (July 2019), it is replaced by Emoji and Symbols palette (viewer or window, describe it as you wish).  


©Alexander Anichkin. This blog is free to subscribe to but please consider donating via PayPal (button at top right of the blog).

Sunday, April 07, 2019

Blogger login problem after Google+ closure


For several days now there has been an 'endless loop' problem with logging in into Blogger.

When try to log in or go to Blogger from whatever other Google application, such as gmail, by  choosing Blogger from the services menu at the top right of the browser page, it takes you to the Welcome page inviting you to create a blog or log in. When you click login it takes you back to the Welcome page.

The solution here is to go to your Google profile and 'change' your profile (displayed) name. In fact, you don't have to change it, just type it in as it is or was and click go to Blogger. Than will take you to your usual Blogger page with blog posts, stat and all the other stuff.

Here is the direct link:  https://www.blogger.com/switch-profile.g  

Sunday, February 24, 2019

Clipart for Pages revisited.

(update for Pages 7.3)

About ten years ago I published a comprehensive review of various places on your Mac where you can find clipart and clipart like images, that come pre-installed on your computer. (See 'Clipart for iWork/Pages where is it')

Looking for clipart remains one of the top searches for Apple Mac users. Much of what I described in that old article still stands. Some things have changed slightly.

In fact, Apple has added some new collections of ready-made clipart. It's very easy to use,  just remember where it is.


For example, instead of Character Palette, there is now a Character Viewer.
To go to it, open System Preferences, choose Keyboard and click on Input Sources (that's where you add or remove additional languages that you may be using).
At the bottom of the window there is a box Show Input menu in menu bar. Tick it, and the language icon, a national flag, will appear at the top of the screen.
When you click on it, at the bottom you see Show emoji and symbols option. Click on it, and the Character Viewer will open.
Here you will find hundreds of clipart symbols, including, yes, emoji, but also many others, animals, flags, cars, stars etc.
Choose the one you want and drag it to your document.

You can also double-click it to add to your document, or — this is an additional beauty — to whatever text you are typing on the Internet, for example in a Facebook discussion or to your blog. Double-click the symbol to add it to your text. Like this, for example, 🤠.

Another hidden gem is 'image bullets'.
Everyone familiar with word processing knows about lists and bullets.
In Pages, open the Text Inspector (under the View menu, go to Inspector and check/tick Show Format).
In the Inspector side-pane, look further down for Bullets and Lists and click on No Bullets tab to open a drop-down menu. There you will see the Image Bullets option.
Click on it to show a host of attractive image bullets. They will appear at the beginning of each paragraph that you choose to have bullets.

Now, the last option there is Custom Image. If you choose it, you may add your own image, a mugshot of yourself or someone else, or an avatar, like in the Internet forums.
Use it to liven up your document when you prepare role-playing games, or teacher-student discussions, or when you write a script.

Sunday, February 17, 2019

Resetting display.


If you use an external additional display you may encounter this frustrating problem: screen seems to go wider than the display with menus on the dges half-obscured; images are distorted (squashed) and fuzzy; everything seems out of proportion.

Restarting the machine or calibrating the display may not resolve the issue.

One simple trick not to be forgotten is resetting the display. Disconnect (unplug) it from the computer, wait for about 30 seconds and reconnect. The display comes back to its usual behaviour.

It worked for me a few times, so I thought I should share it.


Sunday, February 10, 2019

Christian Fish sign.


We were talking about early Christians.

A friend, who is well-versed in Bible and Biblical stories, told me how they used the Fish sign as a secret password to recognise each other when Christianity was still considered a dangerous extremist sect and Christians were persecuted. I've always thought of it simply as a reference to the bread and fish miracle. But it turns out there's more to it.

You meet someone who you think might be one of yours. You put a dot in the sand with a big toe. The person standing opposite you would look at it and draw a curving line around the dot. You look at it and, with his foot, draw another curving line. They join up near the dot and cross at the other and, thus forming a representation of the Fish.

I decided to try it in Pages and here is what I got.


Click on the Shapes menu in the Toolbar of your document and choose the circle from the menu. Reduce it to the size of a dot.  
Click on the Shapes menu in the Toolbar of your document and choose the pen tool in the top right corner. 
Draw the first line by clicking in the document, then drag, let go to make the second dot, then drag again, let go and double-click on the last dot to finish the line. 
Adjust the curve as you like by dragging the midpoints, they appear automatically as you hover the cursor over the line. 
In the Inspector side pane make it thicker, change colour (here it is Mocha), and add shadow. 

Repeat the above to draw the second line. And you get a lovely looking Fish sign. 

Keep it in your document, make a screenshot or export to PDF to reuse elsewhere.


Sunday, February 03, 2019

Mac OSX Japanese problem.


When you use several languages on your computer, there is a curious problem in OSX 10.13.6 High Sierra, that I haven’t experienced before. With Japanese as one of the languages selected as ‘input sources’, my Mac begins to behave in an unstable way.

The symptoms include 
very slow or no response to keyboard commands; 
unexpected delay in response
and repeated keyboard strokes when non were executed by myself. 
Sometimes the Mac stalls completely with or without the ‘wheel of death’.

It is so bizarre that at first I thought I was being hacked or some virus took over my machine. 

After some discussions with fellow macusers and research I found that it was not just my machine. Many others have this problem as well.

Apparently this issue occurs when a language which uses many accents, like French in my case, clashes with Japanese kotoeri input system (you type with Latin characters and the computer changes them into Japanese characters).

So, the solution 
is to remove either Japanese, or the other language from input sources. 

To do that, go to System Preferences > Language & Region and click/tap on Japanese/Nihongo. 
Then, click on the minus symbol below the languages side-panel. 

Then, restart the computer and it will come back to its usual stable behaviour.

If you need Japanese rather than French, try removing French. I use Japanese only occasionally, so I can’t vouch for this. But removing Japanese has worked for me.

Meanwhile, we should wait for the Apple wiz-people to sort the problem. Ahh, well.


See this article for a slightly different description of the same problem and similar solution.

Tuesday, January 29, 2019

Where is my document data?


29 jan 2019

- Click on the document icon > Command+i, or
- Click/tap once on document icon > Control+click for on-screen menu > Choose Get Info

We have many different reasons to want to look up the document data — word count, type, ownership-copyright status, who commented on it and when. 

For me, one of the main reasons is to remember when I wrote (created it). When I work I get loads of side ideas that I want to scribble down quickly to develop later. Sometimes it’s a full sentence, sometimes just a couple of key words. Sometimes I put the words into the name of the document leaving the body itself blank.

Suppose it’s a reference to a news event of the day, or a radio programme? I need the date! How do I find out? Document properties, of course.

For some reason, the current version of Pages  (7.3; UPD 16 Sept 2019: this trick works in Pages 8.1)) doesn’t make it as easy as it used to be. In older version you could look up the Pages document under the File menu. Now it’s no longer there.

So, where do we find data on our Pages document? 

Close the document, click or tap on it once in Finder or in the folder where you keep it. 

Press Command and type i (letter i for ‘information’). The old-style Inspector window will open showing you lots of information about your document, including the day it was created and when it was opened and modified. 

After selecting (clicking once your file) you can also go to the File menu in Finder and select Get Info.

And a third, even smarter for some, way of opening that window is to Control-click the Pages doc, which opens a pop-up menu with a Get Info option right over the file icon.   

That’s it!

Friday, January 04, 2019

Saving photos in Pages documents — and extracting them back.


It's been a while, but only recently I realised that I often put photos in Pages documents to save them for use later in a project or to keep text and illustrations together.

And it makes sense. You can only put very brief description of the photo in the name of the file, but in a text document you can give it a full description, place it in a context, format and edit it. And still keep it in the full original beauty.

One stumbling block that I encountered years ago when I started using Pages was how to get the photo back from the document if for some reason you want it back as a separate file. There is a simple trick that isn't obvious unless you know it.


In the Pages document click on photo to select it.

In the Inspector side-panel click on Image. You will see a small icon with the name of the file.

Click on the icon and hold.

Drag it to the Desktop — that's it, that will be the original photo file.

Now you can share it, use with a different document, upload it to the Internet etc.

(If you can't see the side-panel, go to the View menu, slide down to Inspector and choose Show Inspector).


Sunday, December 30, 2018

New Year Greetings, a card.


Happy New Year to all I Work in Pages readers!

It took me less than an hour to draw this card almost entirely with Pages Draw Pen (you can see it in the top right corner of the Shapes menu in the current Pages version (7.3). The Robin on Snowman's hand is from my previous design. The handle of the bucket is a line with end-points.

Enjoy graphic design in Pages!

This image shows all the separate elements highlighted:


And here you can see the Snowman's body with the dots I used when drawing him:


Wednesday, November 28, 2018

Word Count Revisited — Pages 7.2


For word (character) count, go to the View Menu and slide down to Show/Hide word character count. It will appear at the bottom left corner of your document in Pages.

The current version of Pages (7.2) allows you to select easily a word, character lines or paragraphs count. Just click/tap on the drop-down menu there and select what you need.

Readers of this blog often ask how to subtract the endnotes or footnotes from the overall word count.

This is fairly easy: press the Command key (next to the Space bar) and tap A. This highlights the whole of the text but leaves out the footnotes. Note the word count and click/tap away. That's it!

The screenshot below shows a character count of the thesis I am currently working on without the footnotes.


See also this post on the same subject, and enjoy Pages!
Related Posts Plugin for WordPress, Blogger...

Copyright

© 2006-2010, 2010-2017 Alexander Anichkin, All Rights Reserved.
All content is original and was created by me, the author and publisher of I Work in Pages.
Quotations and images are attributed where applicable.
No republication without express prior permission.
Blog template by Blogger with customisation by the publisher.